
Form type, questions provides general data acquisition for things like:
- questionnaires
- petitions
- consultations
- surveys
- polls
- application forms
- or anywhere you want to collect structured responses to a set of questions connected to a respondent.
Accompanying the form is a new section, questionnaire and petition responses, in the member info menu. You can see the responses to your form in various ways there, including on bar charts, pie charts and maps.
The form identifies a list to collect together the responses and uses custom fields for your questions. A new custom field lets you ask them to pinpoint a location on a map.
See also:
- Questions form and responses improvements
- Multi-page questionnaires
- Edit questions form responses
- Questions form: anonymous submissions and file attachments
- Multiple points on maps in questionnaires
- Subscribe to daily summary of questionnaire/petition responses
Contents
Quick summary
- Make a new form with type questions and give it a meaningful name.
- Set the necessary settings (either click the blue boxes that say things are not set up yet, or use
 ): set the contact type for contacts the form will add.
 - Decide how many additional steps you want for further questions (you can always change this later if you need more).
- Set options
 for how you want the respondents to identify themselves and what consents you want to offer them.
 - Add custom fields
 for each of your questions: give each a name, and a type (and for multiple choice questions, how many answers).
 - Edit the question captions
 and any multiple choice answers (and reorder them as required with drag-and-drop or in options).
 - Embed the form in your website to collect answers.
- See the responses in the questionnaire and petition responses section in the member info menu. Download a spreadsheet of them all if required.
The questions form
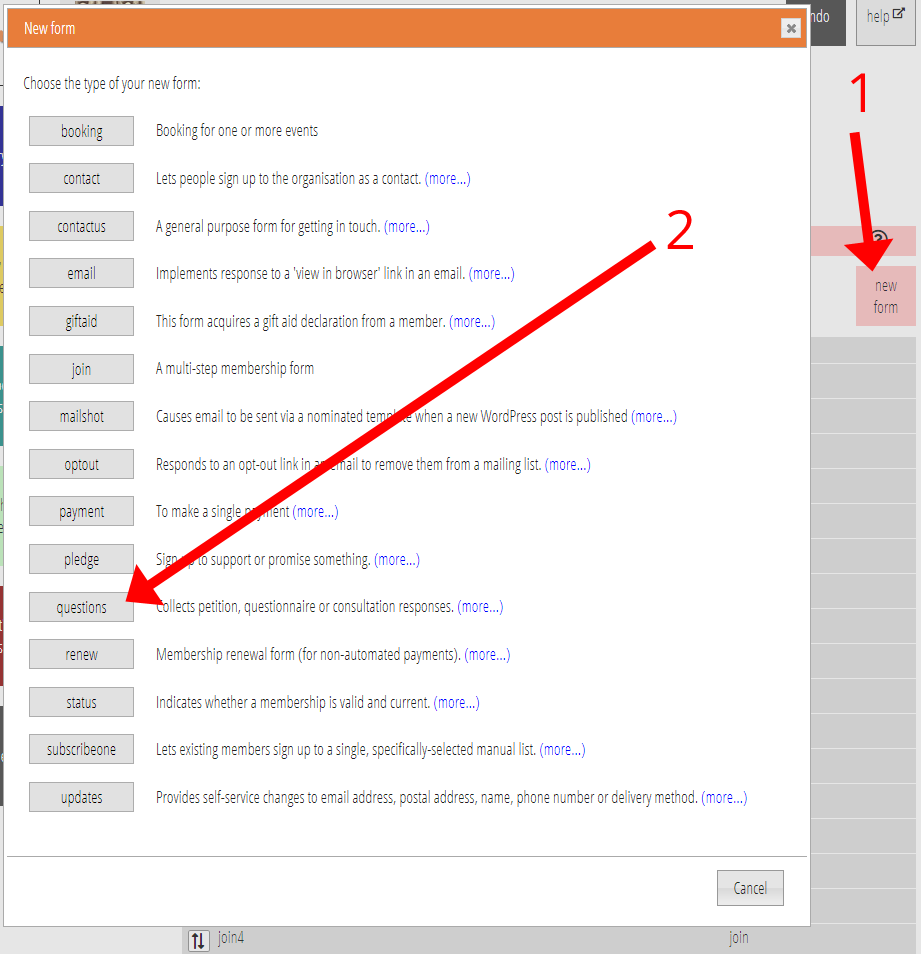
Make a new form in the usual way, choosing the new form type questions (Fig 2).
Use the prompt given, or the settings icon![]() , to choose the list where the form should save its respondents and their responses. You’ll also need to choose which contact type should be assigned for any new contact records that are created for respondents we don’t already know about (Fig 3: 1).
, to choose the list where the form should save its respondents and their responses. You’ll also need to choose which contact type should be assigned for any new contact records that are created for respondents we don’t already know about (Fig 3: 1).
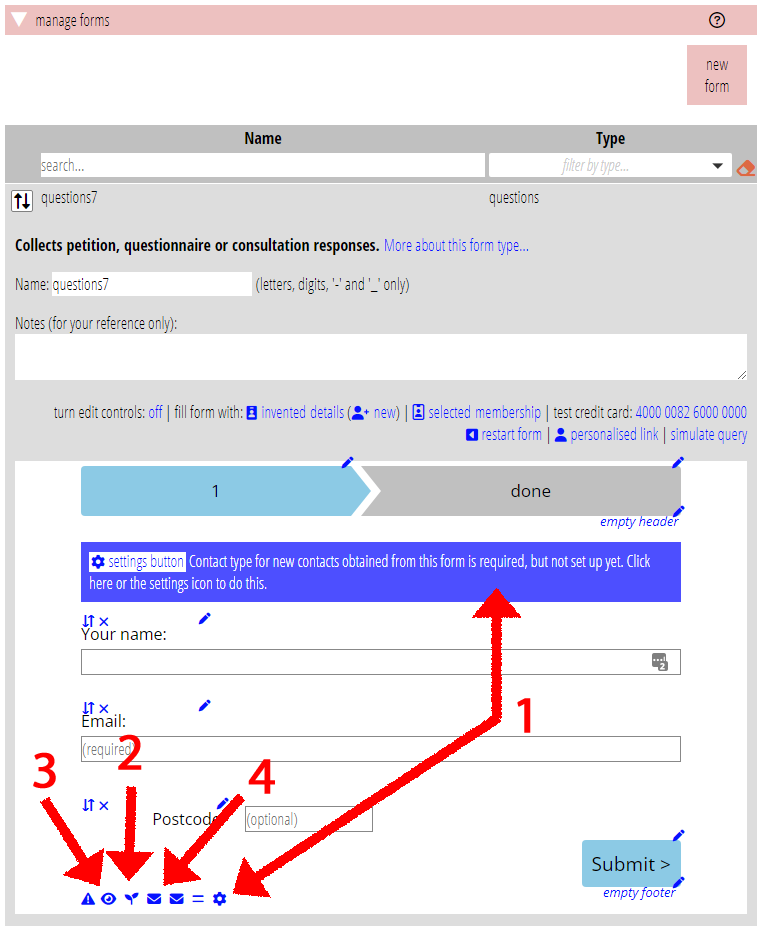
The form offers some basic built-in fields for administrative things that will almost always be wanted. As with most forms you can choose which of these you want and in what order using drag-and-drop or the options icon![]() (Fig 3: 3), and word the captions as you wish using the text editing icon
(Fig 3: 3), and word the captions as you wish using the text editing icon![]() :
:
- their name (required or optional)
- their email address (if you wish, you can request a verification email
 to confirm this is correct and as a double opt-in to check it really is who they say it is – particularly important for petitions; Fig 3: 4). If you make email optional, or omit it, then you are allowing anonymous responses. Obviously you can’t verify it if email address is not given.
 - address, or just postcode (required or optional)
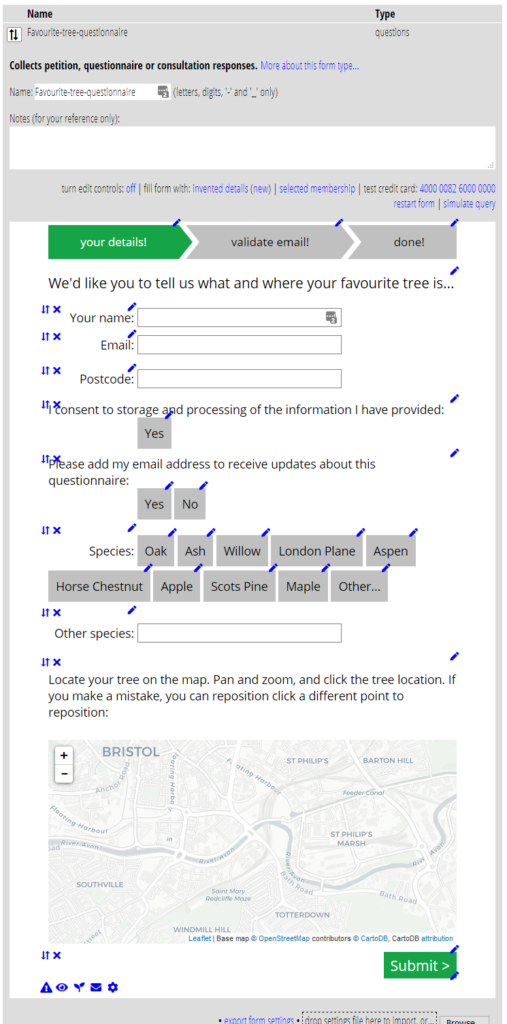
- box to agree to storage and processing of their data (there is no No answer to this, as it’s the whole point of the form, but asking permission makes the consent explicit, and stores the date-stamped evidence with the response as arguably required by GDPR)
- boxes to agree or decline further contact, both:
- specifically in relation to the questionnaire/petition (for example, to update them on progress or outcome). Use an automatic list with source questionnaire to do that.
- in general (for example, if they are a supporter contact). The form will also allow you to apply these consents without explicitly asking, but unless the context of the form makes it clear, this would probably not be legal in European countries).
Asking questions
The heart of the form is, of course, the questions you wish to ask. (For a petition it may be sufficient just to use the heading text to state what they are signing, and ask for their name and other identifying information, but you still have the option to ask other things.)
To ask questions, you add custom fields to the form. Custom fields are available in other forms, such as when making a booking, but here they are central.
To add custom fields, run through the form until you reach the step where the question is wanted. Click the seedling icon![]() , give them names, and choose their types (Fig 4).
, give them names, and choose their types (Fig 4).
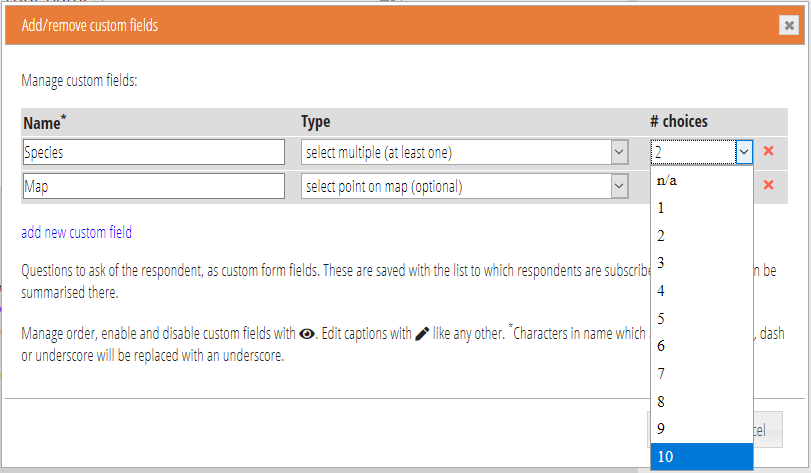
You can ask the following types of question:
- text: a short, single-line, text field (optional or required)
- paragraph of text (ditto)
- date (ditto), similar input to text but checked for date validity
- chooser button to pick exactly one of a number of options (select one; a yes/no question is just this with two buttons, but you can have more)
- chooser buttons to pick any number of options, including none – select multiple (optional) – or at least one – select multiple (at least one)
- pick a point, or more than one point, on a map
- upload a file
Once you have added some custom fields you can edit their captions![]() and change their order using options
and change their order using options![]() like any other form fields (Fig 5).
like any other form fields (Fig 5).
Reviewing responses
When the respondent completes the form, their responses are stored with the list you identify for the form. If you delete the form, the responses go with it. If you delete a membership record, any responses they made are also deleted.
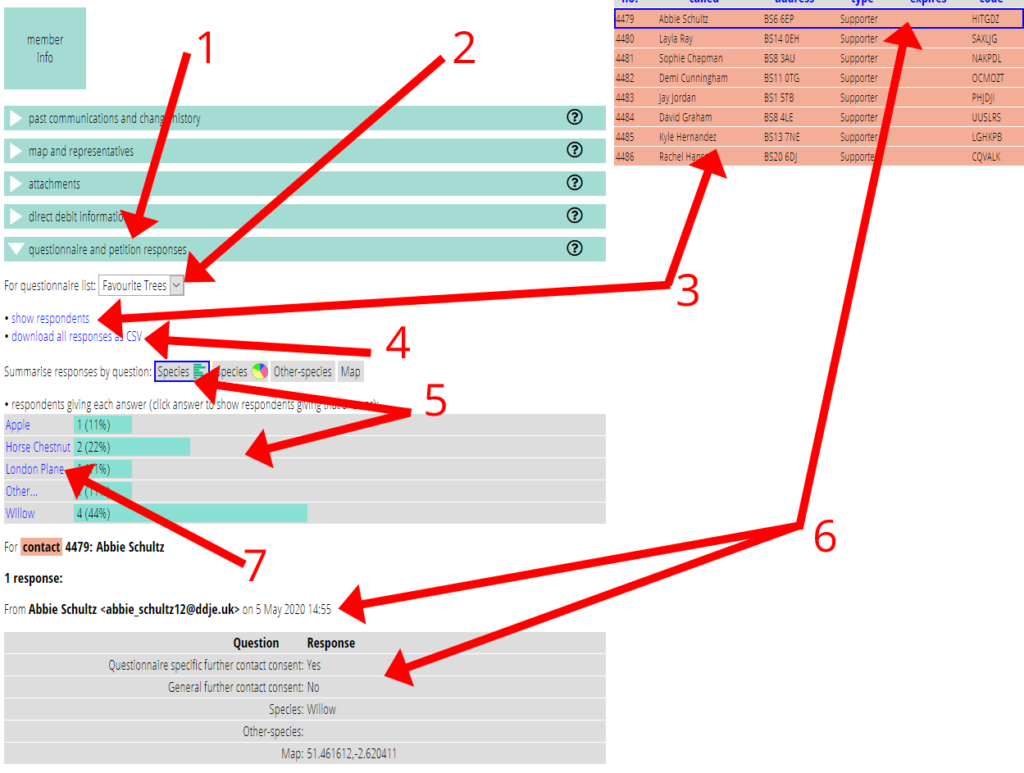
You can review, add and amend responses in the new questionnaire and petition responses section in the Member Info menu (Fig 6: 1).
The first thing to do is to identify which questionnaire you want to look at by selecting it from the menu at the top (Fig 6: 2).
Then you can:
download all responses as CSV (Fig 6: 4): get a spreadsheet containing all the responses, so that you can use spreadsheet functions to do further analysis. (Technical note: the CSV file is encoded using UTF-8, which is not the default for Excel, but Excel should detect this and open it correctly; Google Sheets is natively UTF-8).
show respondents (Fig 6: 3): list the membership records of everyone who responded. Notice that this is different from showing the subscribers to the same list, which wouldn’t include those who have opted-out.
add respondent manually: as if they had entered an empty form. You can then add answers manually with the add an answer button.
Select a respondent from the membership records list to show their complete response (Fig 6: 6). In fact, someone may have responded more than once or more than one member of a household may have responded, so you may see more than one set of responses. Each set identifies the individual making the response and when they submitted it.
Summarise responses by question (Fig 6: 5). A list of the questions asked is shown (excluding questions with paragraph-type answers). When you select a question, all the responses to that question are summarised, in the format discussed below. If you click a response you can see those who gave that response.
Multiple-choice answers summary
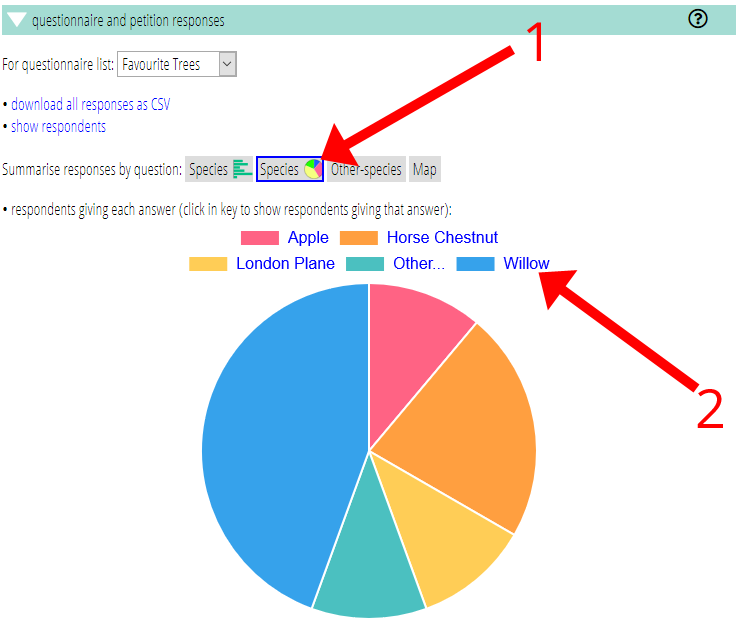
Multiple-choice answers are summarised as either bar charts (Fig 6: 5) or pie charts (Fig 7: 1), with the number of respondents choosing each answer. Choose the button with the bar chart or pie chart icon depending which you want.
Where they could choose more than one answer, the total may be more than 100% as it shows the results as a percentage of respondents making the response, not as a percentage of the total number of answers.
To find out who gave a particular response on a bar chart, click on the answer (Fig 6: 7). This will show just the respondents giving that response to the selected question.
Likewise on a pie chart, click the question in the key at the top of the chart (Fig 7: 2).
Text answers summary
For questions with short text answers, these are summarised in a bulleted list (not illustrated).
If two people give the same response, it is not repeated, but instead, the number of respondents is shown alongside.
Click the answer to show the respondent(s) who gave that answer.
Map location answers summary
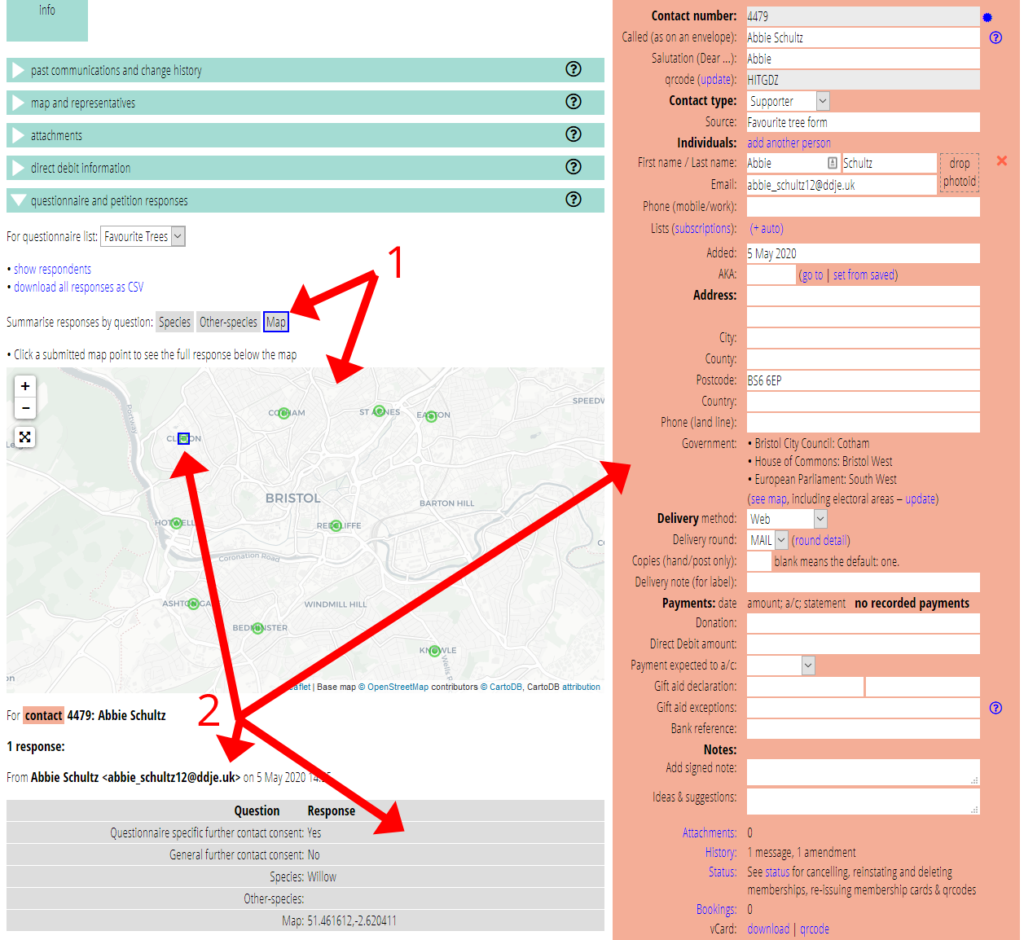
For map locations, all the points chosen by respondents are plotted on a map either as a set of markers (Fig 8: 1) or as a heat map.
If you click a point, it will show you the complete response(s) for that respondent below the map (and select the respondent’s membership record; Fig 8: 2). (It is just conceivably possible two people will pick exactly the same point, in which case it will show both memberships, in the same way as a multiple-choice answer chosen by several people).
If one or more responses are already shown below the map, they will be highlighted in blue on the map, so you can see where the map location for a response is. (It is shown in the table as a latitude/longitude co-ordinate).
Note in particular that if you click a multiple-choice answer, say Willow for Species, and then switch to the map question, you will see where the first willow was positioned on the map, and then select the next member to see where their response put the willow, and so on.
Regular summary
Cameo sends a notification about new responses daily (if there are any). Subscribe to the notification tag QuestionnaireResponses to receive these by email.
Limitations
You can’t make questions dependent on each other or conditional (e.g. making particular responses to one question show different subsequent questions) as you can in Survey Monkey.
The aim initially was to cover similar ground to Google Forms. So in our example here, we can’t make the “other species” question appear and disappear depending on whether they selected “other” from the species list. If there is demand, it may be these can be provided in future versions.