Cameo now supports more sophisticated event listing presentation. Using a template means there is less repetition from event to event: the full description need only be narrative text unique to the event.
Templates are HTML and CSS, so setting them up requires some technical knowledge (if you don’t have that knowledge, you can stop reading where indicated). Once done, though, event descriptions themselves are simpler to write.
For existing full descriptions, substitutions now look like those in email templates, and there are more of them (including one to insert common content, and another to include a “hero” image). The principle is unchanged, though. You can continue to do what you already do: you don’t have to use the new templates.
There are some minor changes to the Event Listings WordPress plugin. Also, events & bookings → events now presents the different parts of the event definition using an “accordion-style” menu. This avoids the event definitions becoming overly-long.
Contents
Background
Events in Cameo have several descriptive fields along with the other properties of the event. The point of these is to:
- avoid repetition: not putting the same content in multiple places (booking form, web page, email, summary listings etc.)
- manage events centrally, so that, for example, your web site changes automatically as events happen, rather than having to manage event listings by manually editing web pages.
In addition, you can also now include custom descriptive fields.
The event listings WordPress plugin or the equivalent event form provide the listing for an event in a web page. This comes from the full description in Cameo’s event description. Currently, that then includes things like where and when, and book buttons, using substitutions to avoid repetition, as well as narrative text and pictures.
The full description is written using the formatted text editor. That means it can produce reasonably good text presentation. However, it is a linear sequence of text and pictures. You can’t easily, for example:
- overlay the event name and some of the details on a large image,
- include graphic elements other than pictures
- do anything visual that could respond to properties of the event
- add elements that behave responsively on small screens
- include boiler-plate text that remains the same from event to event, other than by copy and paste.
Adding event templates provides a framework for dealing with layouts like these. For emails, the mailshot editor provides many ready-made layouts. That could be a future approach here too. However, for the moment, event templates are HTML and CSS. That gives maximum flexibility, rapid development and minimal impact on existing events, but requires some technical expertise to set up. Once done, event descriptions are simpler in day-to-day use.
Event definitions
You do not have to use event templates. You can continue to work as before. You can also mix the two: use the full description alone for some events and a template for others.
There are a few cosmetic changes:
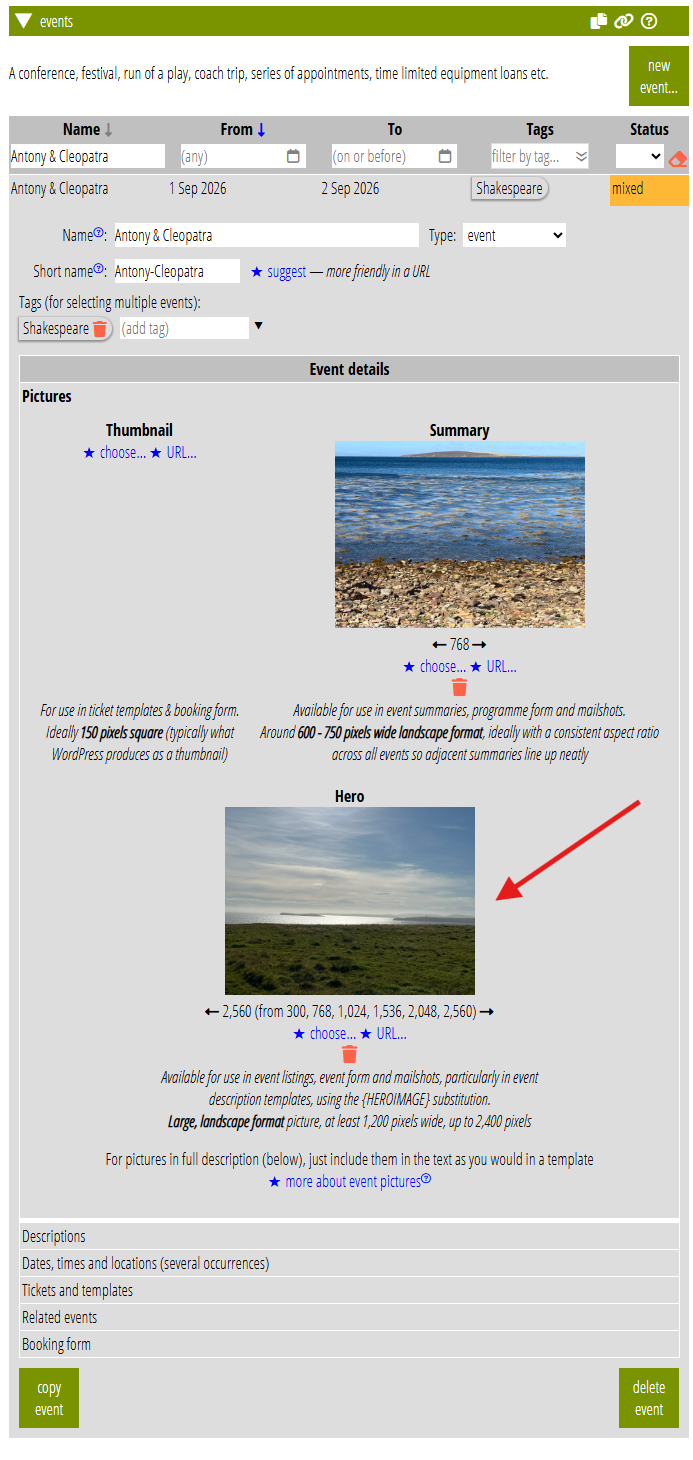
- The pictures section of an event definition now includes a third kind of picture: a hero image (Fig 1). This would usually be a large image. You don’t have to have one. If you do, though, you can include it in the full description and it could be differently-styled on your web page from images just included straight from the media library.
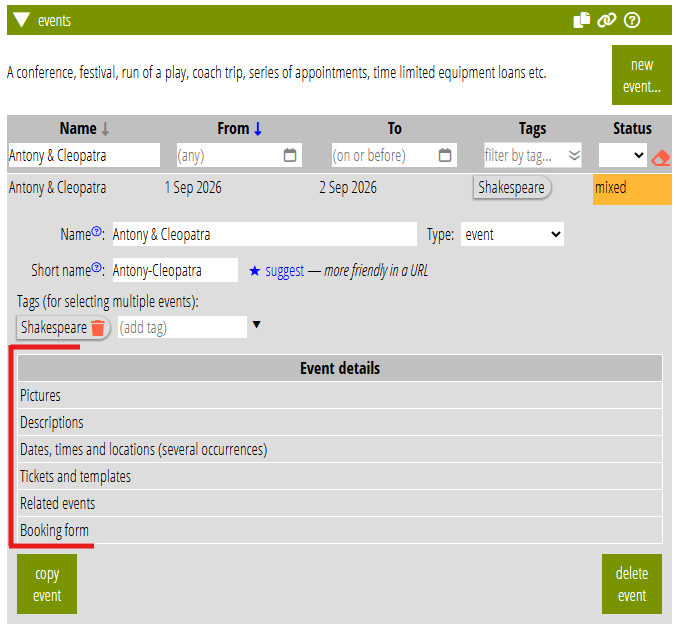
- That addition makes the event definitions even longer. To avoid this becoming unmanageable, of the sections previously grouped in a box now show up accordion-style (Fig 2). Open each separately to see the same fields as before.
- The substitutions in the full description now look like those in email templates. (This change is primarily so we can use the same template mechanism as emails, a great deal of common code). For example,
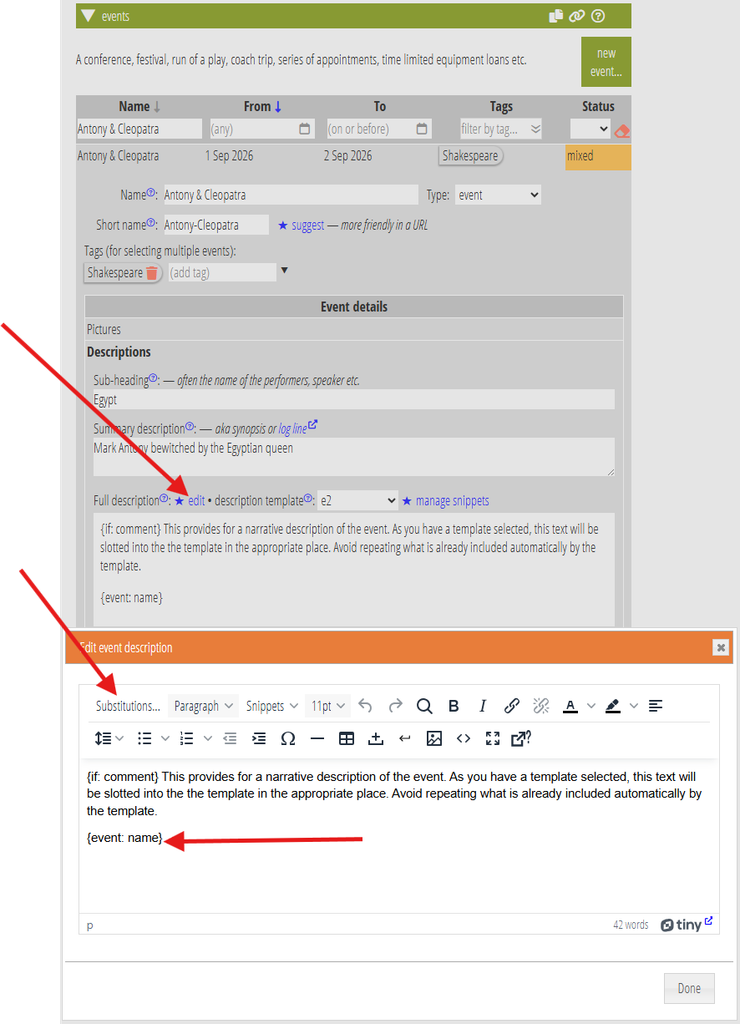
{BOOK}is now{event: book button}. You can include them using the substitutions button in the editor, again just like emails (Fig 3).
substitutions
The full description (and the new templates) offer many more substitutions. In particular:
- all the familiar
{insert: ...}substitutions to include organisation information - substitute the images from the pictures part of the event; in particular
{event: hero image} - conditional substitutions, including ones based on the event tags. This is less useful in full descriptions, where you edit everything every time, than in templates, but can help when copying and pasting from previous events. For example:
{if: event tagged concert}. These work just as in emails, but work on the event details rather than membership details. - include boiler-plate content from HTML snippets (rather like subordinate templates in emails). For example:
{event: snippet scarlatti-biography}. The snippets can themselves include further substitutions.
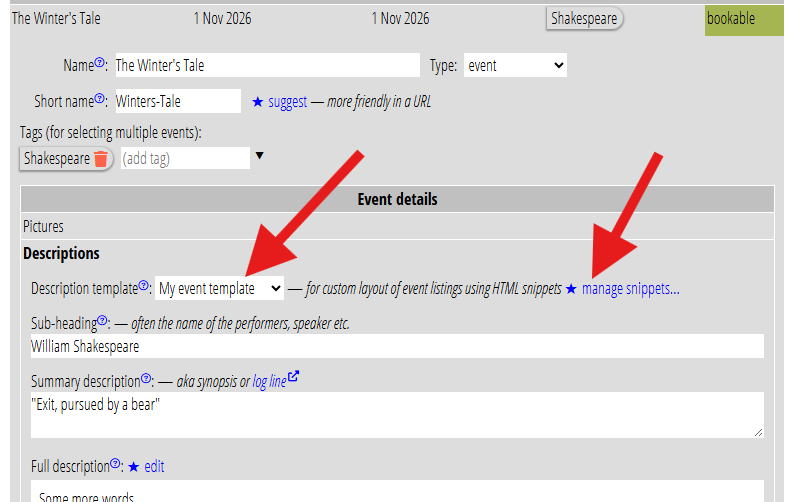
Two controls at the top of the description sub-section let you use event templates (Fig 4):
- a pull-down menu description template. Leave this as [Use full description] to use the full description as before. Select an event template to use that as your event description.
- a link to manage snippets where you define an event template.
event listings WordPress plugin
Previously, the event listings WordPress plugin replaced all the substitutions in the event’s full description itself. Now, though, all the substitution is now done by Cameo before it is seen by the plugin (or indeed the event form).
This means that the event listing block no longer needs or offers controls to set the URL and caption of the book button. The complex syntax for the URL control that allowed you to use a different URL depending on event tags is no longer needed.
Instead, Cameo selects a booking form automatically. It obtains the URL and button caption from the form selected ― so edit the caption there, instead of in WordPress. We select which booking form to use according to these rules, in this order:
- a booking form which is specific to the particular event, as selected in its Book only for a specific, named event setting
- a form which books for events with tags, nominated by its Booking only for events with tag setting
- a form which selects the relevant event with default settings for its query parameters (
 button)
 - a form which is not specific to any event (none of the above are set) and also has the URL where it is embedded set (this is the most usual case, where the event is selected in the URL on the book button)
If more than one booking form meets one of these criteria, then the first in order from forms → form editor (you can adjust the order). However, you should not normally create forms which duplicate the events they respond to. If no form is available (including any from the first three criteria which don’t have a URL recorded for them), no book button is shown.
Event templates
using an existing template
For most people preparing an event, you will just need to select the appropriate template from the description template menu, immediately above the event’s full description (Fig 4). The full description usually then contains just narrative text and pictures about the event, without the additional content like event timing and book buttons. The template should provide these for you.
(Stop here if your HTML/CSS knowledge is limited.)
making a new template
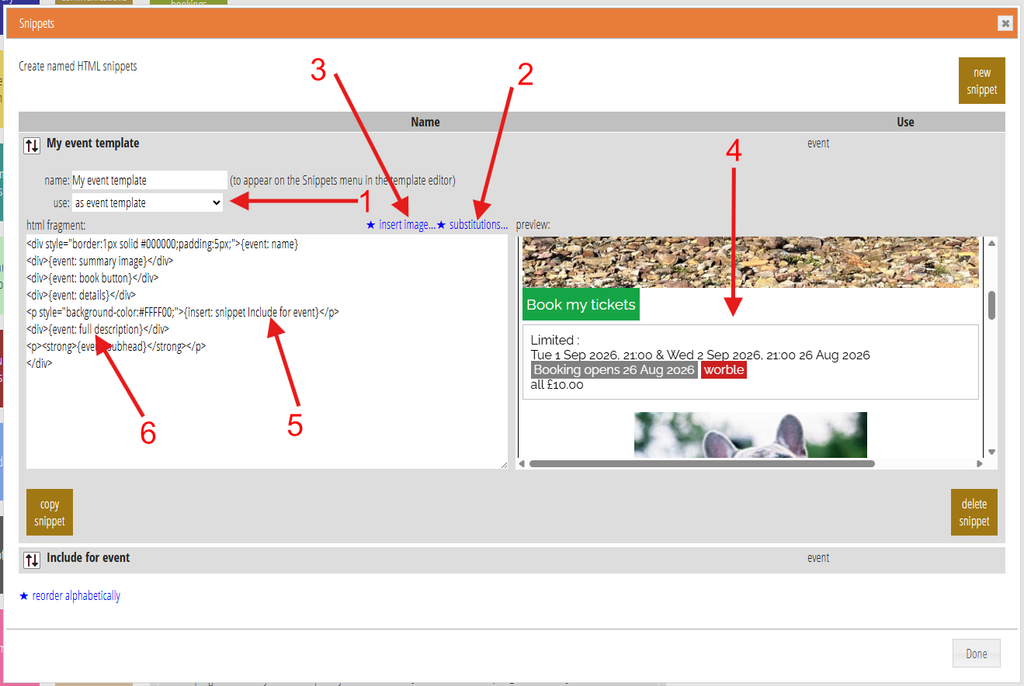
Snippets store the HTML for an event template. (These also store other fragments of HTML, for example any saved custom mailshot template blocks; see Fig 5).
To add or modify an event template, click manage snippets above any event’s full description (Fig 4). For use choose as event template if not already set for you (Fig 5: 1). Also add any sub-templates you want to include with {insert: snippet ...} in the same way (Fig 5: 5).
Note the substitutions… button in the snippet (Fig 5: 2), which allows you to insert substitutions into the HTML, just as you would in the formatted text editor. As for email, avoid typing substitutions: you’ll make mistakes. Similarly you can inset <img...> elements by selection from your media library using nsert image (Fig 5: 3).
The snippet preview (Fig 5: 4) substitutes the event details with those of the selected event. It also includes all the CSS that would be provided for forms in general and the event form in particular. This includes styling from forms → colour scheme and style, especially:
- fonts
- buttons
- additional CSS you provide there
This gives you a good idea of what the template will look like, especially its structure. However, it doesn’t have access to the full CSS of your website, so there are bound to be differences. You will always need to test in the context of your website as it would be viewed publicly. You may also want to use a test event while making the template, so you can check less common cases, such as limited booking dates and event sold out.
Selecting at template for an event means that the event listing starts with the template rather than the full description. The template will typically then include the full description (with {event: full description}). at the position it should appear (Fig 5: 6).
event details (venues, dates, times and prices)
We strongly suggest using the {event: details} substitution to include the dates, times, locations and price range. While the constituent parts are available separately with other substitutions, {event: details} summarises all cases, without undue repetition.
For example, if you have an event that runs on three occasions at the same venue, the venue name is only given once, but if it runs at different venues at the same times on different dates, the times won’t be repeated. Furthermore, it handles sold out and not open for booking for separate occurrences, something that is very hard to do just with substitutions. This doesn;t mean you have to accept the default box appearance: you can always style the details yourself.
You may initially only run events with one occurrence, and assume that including venue etc separately is fine. The danger then is that you will want to run an event twice, say, in the future, and have to rush to adapt a template which assumes it only runs once.
CSS
The HTML is usually straightforward: often just a series of nested <div> elements with appropriate classes. The power of this approach lies in the CSS you then apply to it.
For example, if you want to position text (the event name, say) over the hero image, your HTML might look like this:
<div class="my_hero_heading">
    <div class="my_hero_image">
        {event: hero image}
    </div>
    <div class="my_hero_overlay">
        {event: name}
    </div>
</div>
Then you would need some CSS, something like this:
.my_hero_heading {
    position: relative; /* so the text is positioned relative to this block */
}
.my_hero_overlay {
    position: absolute;
    top: 50%; /* starting half way down the image*/
    left: 3em; /*.indented a bit from the left side of the image */
}
Elements included by the substitutions also provide classes which you can style.
You can put the CSS in one of several places, in:
- for a WordPress website, in your theme’s style file (style.css), or the equivalent for other CMS
- the Additional CSS in your website’s Appearance > Customise, or sometimes a similar box provided by a WordPress plugin, recommended when you use the Cameo event listings WordPress plugin
- Cameo’s Additional CSS at the end of forms → colour scheme and style, recommended when you plan to use the Cameo event form to display your listing.
- an inline
<style>element in the snippet itself, recommended while working on the snippet - in a file in a dedicated folder in your WordPress website’s
wp-contentdirectory, or equivalent for non-Wordpress sites. You can also put other assets here, such as custom icons. Then use<link rel='stylesheet' href='[location in your wp-content]'>at the top of your snippet to include it.
Strictly speaking, you are not supposed to put <style> in the body HTML like that, but it works in all browsers. It is convenient to do this while you are working on the HTML, so that you can develop the two in tandem. The link method is useful because it only loads the CSS for the specific page, but you need access to the file system of your website to do that. The preview of the HTML also includes the form styling CSS, so you could also put it there when you are done, if appropriate. Or you could just leave it inline.
However, if you do put it inline:
- make sure you put a newline after the open curly bracket in CSS, otherwise Cameo will think e.g.
{ background: red; }is a non-existent substitution! - put it first,
- only use one
<style>element (any others are removed).