The contactus form now distributes messages submitted by visitors according to options you set. You can arrange to send it as
- a standard Cameo notification, as before
- a notification sent to chosen organisation role(s)
- as a response in member info → questionnaire and petition responses
Contents
Background
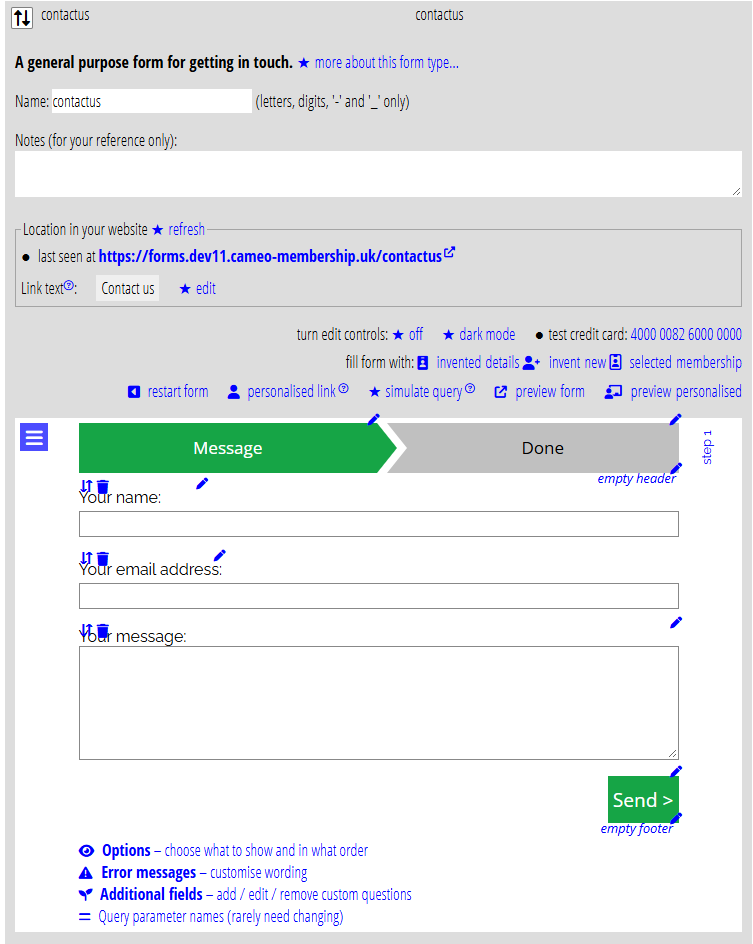
The contactus form (Fig 1) lets you put a form on your website for visitors to send you a message. (Don’t confuse this with the contact form which let’s people sign up as a Cameo contact).
Previously the form sent the response as an ordinary Cameo notification. That is, it:
- appears in library → notifications,
- sends email to Cameo users who opts to receive notifications, and
- alerts Cameo users who have browser notifications turned on
The form lets you provide notification tags to give Cameo users fine-grain control over which messages they receive.
Delivery options
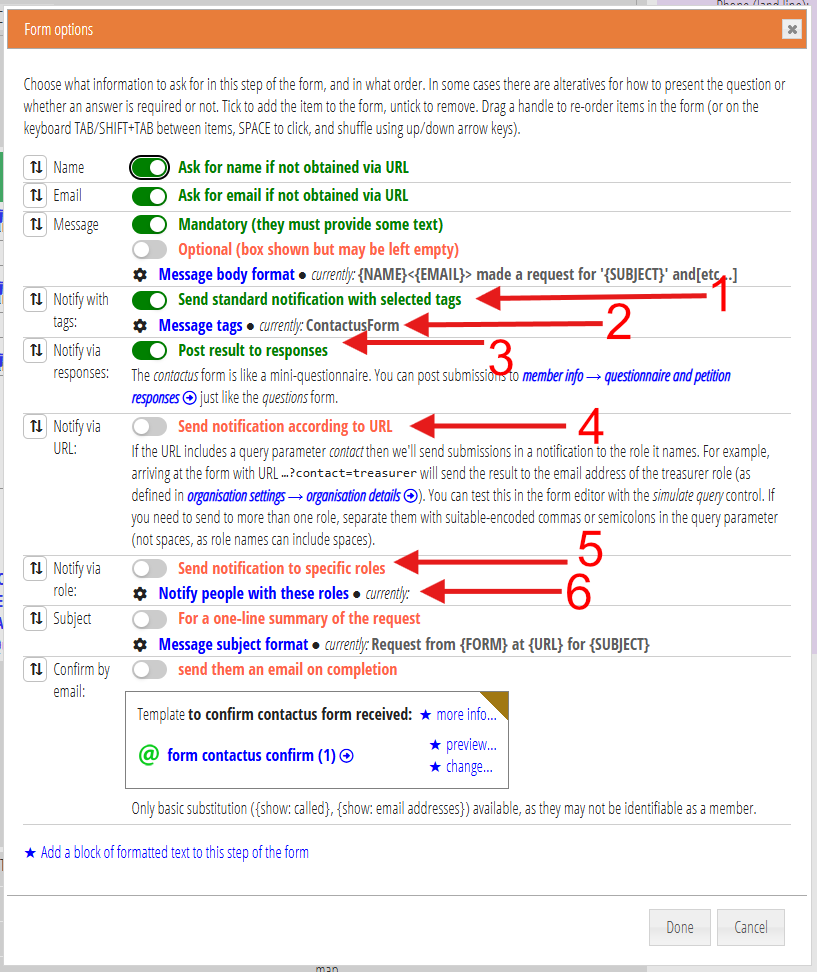
Now, the form has four options to control delivery. (Fig 2; the options may not appear in the same order as shown – those turned on are shown first, and you can control the order).
notify with tags
(Fig 2: 1). Turn this on to for a standard notification, as previously. This option is on by default in new and existing contactus forms. Specify any tags you want with the setting below (Fig 2: 2). The only difference from before is that new forms, and existing forms with no tags, now include the ContactusForm tag by default.
notify via responses
(Fig 2: 3). The form delivers messages to member info → questionnaire and petition responses, in the same way as the questions form responses. This allows you to see responses aggregated, in one place, and to download them all in a spreadsheet. Unless the email address provided by the respondent matches one we know, the message appears under anonymous responses. You still see the name and email address though. Any additional fields you add will also appear, as the would from the questions form. This option is now also on by default.
notify via role
(Fig 2: 6). The form presents messages as notifications, but sent to the email address(es) of chosen roles, whether or not:
- they are also Cameo users, or
- their usual notifications suppress these.
Choose the relevant roles using the setting underneath (Fig 2: 6). See roles defined in organisation settings → organisation details under organisation roles.
notify via URL
(Fig 2: 4). Like notify via role this also sends to the email address(es) of chosen roles. In this case though, you select the role using the contact query parameter in the URL. This means you can use the same page and form but target different people depending on the link the visitor follows to get there. For example, let’s say you embedded your contactus form at:
https://example.com/contactus/
Then, with this option on,
https://example.com/contactus?contact=chair
makes the form send the submission to the role chair, while
https://example.com/contactus?contact=secretary
sends it via your secretary role.
The role names match independent of case, punctuation or spaces. So, for example ?contact=membershipsecretary in the URL matches role Membership Secretary. This allows neater URLs. But if you do include spaces and other special characters, you must appropriately encode (“percent encode”) them. For example, ?contact=Membership%20Secretary as query parameter.
If the visitor arrives at the form page with no role in the URL (perhaps they get there directly, or you omitted the contact=...), then we fall use the default role or roles you choose in the setting Notify people with these roles when none provided in URL. If no role is set there, then no email is sent but the notification is still saved to library → notifications.
using multiple notify options
You can turn on any or all of these together (you must have at least one on to be useful). If you choose more than one of these options the form manages them independently. The first three options will add notifications separately in library → notifications, and depending on the email addresses, may end up with the same person more than once.