As the name suggests, the map form displays a map where the form is embedded. This provides some additional possibilities for venue map links. You can overlay your own points on the map for general purpose mapping too.
Contents
Background
A venue map is provided by nominating a named area. You create named areas in search more → map search. When the map link is presented (in the booking form, event listings and emails), Cameo works out the latitude and longitude from the named area and plugs it into a URL (formerly in organisation settings → organisation details but now moved to admin → system preferences). Before Cameo version 11, that URL only opened a map (usually OpenStreetMap or Google Maps) with a marker at the location provided in the URL. Until now, it has only been possible to show a single pin, at the centre of the named area’s bounding box.
Third-party maps take people away from your site. Also, they only work with a single marker (unless you manage through Google and possibly pay). The map form provides a map embedded in your own site. It dovetails with venue map links. You can also use it more generally, to display any area, or multiple areas, you may make. For example, you can index groups of geographical items.
Map form
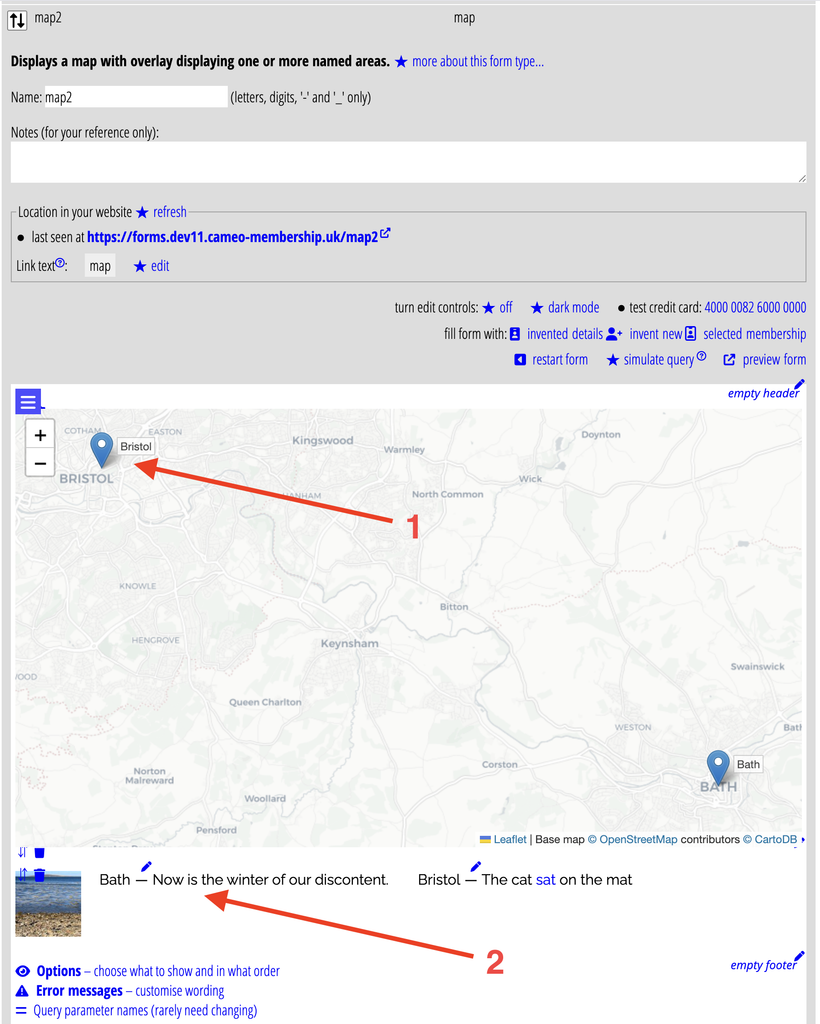
Create a map form like any other form, using new form in forms → form editor (Fig 1). You’ll see just the map, with no markers. The form occupies the full width of its HTML container and all the available height.
adding markers to the map, from named areas
Define the points, lines or areas you want to display on your map as named areas, in search more → map search. As well as the geographical location, these:
- have a name (which can be displayed),
- an optional associated URL, or
- descriptive formatted text, and
- can be tagged.
To overlay one or more named areas, either:
- select a named areas tag in the form options: the map displays all of the named areas with that tag, or
- provide a query parameter in the URL of the page embedding the form. Use either
placeortag(or both):placeselects an area by its name (you can identify more than on place by separating them with vertical bars)tagselects named areas that have the given tag (or tags: separate them with comma or semicolon)
For example, say you have named areas Bristol and Bath (which must be public – see below), and that your web page embedding the map is https://www.mysite.com/mymap/. Then you can overlay both areas with this URL:
https://www.mysite.com/mymap/?place=Bristol|Bath
Or if you tag them both city, then you can display them both with:
https://www.mysite.com/mymap/?tag=city
You can test the query parameters in the form editor with a named area using simulate query above the form.
Alternatively provide the tag in the form options. Using a tag has the advantage that any areas you later tag as city also then display, without needing to change the link or the form. Using a URL means you can have one map form for all uses, displaying places according to the URL, rather than multiple map forms for different purposes.
map form options
As well as the usual header, footer and general text, the form has options ( ) to:
) to:
- choose the base map style (all based on OpenStreetMap: though Google Maps works technically too, its terms of service don’t allow this way of using it. Using Carto variations of OpenStreetMap now requires a free API Key1).
- when a named area is a line or area, choose whether to display the centre point as a marker instead, or to actually show a line or area.
- whether to display the name of the area next to the marker (you can customise the label appearance using CSS if necessary; Fig 1: 1).
- what happens when you click on a marker:
- treat it as a link to a nominated web page (provide the URL in the named area), either in the same or a new tab
- pop up a “speech bubble” containing brief, formatted text. Edit this text in the named area, in the usual way. It can include images (probably just a thumbnail image) and links (so it can serve as an annotated link to somewhere else).
- do nothing
- whether to include a list (index) of the points textually in the form (Fig 1: 2). The form offers various formatting options (which could be augmented by custom CSS if you want). If you put links on the map we display the names linked to your target URL. If you choose “speech bubbles”, we display the text in a list, optionally with or without the area names.
Venue map links
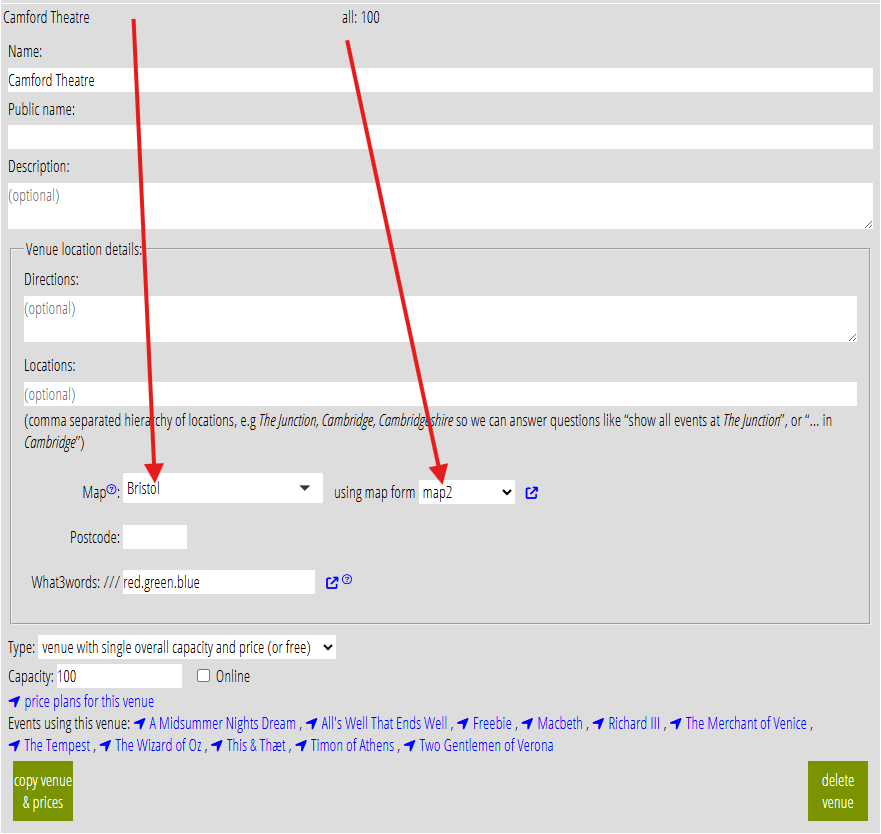
The menu in the venue editor (events & bookings → venues and resources) which identifies the area lets you choose more than one. This area is shown on your map.
Select a map form from the new, adjacent menu in events & bookings → venues and resources to display it on that map form. When you don’t select a form here, we’ll continue to use the earlier method of dropping a pin marker on a third-party map (but just for the first area if you select more than one).
Note that the URL used for a third-party map has moved from organisation settings to admin → system preferences. It is not relevant when you use a map form.
Public named areas
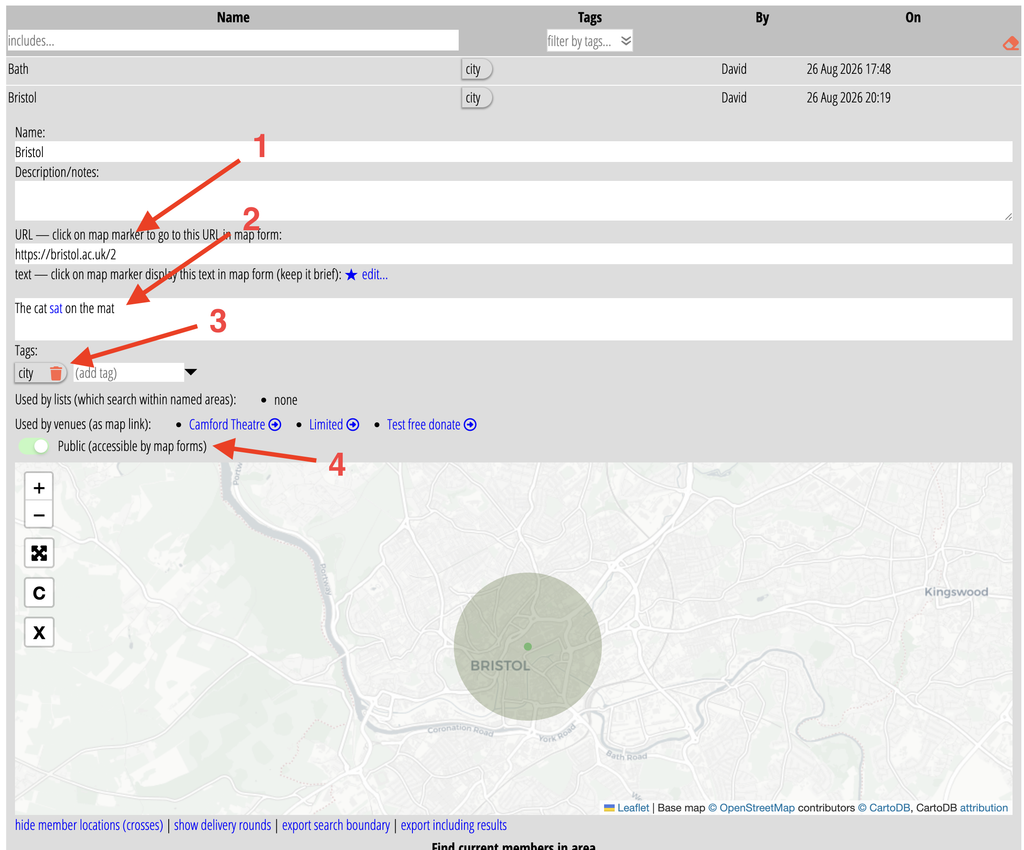
When you display a named area on the map form, other than for a venue, you must make the area public. Toggle this in search more → map search, below where you name the area (Fig 3: 4).
This avoids leaking information from Cameo unintentionally. Without it, someone could just edit a URL to see any named area, not just those you intended.
Also provide here any tag(s) used to select the area (Fig 3: 3), and any link (Fig 3: 1) or pop-up content (Fig 3: 2) that the map should display.
- To get a Carto API Key, go to admin → system preferences, geography, and click the set map centre button (you don’t actually have to change the current map centre), verify your identity, then follow the instructions provided. ↩︎