
One of the advantages of Cameo’s new events management facilities is the ability to keep in touch with people who have attended past events (or, indeed, who are expecting to attend a future one).
As you might expect, this is done through templates and lists: templates to provide the content of your messages, and lists to select the target audience: people who have attended or booked for one or more events.
UPDATE March 2020: a new button email attendees at the bottom of the Reservations section lets you set up a list and template on one go to send arbitrary email messages to attendees.
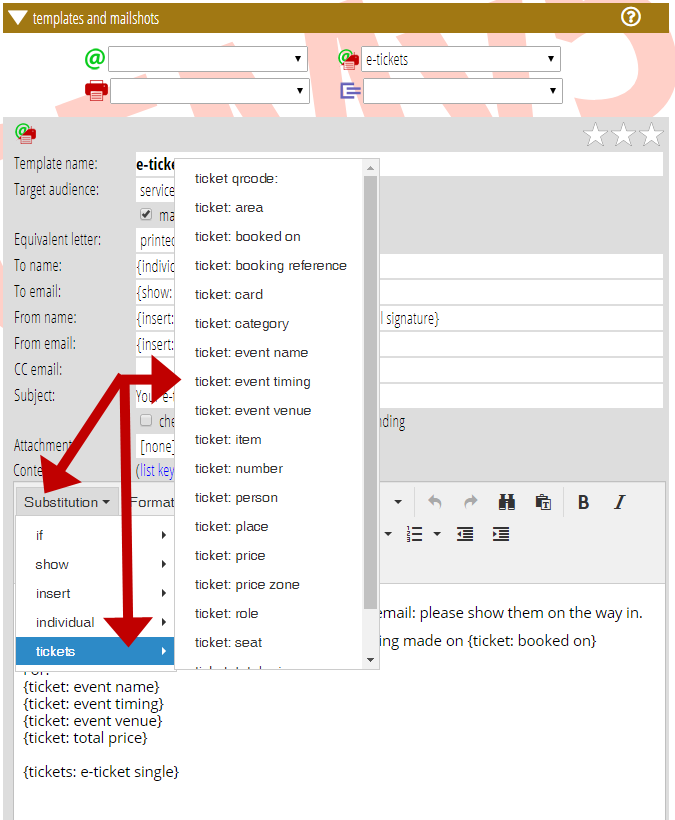
A new set of substitutions is available on the Substitutions menu of the template editor which can insert event-related information, such as the name of an event, or a ticket barcode.
Sending tickets for events are also messages like this. They are handled in much the same way, with some additional controls on the reservation page to avoid having to go back and forth between sections. There are two other uses of templates like this: lanyard badges and attendance lists. More about these below.
Contents
Individual contacts
When a booking is made, the reservation is linked to a membership record, either a contact or member. In the reservations section, this link is explicit: you choose the record to link to when you make the reservation. (Very occasionally you may make this anonymous, but that can only work for sales to people in person who you can give the tickets to immediately; there is no way to link these to anyone later).
When someone uses the self-service booking form, they need to give their contact details so we can supply the tickets, and their email address is linked to an existing record if possible. If not, a new contact is created. You can specify which contact type this should use by marking it in the Contact Types section in Organisation Settings.
Reservations are generally done by one person. Even though they may be buying several tickets, they may or may not be for other household members. Therefore, we keep a record of who made the booking and filter out other household members when merging with event-related templates. For the same reason, you should set these templates up for separate delivery to individuals, and avoid substitutions like {show: called}. Use {individual: name} instead. If Rita Hayworth made a booking they would otherwise be surprised to receive a message addressed Dear Humphrey Bogart & Rita Hayworth.
General mailshots
To send to people who have booked for events, make a list to select them in the usual way. There are two new list sources to support this:
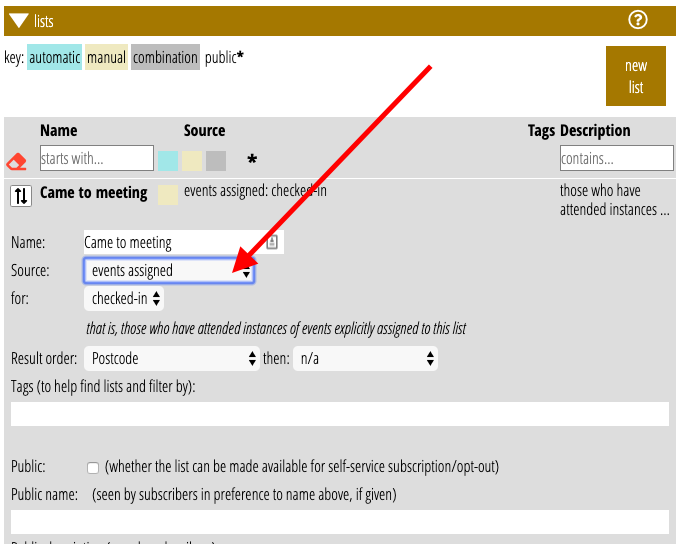
- events assigned: at the bottom of the panel setting up an event in the Events section (illustrated below), each event can be assigned to one or several such lists, so that when the list is used as the audience of a template, it selects those who have booked for any occurrence of that event, or
- event attendees: this is the other way round, a further menu is offered in the list definition where you explicitly choose the (occurrences of) an event to include.
- event attendees by reference: here you can select bookings explicitly by their reference number. It is unlikely you would need to use this to communicate generally with attendees, but it is used by the booking form to issue tickets when someone makes a booking. Enter the booking references required in the box provided.

For events assigned and event attendees, there is a further option, a choice of:
- checked-in: selects people who actually attended the events linked to the list. That is, they have been recorded as checked in (which can be done manually by locating the booking in the Reservations section and clicking the check-in button, or using the Cameo check.in app). If your event doesn’t require advance booking, you can still use this to record attendees, adding a booking to the non-ticketed event and checking in immediately afterwards with the adjacent check-in button.
- booked: selects people who have a finalised booking for the event, whether or not it has happened yet or whether or not they are checked-in. You might use this to send out a reminder or follow up about the event arrangements beforehand.
- unticketed: people who have booked but not had tickets issued. This option is not that likely to be used manually, but it is used automatically to prepare the batch of tickets needed to be available for collection on the door.
Previously you could record attendance at meetings and so on by assigning people manually to a list. Now, recording their attendance at an event does this automatically, and because the event that represents the meeting can be assigned to more than one list according to the meeting’s purpose, say, meeting attendees can be partitioned without needing to group lists of lists as before. You need fewer lists.
Tickets, lanyard badges and attendance lists
There are three choices people can make for receiving tickets (if the event is set up to allow them):
- by e-mail,
- in the post, or
- collect on arrival.
When a booking is completed, an email or letter is prepared if they choose either of the first two. Otherwise they remain “unticketed”, and will be included in the batch of tickets for collection when it is produced using the appropriate button at the bottom of the Reservations section. If they happen to call in to collect their tickets earlier, they can be printed individually by locating the booking (by booking reference, or by locating their membership record) and clicking the (re-)issue tickets link. The ticket issuance would then be recorded in the booking, so not included in the batch for collection produced later.
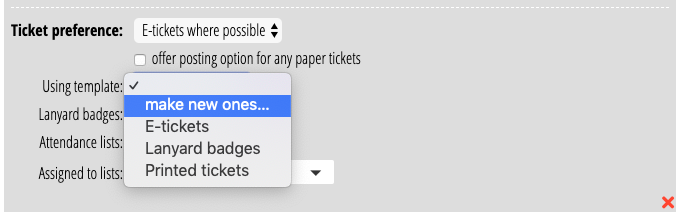
This all happens through the same mechanism as explicit messages with lists and templates described above. There are up to four templates and a stationery item to support tickets. These five parts can be set up automatically the first time you need them, and then customised to your requirements. In the Events section for the event in question, under Ticket preference, using template, chose make new ones to generate the set of templates. It is likely you’ll use the same ticket design for other events, in which case you can instead just select the main one of these templates again for subsequent events.
Ticket templates work like this:
- an email template is assigned to the event to produce the email message for e-tickets.
- a letter template is assigned as its alternate template of the e-mail template, to produce printed tickets when people don’t have an email address, or if they explicitly opted for postal or collected tickets.
- two subordinate templates provide the actual ticket designs (one for email and one for printed). This is referenced and repeated for as many tickets as there are in the booking by the {tickets: …} substitution
- printed tickets require stationery to lay them out, which the tickets letter template references. This may be one ticket per page, for a proper ticket printer, or just part of a larger letter or label-like sheet.
Paper tickets are always needed (for a ticketed event): not everyone has email. However, you can choose whether to offer to post these, or only have them available for collection; and if posted to charge separately for this. If you don’t want to offer e-mailed tickets at all, only paper ones, you can reorganise the default set of templates so that there is no email template (or subordinate ticket template for it), and the event refers only to a letter template.
The main template which the event refers to has as its audience services tickets. Only templates like this are offered on the menu shown above as candidate ticket templates. When the template is actually used to produce a single message (e-tickets on booking) or more (a batch of tickets for collection), services tickets is simply shorthand for a list audience which has event attendees as its source, and references (for just one booking) or unticketed (as the collected tickets) as the list option. The merge first generates a temporary such list, then uses it just as if it were created manually. (For email, it also then actually sends the message).
Lanyard badges are the identification tags worn usually in plastic holders on a thread – or lanyard – around the neck at conferences and the like. These can be produced automatically. The process is identical to batch ticket collection, just using a different template and stationery. They are usually printed like large labels, say eight to a sheet. They could just as easily be labels for peel-off and stick-on name badges. Because these are only ever printed, and would not usually be found in the context of multiple tickets per booking, the default set you can make comprises just one letter template and stationery for you to customise. The default badge contains a VCard QR Code (trade shows like to have these available for scanning).
Finally, attendance lists (either expected attendees or those who have already actually attended) are also somewhat similar, in that the multiple records, located in the same way, are imposed one after the other on a sheet. They are also handled in the same way. These use the new row of table pagination method for stationery to achieve this.
However, it is also convenient to have attendance lists available in a spreadsheet form, so buttons are available for both bookings and attendance to produce equivalent CSV files for download. These are not produced using templates. The advantage of using a template is you can choose what fields you want and in what order: with CSVs, you essentially get everything.
“I’ve already got a list”
You may already have manual lists to which people were added to represent attendance at a meeting. So a natural question is “can I convert that list to an event with attendees?”. There isn’t any automated way of doing this at the moment, but if there is demand for it, I can produce a one-off script to do this conversion. It is possible to do manually, even in arrears, but it is a bit tedious if there were many attendees.