
Form type attendance is available to let people check themselves in for an online event which they have previously booked for. Then it redirects them to the event’s web page.
Don’t provide people with bookings with the URL of the event location (on Zoom, Teams or whatever). Instead, give people the URL of the page on your website which embeds the attendance form. The form acts as an intermediary to the actual URL.
This means you:
- Can record attendance (and use that attendance list later for statistics or targeted email),
- Can send a personalised link to the event even when there is only a single URL identifying it. Keep the URL you distribute within your own website.
- Do not have to obtain or decide on the actual online service you’ll use until nearer the time. You can deliver the link to the event as early as in the booking receipt, without having booked the service to host it.
- Don’t have to wrestle with the third-party service to get an attendance list out of it. Nor do your attendees have to separately sign in to the event (unless the service requires this). Their personalised link to the attendance form is sufficient to identify them.
You might also want to read about hybrid events (those held both in person and online).
Contents
The workflow
Here’s how it works:
- You send an email to people who have booked for an event saying how to join it online. This would be instead of the tickets you would send for an in-person event. The email includes a link to join in, a personalised link to a page on your public website (not a direct link to the service providing the meeting, such as Zoom).
- That page embeds a Cameo attendance form. So when they follow their invitation to join, they see a message saying they will be transferred to Zoom or wherever (you can customise the message in the form). At the same time the form automatically checks then in to the event.
- The personalised link identifies the booking (whether it is the booking receipt, tickets or a follow up email later to event attendees), and the booking identifies the event (or event occurrence, if more than one) to check in for. The event definition also provides the URL it should forward to (Zoom etc). This is how the form is able to transfer the to the correct online event.
Event set up
An online event differs only from any other event in having a URL where the meeting will be held. This is set in the occurrence of the event. The New Event button in events & bookings → events can now set this for you when it makes the event. It can also create an attendance form at the same time the first time you need one.
If you don’t know the URL to transfer to when you make the event, you can add it later, any time until you are ready to start allowing people to check in.
Using One Off Event
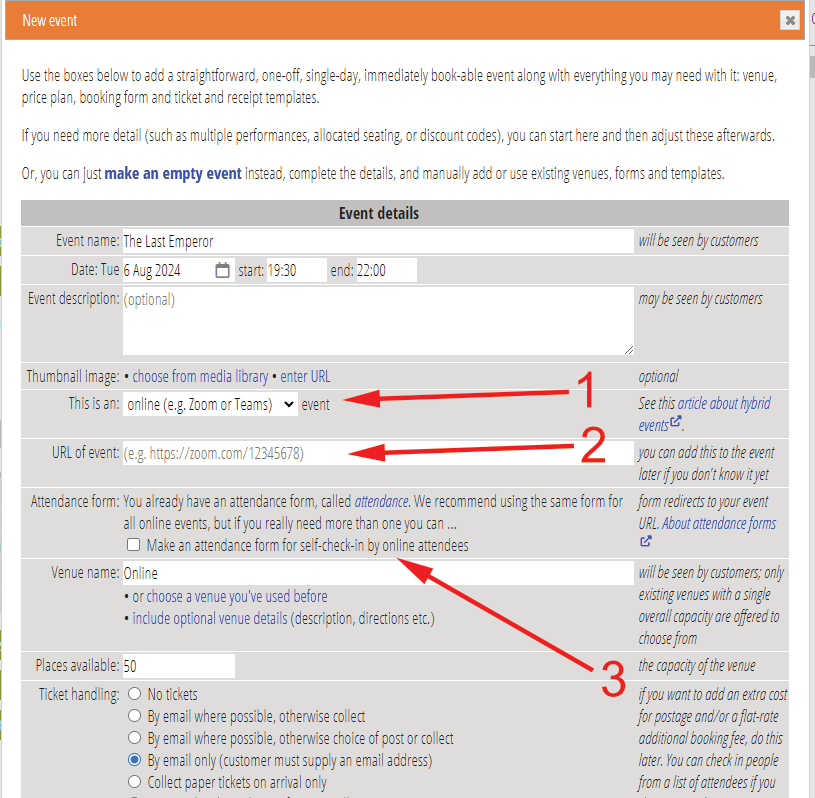
Click the Add One-off Event button and fill in the event details in the usual way.
When doing that, choose an online or hybrid event (Fig 1: 1). This reveals:
- a field to enter the URL where the event will be held (on Zoom for example; Fig 1: 2) if you know it
- a box to tick to make an attendance form to go with the event (Fig 1: 3).
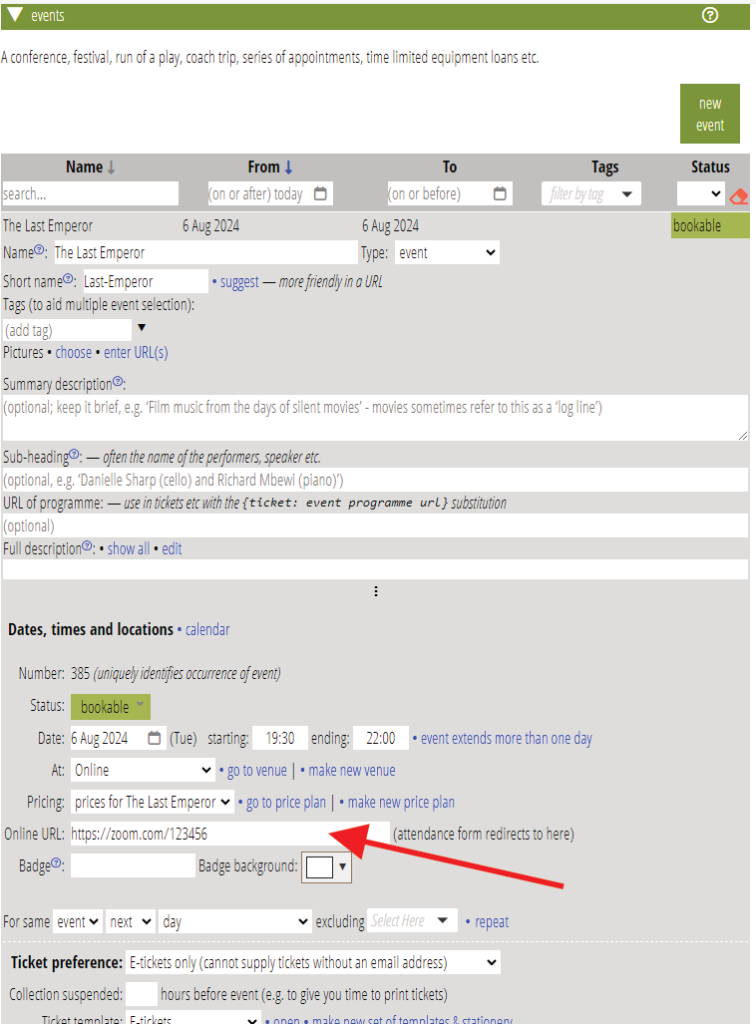
Manually setting the event’s URL
If you don’t know the URL of the online event when you first make it, leave it blank. You can then add it to the event later.
The attendance form
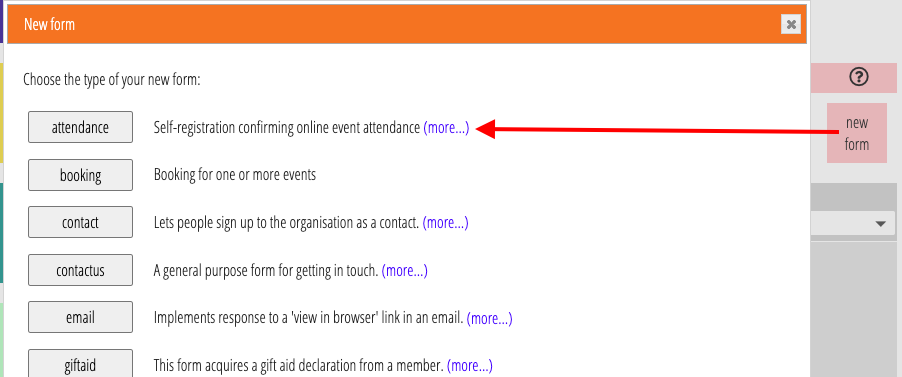
If you don’t already have an attendance form, make one using new form in forms → form editor.
The form only works when personalised. To set it up you need someone to have have made a booking for the event in question, and in particular been sent tickets or a follow-up email. You can always cancel the booking later if you do it as a test.
Select this person (you can click their membership number in the reservation; if you use someone else it will tell you they don’t have a booking for the event). Click personalise form above the form preview in Manage Forms.
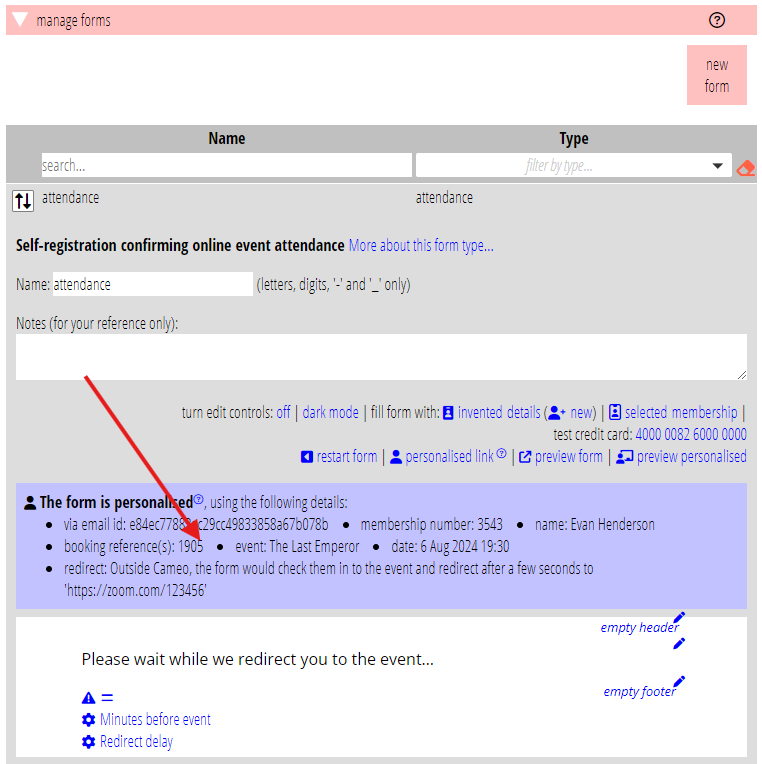
The email used for personalisation knows which booking it refers to, therefore which event and online URL in the event.
Manage forms shows you details of which event the email used for personalisation refers to (Fig 6).
The real form has a time limit prior to the start of the event before which people cannot check in. This is 60 minutes by default, but you can change it in the form settings. Late-comers can continue to check in until midnight on the day of the event.
However, Manage forms does not apply this time limit when previewing inside Cameo. This is so that you can set up the form as they will see it. The redirect to the event’s URL also does not happen in this form simulation.