
This illustrates using Cameo’s events management for a week’s run of performances of Macbeth in the Camford Theatre, with reserved individually-ticketed seating, higher prices in the Circle than in the Stalls, and a lower price for under 16’s.
You might find it helpful to review Example 1 first where the parts in common with this are shown in more detail.
Contents
Venue
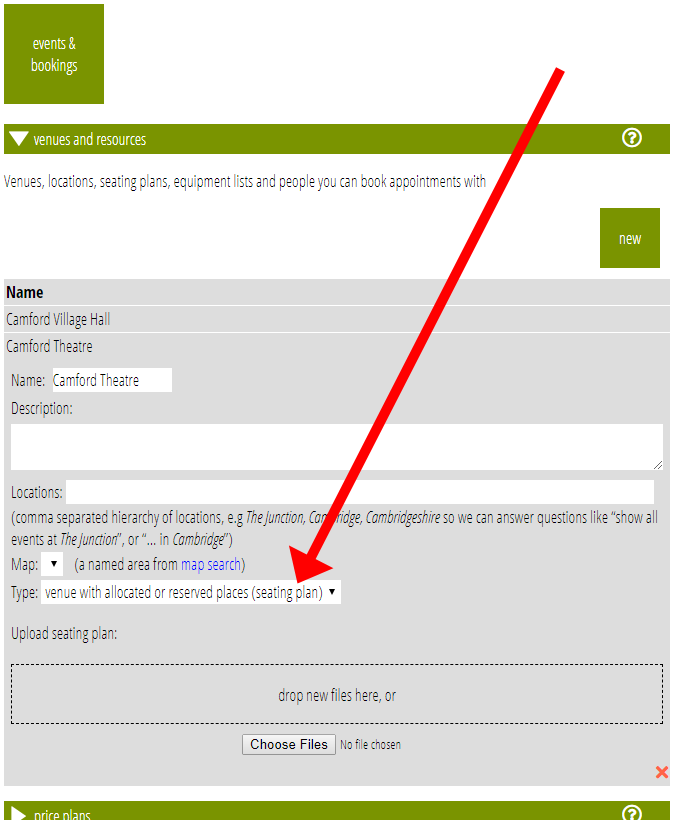
Start in the Venues and Resources section of Events and Bookings by adding a second new venue. Unlike example 1 we will choose as the venue type venue with allocated or reserved places (seating plan).
Now upload a CSV file which describes the layout of the theatre in the format shown here. It’s done this way as things like seat numbering can usefully use spreadsheet formulae to increment each seat number, which is much quicker to construct than entering all the information manually. Here’s an example in Excel:
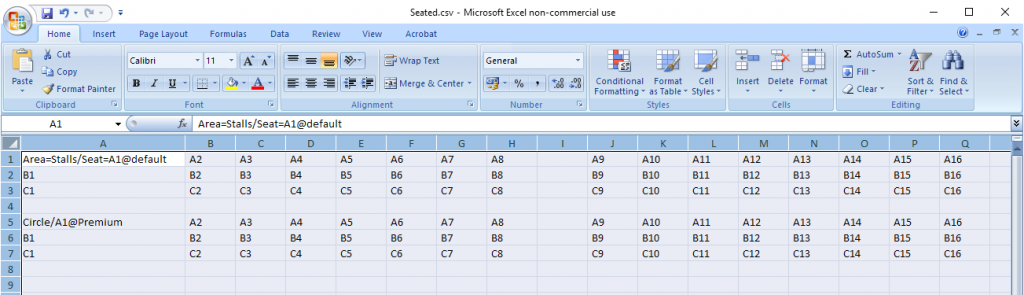
Each cell represents a seat. Put the seat number in the cell. You can choose to number as A1,A2, … or just 1,2,3,… for all the seats in the house, or separate out the row and seat with a slash, as in A/1, A/2,… The latter form means you can caption the row and seat separately on a ticket if you want (for example Row A Seat 1, rather than just Seat A1; singly numbered seats might be more appropriate for a coach trip). Spaces in obvious places are ignored for better readability.
Whichever you choose, there can then be a second or third level of seating indicating an area of the theatre, such as Stalls or Circle. This is written Stalls/A1 or Stalls/A/1 according to the format for seat or row and seat.
While you could write these out in full for each cell (and that may be easiest if you are using a formular to increment seat number), you can also abbreviate by omitting the next levels up from the seat in most cells. That way the row and/or area is inherited from the next cell that does have it nearer the top (and on the top row from the next left).
So you could write
    Stalls/A/1, 2, 3, 4, 5, ...
    B/1, 2, 3, 4, 5, ...
    ...
    Circle/A/1, 2, 3, 4, 5, ...
    B/1, 2, 3, 4, 5, ...
Leave blank cells to indicate aisles or a tapering seat pattern. You can also put a # in an otherwise empty cell to indicate that a comment (just for your own reference).
You can precede elements of the seat numbering with the name of that part of the hierarchy and an equals sign – typically you only need to do this in the first cell. This allows for captions in tickets etc. For example:
Area=Stalls/Row=A/Seat=1, 2, ...(Seat, Row and Area are the defaults if you don’t provide this). Here’s what our completed seating plan looks like:
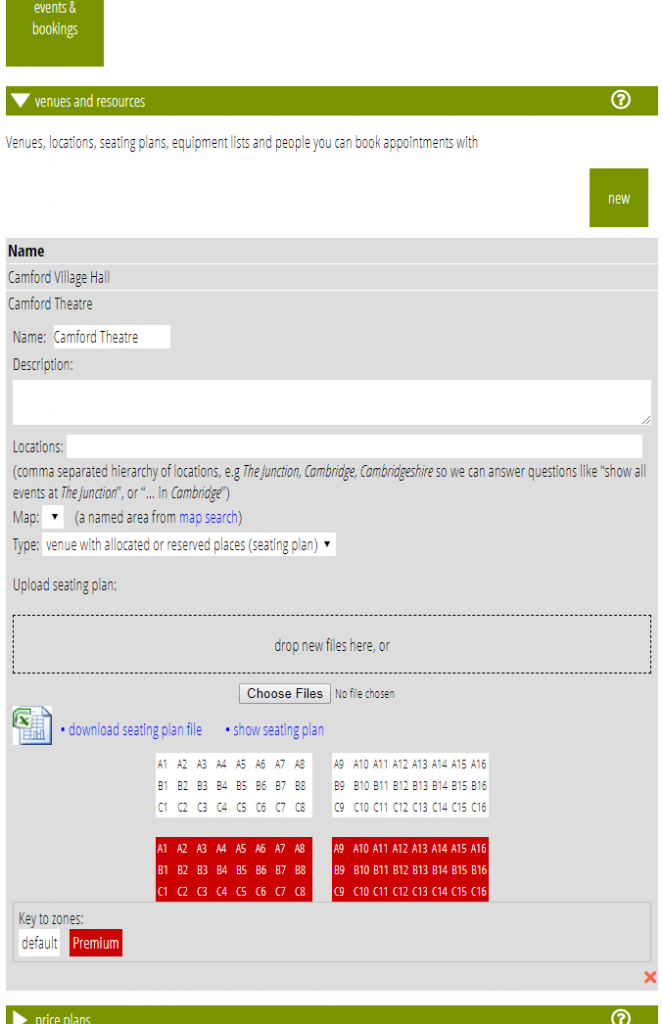
Notice the whole of the Circle is assigned to Price zone Premium. Areas of the theatre don’t have to coincide with pricing zones like this: the central area of the Stalls with a better view might command higher prices. Price zones are indicated by appending @zonename to the cell contents, and as before, when omitted it is inherited from the one above (and to the left on the first row). See pricing zones in the help for Venues for more information.
Price plan
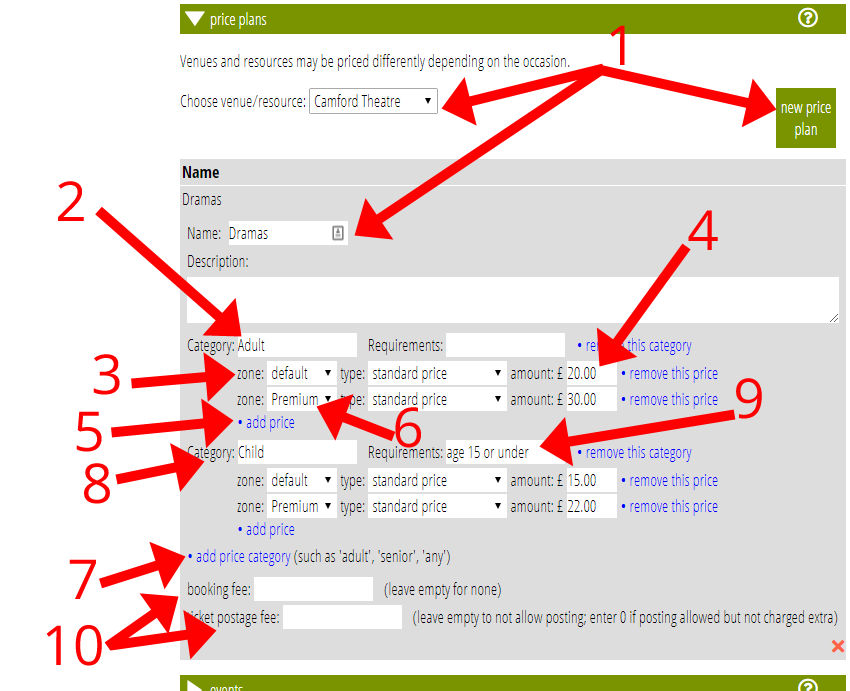
As in Example 1, we’ll set up a price plan. In the Stalls, we’ll charge £20 for adults and £15 for children; and in the Circle it’s £30 for adults and £22 for children.
- Select the venue Camford Village Hall we just set up, click the New Price Plan button and give the plan a name: Dramas, say (1).
- Cameo gives you an Adult price category to start with (2). Select the default price zone for this (3), add the standard price (£20 (4)).
- Then add price (5). This time choose Premium zone (6) and add the cost, £30. That’s the adult prices done.
- Then add price category (7), name the category Child (8), and this time put the requirements needed to buy such a ticket, namely age 15 or under (9). Add the two prices for children like the adults.
- Add any overall booking fee and postage fee for tickets if appropriate (10).
The event
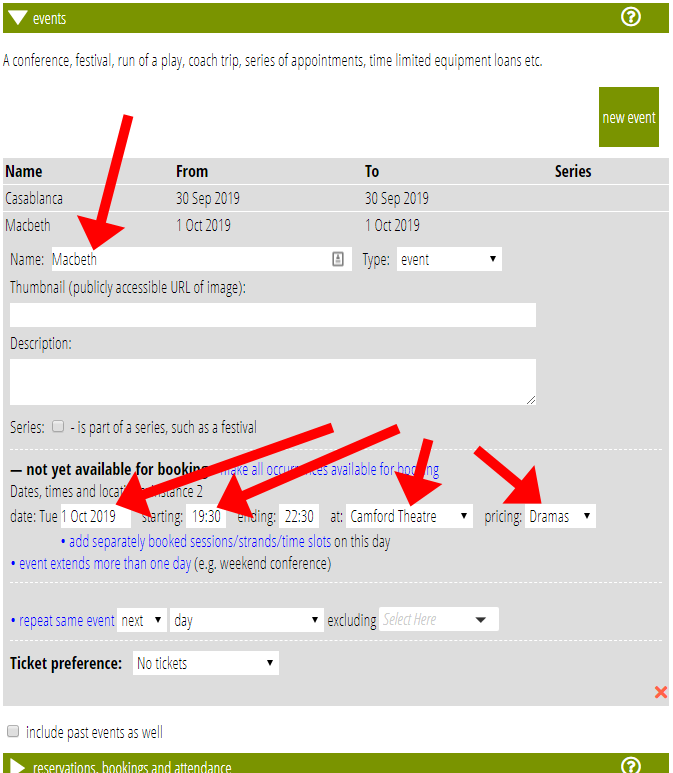
Now Cameo knows where and how much, we can say what and when. This event differs from Example 1 in that we are going to repeat the performance on consecutive evenings from Tuesday 1 October to Saturday 5 October, with a matinee on the Saturday.
So, in Events, as for Example 1, click the New Event button and give the event a name: Macbeth, and add the details for the first performance selecting Camford Theatre for the venue and Dramas for the pricing.
Now, decide how the event repeats. We want to add 5 repeats (Wed – Sat plus matinee), so every day (with no exclusions) adding 5 events.
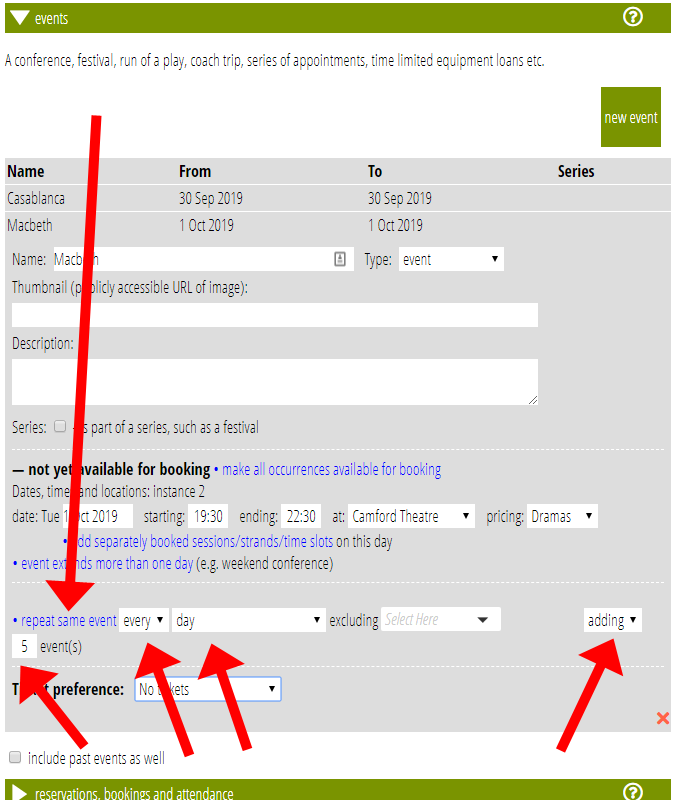
Then click the repeat same event link (1, below). This will calculate the new dates but end up with one on Saturday and one on Sunday (2), which we’ll just amend in a moment. Notice we are now seeing the “Sunday” event, occurrence number 6, and that there is a drop down menu (3) and a calendar (4) from either of which we can select the other occurrences. Though not necessary and not seen by customers, we can call the occurrences by more meaningful names by changing the repeat occurrence box (5):
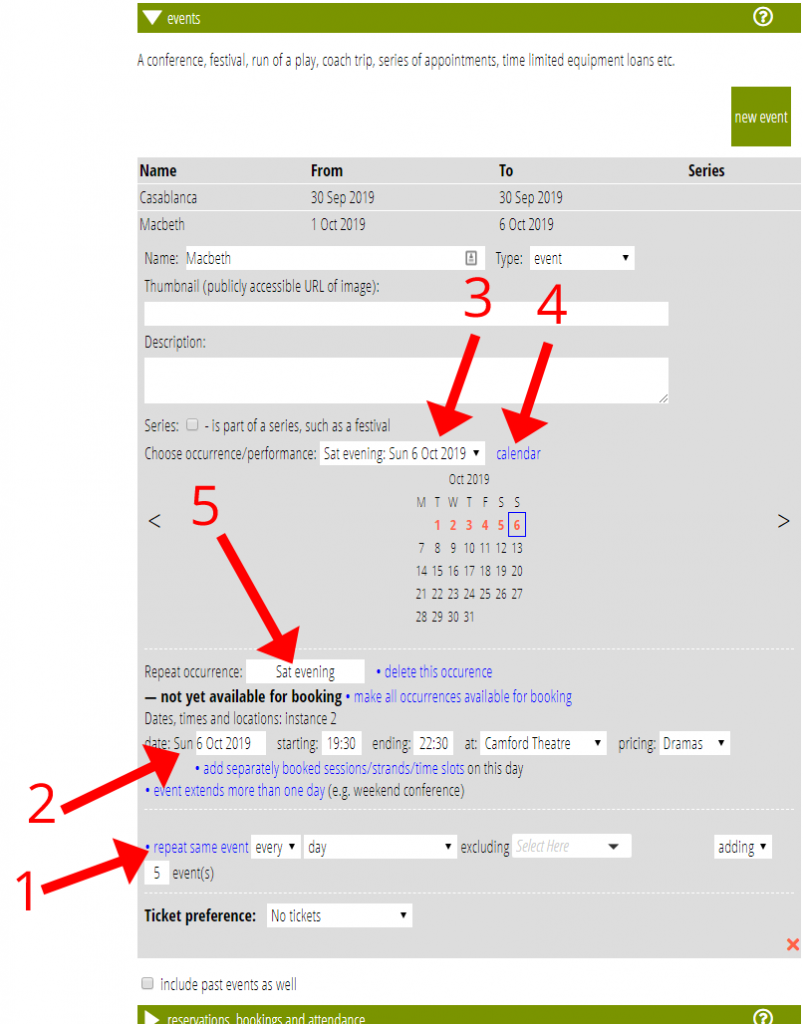
More importantly, while Wednesday to Friday will be fine, we need to correct the timing for the last two occurrences. Change this just like the original Tuesday that you entered:
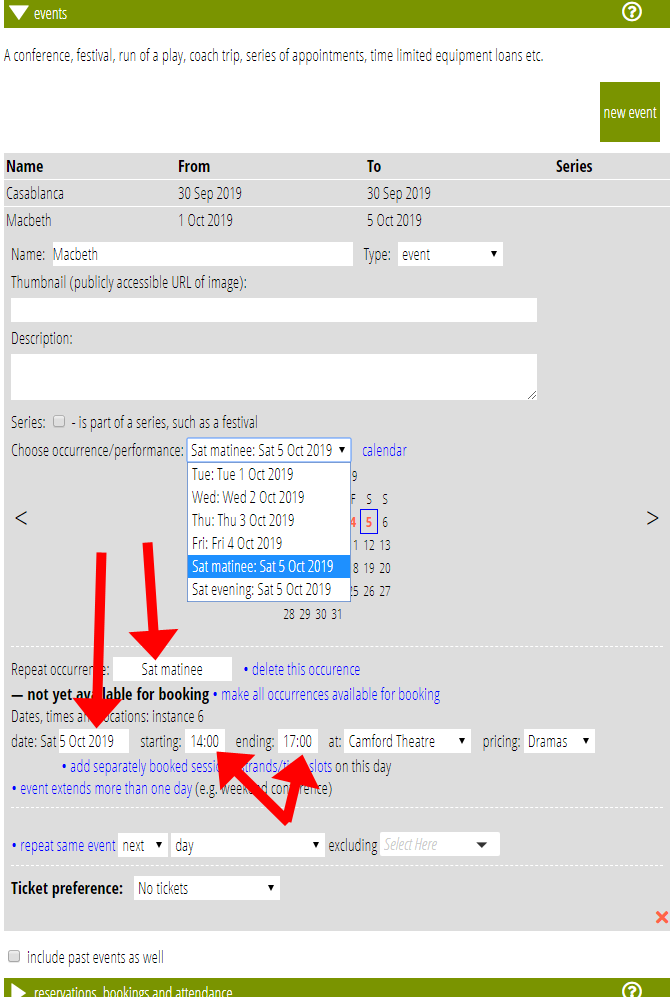
Finally, when you’re happy with everything, we can open it for booking by clicking make all occurrences available for booking.
Booking through Cameo
Having added the event from Example 1, we now have two events in Reservations, Bookings and Attendance (the one we made here also repeating several times), so we need to narrow down to a single performance. It is sufficient to choose just the date for the earlier performances, as that uniquely identifies the event; on Saturday you would also need to choose the time. It doesn’t matter whether you select Macbeth or not: that adds nothing.
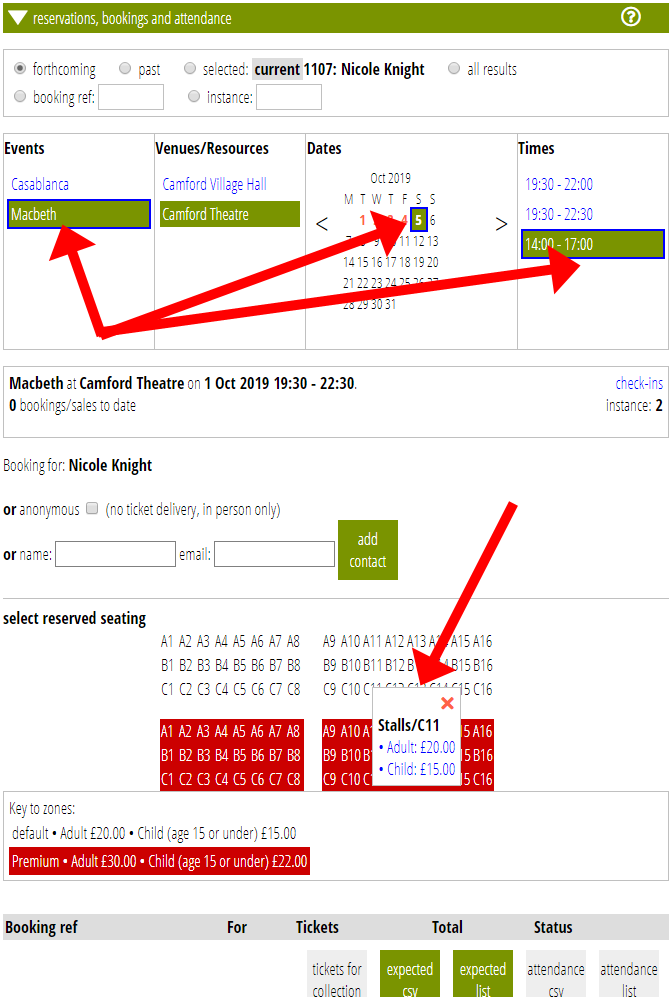
Once the event is selected, instead of just a number of places to select, we see the seating plan and choose individual seats by clicking them. If, as in this example, there are multiple categories for a seat, a menu of those pops up and you need to choose which. Repeat for as many seats as required. As you do this the pending booking beneath changes. As with Example 1, click the reserve button to hold the seats. (If someone else books the same seats and gets in first, it will tell you and not let you double book).

Here, I chose two adult and one child tickets in Stalls C11 – C13 and made the reservation, which is held for 20 minutes). Notice the seating plan now shows those seats as unavailable, and lists them in the our reserved booking.
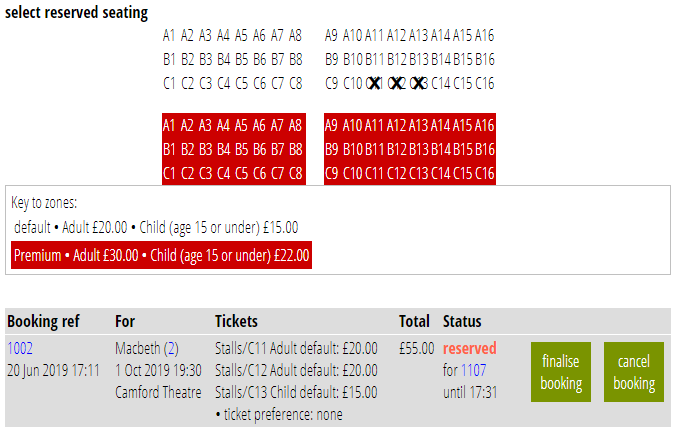
Finalise the booking!
Checking in is exactly the same as Example 1. The tickets will show the seat numbers, of course.