
There’s a few additions to make it easier to create and move between events, their venues and price plans and also to register and check in someone simultaneously at an event. Adding one-off events has move to be a form accessed from the add one-off event button in the events section, rather than a section in its own right. All the functionality remains the same.
Contents
Events and related venues and price plans
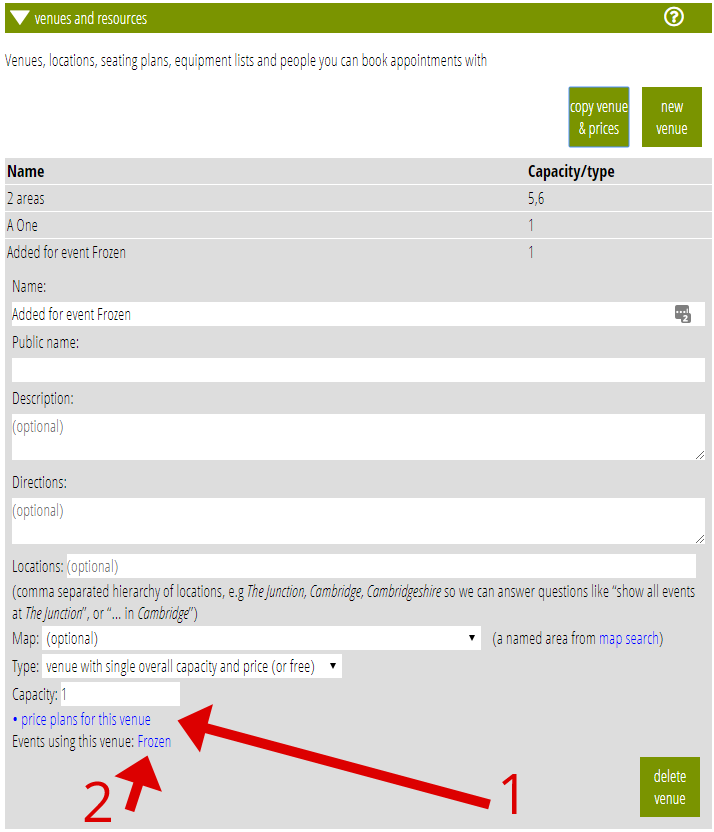
If you start with creating a new event, you can now also create a new venue and a new price plan at the point where you need it, from the venue and price plan selection menus (Fig 1: 1), rather than having to create them in advance. Default names are invented for them.
You can also now open a venue or a price plan using links next to these two menus (Fig 1: 2). So having created a new venue you can jump to it to change or add detail, such as the invented name. But you can also do this for existing venues or price plans as well.
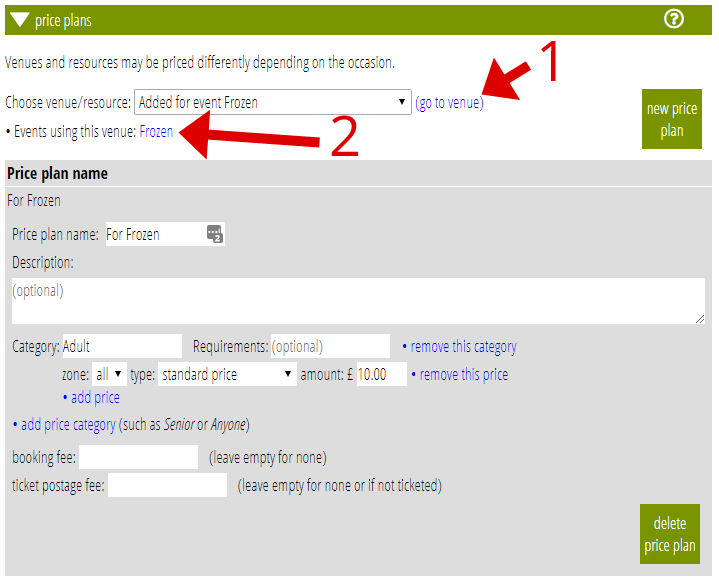
Similarly there is now a link at the bottom of the panel describing a venue to jump to the price plans for that venue (Fig 2: 1) and to any of the events (including any for which the venue has just been created as above; Fig 2: 2), so having completed the venue information you can return to completing the event.
Thirdly, there is also a link in the price plans section to the venue selected (Fig 3: 1) and to all events using that venue (Fig 3: 2).
So moving around between these three panels has become very much easier.
Simultaneous registration and check-in
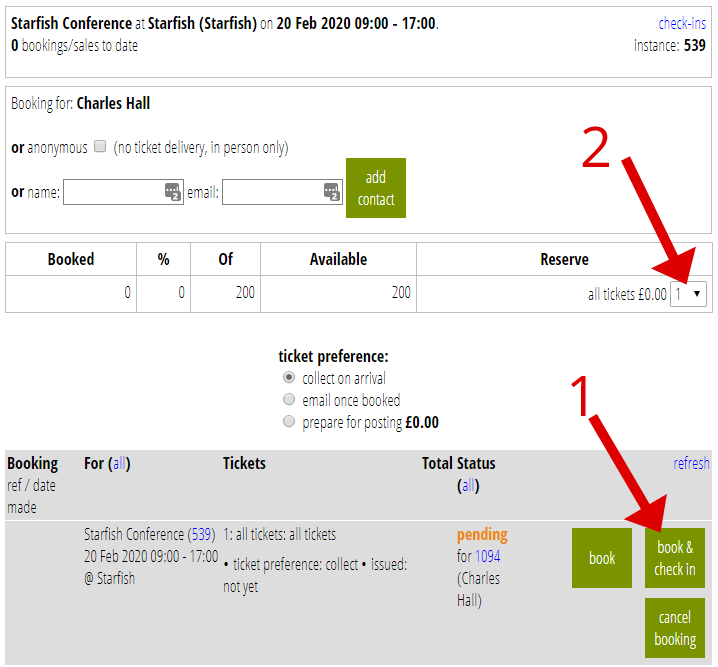
When using the reservations, bookings and attendance section to register attendees, for example at a check-in desk, you can now also check them in at the same time as registering them. For free events there are now two buttons, the original book and a new book and check-in (Fig 4: 1) which does the same but also effectively clicks the check in button (the blue door in the booking list) as well. For paid events, you reserve first, take payment and then finalise: there is now a third way to finalise, with the finalise and check-in button, which also finalises as usual and then checks them in.
In addition, the first selector for the number of places wanted (often the only one, especially for free events) is reset to 1 rather than zero after the first booking (Fig 4: 2). Therefore to register and check in someone is now very often just a matter of looking them up and pressing a single button.
Add one-off event
Previously a section in its own right, this has now become a button at the top of the events section (Fig 1: 3). The button pops up the form to fill in, which is identical to the earlier form. (No other sections behaved like this, so it is much more consistent in the user interface as a box to complete than a section.)
Further minor changes
Also to “reduce friction”:
- a new venue is created with the type already set (to the simplest, single capacity only); and will always succeed even if a similar name already exists – it adds “(2)” etc to the name rather than giving an error (likewise for a new price plan).
- renaming a venue or price plan also updates any events referencing it
- making event available for booking (and suspending it again) now shows as a proper button, not just a link.
- a new venue created using the New Venue button is now opened at the top of the list of venues, near to the button. (Previously they were added at the end). This is also the case for a new price plan.