
Cameo now has a built-in calendar. Find it in library → calendar.
- view as a list or by month (Fig 1: 3)
- add appointments (timed, day, several days; Fig 1: 2)
- tag appointments
- repeat appointments (including nth day of month and last day of month)
- get notifications in advance
- filter appointments in the usual Cameo style (Fig 1: 4)
- provide location (online URL or place) and on a map
- add attachments to appointments
- see other Cameo dates on the calendar (forthcoming events, invoice payments due, reminder notifications due)
- get iCalendar files for export to other calendars
Contents
View by month
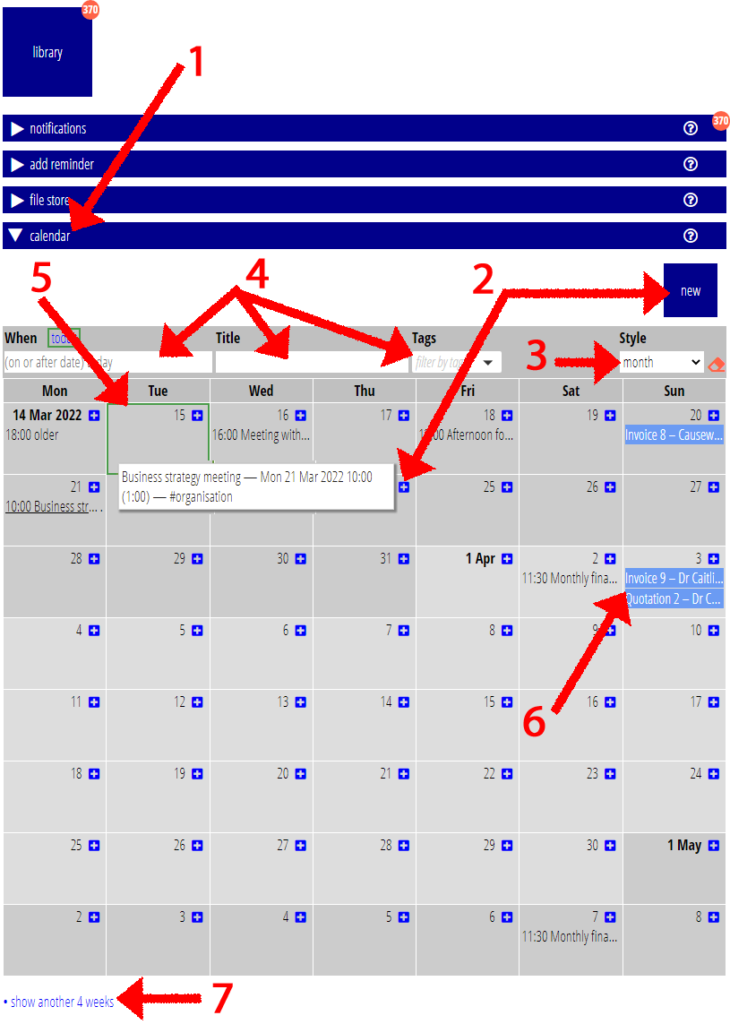
- Change the view style from the control in the heading of the list of appointments (Fig 1: 3). A green outline indicates today (Fig 1: 5).
- We only show one line of information for each appointment. Hover for a fuller description.
- Look further into the future either by filtering by date (Fig 1: 4; see below) or adding weeks to the bottom of the calendar (Fig 1: 7).
- See other dates from Cameo on the calendar, such as events and invoice due dates (Fig 1: 6). Hide these using the tags filter (Fig 1: 4).
- Click on any appointment to see or change appointment details (see below).
View as list
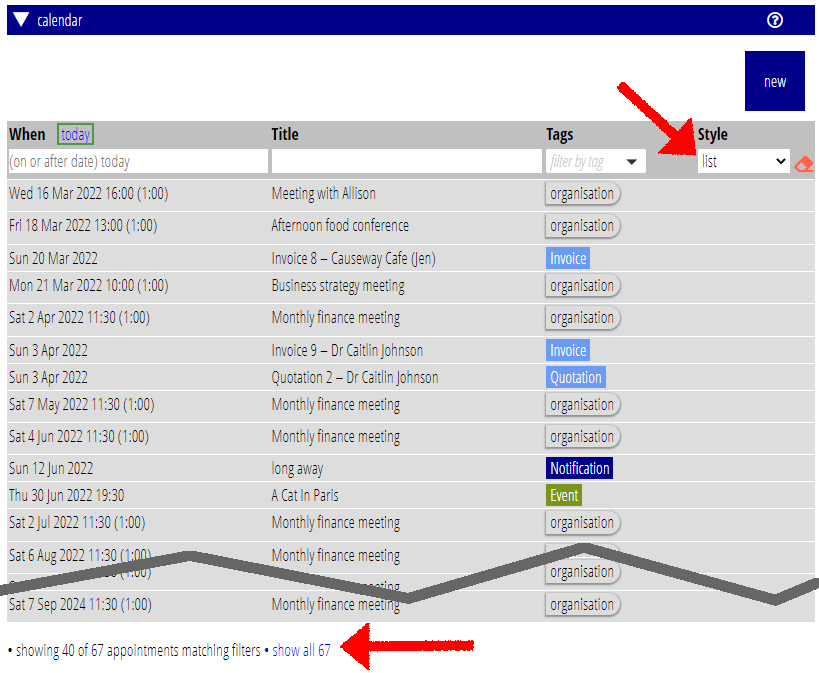
The list shows appointments and other dates, such as events, initially from today into the future (Fig 2). See more entries using the link at the bottom, or use filters (see below).
Filters
Filters work in very much the same way as other tables in Cameo. The also work the same in list or month view.
- Start the calendar at a different date (past or future) by changing the date in the heading of the first column.
- Search by words in the titles of appointments using the title filter in the heading. This only searches appointments, not other dates such as events.
- Filter by tags assigned to appointments with the tags filter in the heading, again similar to other such lists, and only for appointments, not events etc.
Adding or changing an appointment
To add a new appointment, either:
- Click the new button (Fig 1: 2). It will add the new appointment initially for tomorrow.
- Click the + button for any date in the calendar view (Fig 1: 2). It will add the appointment on that day.
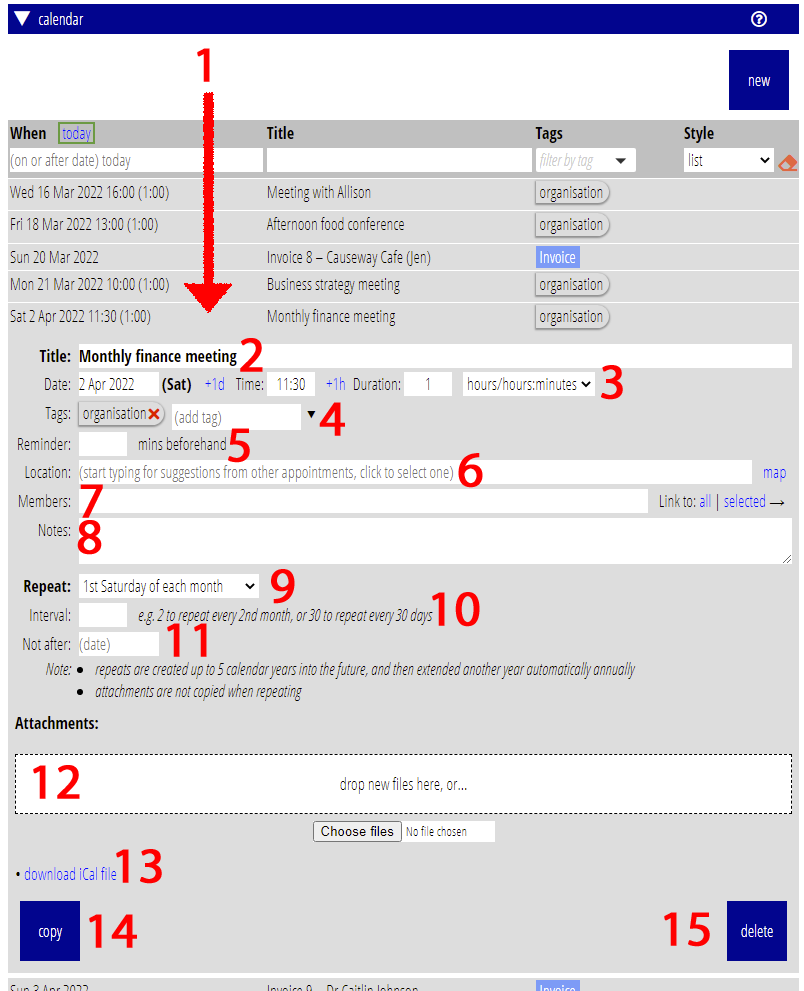
- Click the copy button at the end of the detail for an existing appointment (Fig 3:14; copy does not include attachments or repetitions).
To view or change an existing appointment, click its summary, in either list (Fig 3: 1) or month view.
In either case the details expand underneath, as with Cameo’s other accordion-style lists. Note that you view but can’t change built-in dates, such as forthcoming events.
- Title: give the appointment a title (Fig 3: 2)
- Date: say when it occurs and how long it lasts (Fig 3: 3). If you have a whole day or multiple day appointment, choose day(s) from the duration period menu. Click +1d to move the start date a day forward rather than typing it, and +1h to move the start time on an hour. You can leave out the duration if all you want is a reminder at the given time.
- Tags: optionally, give the appointment one or more tags, in the same way as elsewhere in Cameo (Fig 3: 4). Unlike other calendar apps, Cameo does not have separate calendars for different purposes. Instead you can tag appointments and filter by those tags. This has the advantage that appointments can appear in more than one category.
Like other tags in Cameo, the list of available tags is specific to the things being tagged: for example, template tags are separate from calendar tags.
However, when you add a calendar tag, Cameo also adds an equivalent notification tag, starting with the word Calendar. That means you can subscribe to notifications for a reminder about specific groups of items on your calendar. - Reminder: optionally, set the number of minutes before the appointment when you want to receive a reminder (Fig 3: 5). Cameo posts a notification at that time, tagged as described above, so you can subscribe to them. Subscribe to notification tag Calendar to see all calendar notifications. If you don’t set the time (which can be zero), Cameo does not post a notification.
- Location: Optionally say where the appointment is happening (Fig 3: 6; see below).
- Members: You can link the appointment to membership records (Fig 3: 7). Notifications also reflect these. Search for the records to link to and click all or selected to apply them. When you open an appointment which already has memberships associated with it, Cameo displays them in the search results alongside.
- Notes: add any further information in the Notes box (Fig 3: 8).
- Attachments: drag and drop files to attach them to an appointment (Fig 3: 12), as with attachments elsewhere. When you repeat an appointment, the extra appointments added do not include the attachment.
- Delete button: click to delete the appointment (Fig 3: 15).
Repetition
- Repeat: choose how you want to repeat it from the menu (Fig 3: 9). For example, each Wednesday or first Saturday of every month.
- Interval: if you don’t want every repeat occurrence, set the interval (Fig 3: 10). For example if you want it quarterly, having chosen say First Saturday of each month, put 3 in the interval box. The selected repetition will change to First Sunday of every 3rd month.
- Not after: If you don’t want to repeat indefinitely, set a date after which the repeats will end (Fig 3: 11). Either way, Cameo initially generates up to five calendar year’s worth of repeat appointments. It then adds a further year’s-worth on 1 January each year, so they will continue to reach 5 years into the future, or their end date whichever is earlier.
When you make a change to a repeated appointment (or delete it) you can choose whether to apply the change just to that appointment or the whole series. For example, if you change our 3rd Saturday appointment to the following day, for all its repeats, they will all move to Sunday. Cameo actually does this by deleting and re-creating the repetitions.
If you choose not to apply a change to all occurrences, Cameo disconnects the appointment from the others. After that it behaves as if you had made it independently.
Location
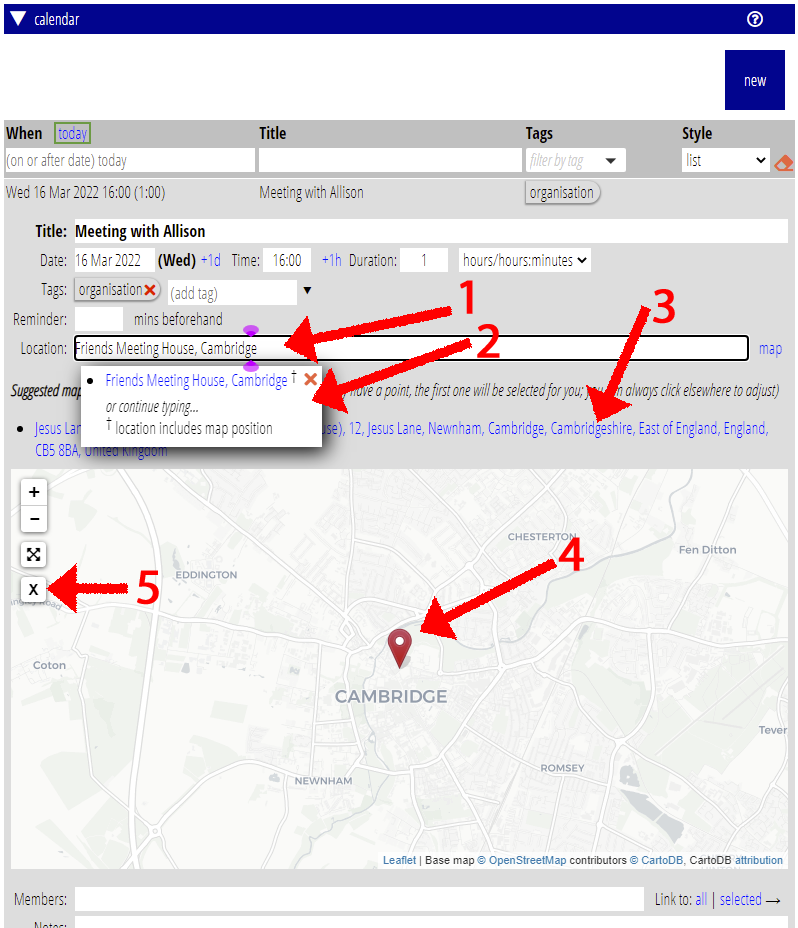
The location box (Fig 4: 1) behaves a bit differently from the others. When you start typing into it, Cameo looks for similar locations in other events, and offers a menu of them to choose from (Fig 4: 2). This recognises that you often need to re-use the same locations. To add a new location, choose the place you have typed so far from the menu.
If you enter a URL in the location box (that is, starting with https://…, such as https://zoom.com/12345678), Cameo displays an external link icon (![]() ) to the right of the location box. Click it to open the link in a new tab. Notifications also include the link.
) to the right of the location box. Click it to open the link in a new tab. Notifications also include the link.
Otherwise Cameo shows a map control. Click that to display a map underneath (as shown in Fig 4). When you provide a point on the map, notifications will include a map link.
- Pan and zoom as usual.
- Click on the map to indicate the place (Fig 4: 4).
- Change the point by clicking on the map again.
- Click the X control (Fig 4: 5) to remove a map point.
Furthermore, Cameo looks up the location you described and suggests possible map locations for it (Fig 4: 3). Click a location to put it on the map. (Cameo may list the same street more than once if it happens to be broken up into several sections).
If you open the map and
- you haven’t already given a point, and
- there are some suggestions,
then Cameo will choose the first one for you automatically. If this is not correct
- choose a different suggestion,
- click on a different point, or
- remove it altogether with X.