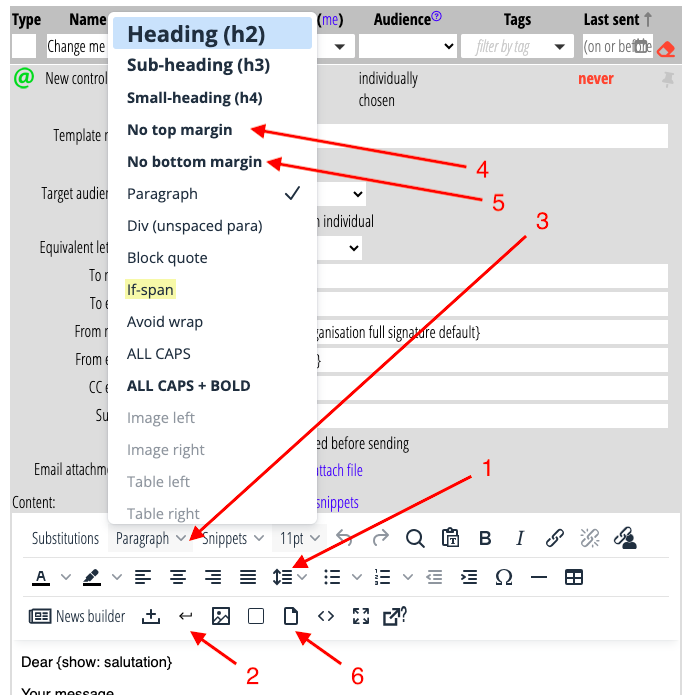
The template editor offers some new controls:
- adjust line height
- insert line break (new line)
- omit top margin on headings and paragraphs
- omit bottom margin on headings and paragraphs
- upload and link to file in media library
Contents
Email apps
Caveat: email apps decide for themselves what formatting to honour. Most show the message as you intend. However, unlike web browsers, some may ignore aspects of styling. Every email app is different and formatting is not guaranteed to work as you expect.
Line height
Normally the line height (the gap between one line of a paragraph and the next) is 1.2 × the natural height of the font. The new line height control (Fig 1: 1) lets you space lines more or less narrowly than that.
This only affects spacing from one line to the next. It does not affect space above or below a paragraph or heading (the top and bottom margins). However, if you introduce an explicit line break, the lines before and after are part of the same paragraph or heading, so the line height does affect the result.

example
This paragraph has default line height, 1.2. Lorem ipsum dolor sit amet, consectetur adipiscing elit. Suspendisse consequat lacus tortor, at vestibulum turpis sodales. Donec eu lacinia turpis.
This paragraph has line height 1.0 (no space between lines). Lorem ipsum dolor sit amet, consectetur adipiscing elit. Suspendisse consequat lacus tortor, at vestibulum turpis sodales. Donec eu lacinia turpis.
This paragraph has line height 1.5. Lorem ipsum dolor sit amet, consectetur adipiscing elit. Suspendisse consequat lacus tortor, at vestibulum turpis sodales. Donec eu lacinia turpis.
Line break (new line)
Pressing the Enter key starts a new paragraph, with all that goes with it: margins, styling etc. You can, though, start a new line within a paragraph (or heading), to behave the same as content wrapping naturally from one line to the next. This has always been possible using SHIFT+Enter (i.e. holding down the shift key while pressing the Enter key). However, it is not obvious unless you know that (e.g. from the similar behaviour in Microsoft Word).
Therefore, a new button in the template editor toolbar (Fig 1: 2) inserts a line break (and, if you hover, reminds you what to type on the keyboard to do the same).
example
This paragraph wraps naturally. Lorem ipsum dolor sit amet, consectetur adipiscing elit. Suspendisse consequat lacus tortor, at vestibulum turpis sodales. Donec eu lacinia turpis.
This paragraph has a line break here:
Lorem ipsum dolor sit amet, consectetur adipiscing elit. Suspendisse consequat lacus tortor, at vestibulum turpis sodales. Donec eu lacinia turpis.
Top and bottom margins
Headings usually have quite large top and bottom margins. Sometimes you may prefer to remove one or other of these. To do that, put the cursor in the heading. Then choose No top margin (Fig 1: 4; or No bottom margin; Fig 1: 5) from the format menu. You can do this for headings or paragraphs. The format menu is the second button (Fig 1: 3), after the substitutions button.
If you remove the bottom margin from a heading that is followed by a paragraph, you will notice that a smaller gap remains. Removing the bottom margin of a heading does not remove the top margin of the following paragraph. (When both margins are set, HTML does not add the margins together, though: it takes the larger of the two. Some quite complicated rules control how margins are collapsed like this). If you want to close the gap completely, remove the top margin from the paragraph as well.
Conversely, there is no need to remove the top margin of a heading at the top of a message. HTML does that automatically, so it makes no difference. If you want to push the headline even closer to the top, you could reduce the line height to 1 (see above).
example
Heading
Followed by a paragraph.
Heading
The heading has no bottom margin, but this paragraph unchanged.
Heading
The heading has no bottom margin, and this paragraph has no top margin.
Upload and link to file in WordPress media library
This only applies if you use the WordPress media library as the source for your media in emails. It complements image upload, but for non-image files.
Choose the file upload button (Fig 1: 6) to upload a file (other than an image, e.g. a PDF) and insert a link to it in the text. The button opens a file uploader where you can drop or choose your file. Also, you can provide a short description, which is useful for searching for the file later in WordPress.
If you already have text selected when you press the button, we apply the link to that text. Otherwise, we insert the name of the file (as WordPress has it) as the link text at the cursor position.
