
The combination of a new Cameo form type and a new plugin for WordPress offers a way for your public website to:
- allow current members to identify themselves to your WordPress website from the Cameo database
- remember them
- designate and limit access to member-only pages
- auto-fill some details in Cameo forms from their Cameo membership record
Contents
Background
When appropriate, Cameo forms embedded on your public website can identify people by a personalised link they receive from you, usually by email.
However, it is now possible to make that personalisation longer-lasting, in effect by using personalised links as a login.
Overview
A new WordPress plugin called cameoidentity manages persistence of someone’s Cameo identity. When it sees a personalised link it offers to remember the person the link identifies, rather than just using it for the page the link takes them to.
The plugin also mediates access to member-only pages, redirecting to a log in page on your website (which you need to add) if their identity is not known. The plugin recognises a restricted page (or post) when you identify it with a WordPress custom field called cameoprivatepage (more details below).
Your new login page embeds a new Cameo form of a new type called login. Login isn’t controlled by a password, but instead by sending them an email at the address they provide, with a link to click to verify it is them. We only send the email if we find them as a current member in the Cameo database. (If there is demand for it, this could also be applied to selected contact types in the future).
Cameo identity WordPress plugin
A new WordPress plugin called cameoidentity manages persistence of someone’s Cameo identity. Obtain this from the Cameo WordPress plugins download section. Then install it on your WordPress site.
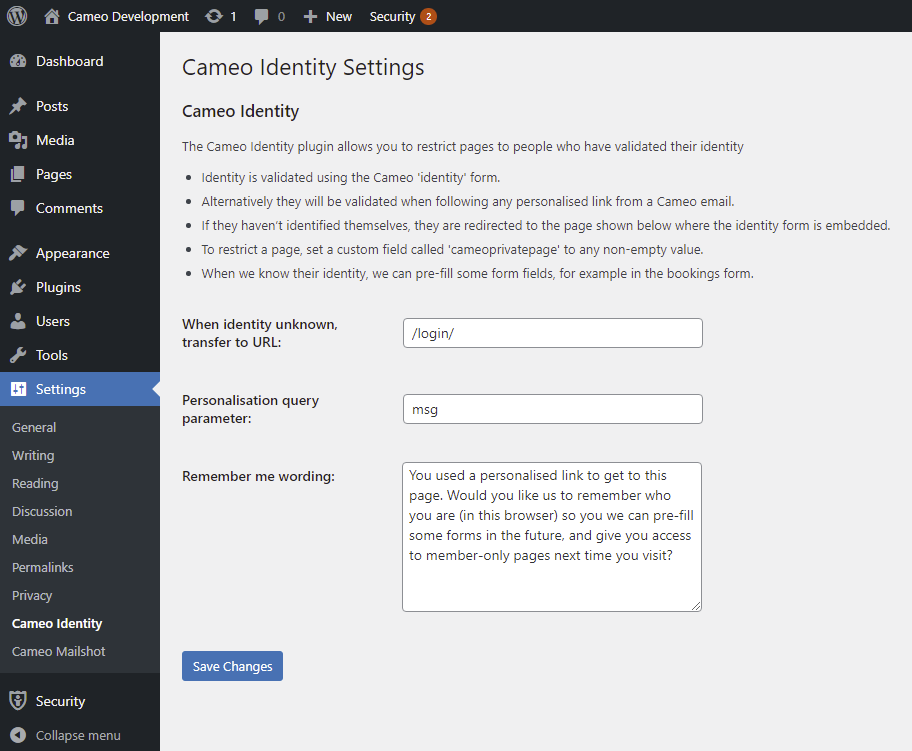
Once installed and activated, you need to provide some settings. The plugin adds its own settings page in the WordPress dashboard, under Settings (Fig 1). Alternatively, settings are linked from the WordPress dashboard plugins page.
- When identity unknown, transfer to URL. Provide a URL of your new login page on your website here (you can anticipate the URL if you haven’t actually created a login page yet, for example
/login/). The plugin redirects to this page anyone who visits a member-only page who is not already logged in (that is, we don’t know their identity). The login page will usually embed the new Cameo login form (see below). The URL can be relative (just start with a slash), but it doesn’t matter if you quote the whole thing, starting with https://… - Personalisation query parameter. The name of the query parameter you use for personalised links in emails sent by Cameo. This will rarely need to change from the default, msg.
- Remember me wording. When someone uses a personalised link, the plugin doesn’t automatically remember them: it asks where it should do so. The text provided for this setting is what they see. So if you don’t have member-only pages, for example, you would want to drop the mention of that from the text.
Once set up, the plugin will respond by popping up an overlay asking whether they want to be remembered (just like remember me on many log in pages) when the URL of the page is personalised.
We remember them for 90 days. Each page view starts the clock afresh.
Login form type
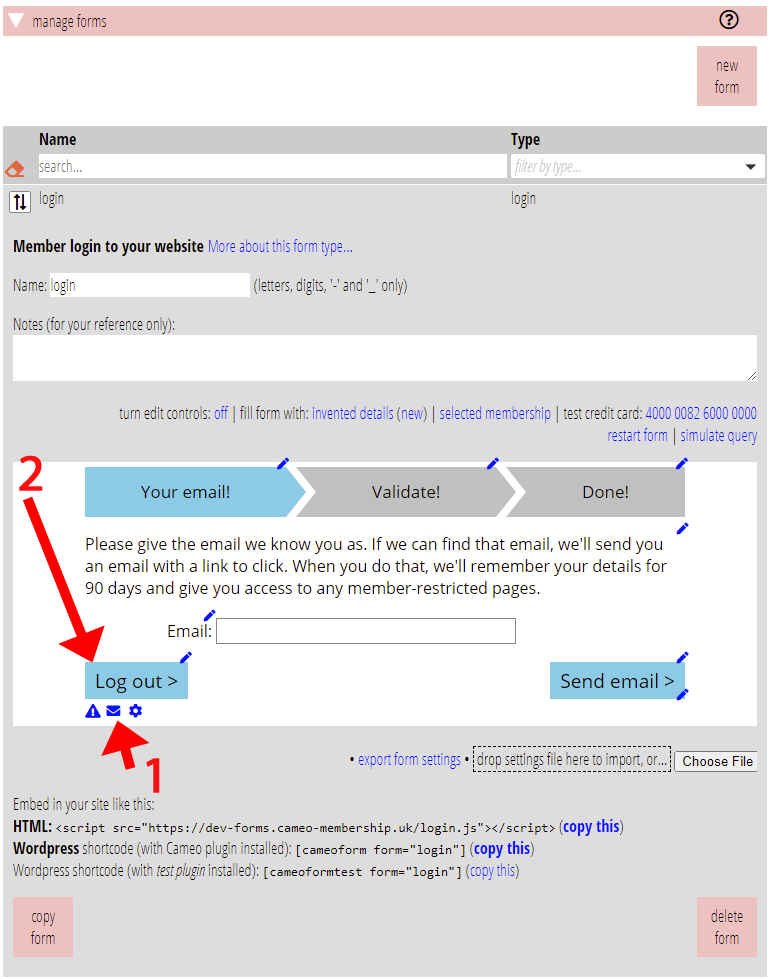
Any personalised link will trigger the cameoidentity plugin to remember someone. The login form (Fig 2) is just a way of generating a personalised link specifically for the purpose. It works like a login page anywhere else, but instead of a password, it uses their email address to identify them. In fact, this is exactly the same verification that is used in other forms, such as contact to ensure they are who they say they are; but the login form just does this step, nothing else.
Create the form in the usual way, in forms → manage. You will need to use the email setting control ![]() (Fig 2: 1) to make a suitable proforma template for the email that is sent (that services this form – just like other forms that send email). Most likely you will also want to customise the wording.
(Fig 2: 1) to make a suitable proforma template for the email that is sent (that services this form – just like other forms that send email). Most likely you will also want to customise the wording.
If you had to change the query parameter setting for the identity plugin, in particular, you will need to adjust the link in the proforma template the form makes for you to use the same query parameter. Usually you won’t need to do that.
The form is very simple. It just asks for an email address. When someone supplies that, the form
- checks we know that address as a current member,
- if so sends them an email constructed from the template that services the form,
- asks them to check their email inbox.
They then click on the link in that email. The identity plugin sees that as a personalised link, so it then remembers them (it doesn’t ask in this case, as that is what the login form is for). The form briefly acknowledges completion and then transfers them back to the page they originally tried to access.
If someone is already logged in, the form also offers a log out button. When you are editing the form, this always appears (Fig 2: 2), just so you can adjust the wording on the button and its acknowledgement if you want to.
Login indicator
When someone is logged in, their email address and a logout link are displayed in the top-right of each page.
You may want to put a little CSS in Customise → Additional CSS to precede it with suitable text such as Logged in as, and perhaps change position or size. For example:
  #icameoidentity_me {
    font-size: 80%;
    margin-top: 4px;
  }
  #icameoidentity_me:before {
    content: "Logged in as ";
  }
Member-only pages
A member-only page or post on your website is only accessible to someone whose identity has been remembered by the cameoidentity plugin. If we don’t know them, the plugin intervenes and redirects them to the login page set for the plugin, which should embed a Cameo login form, as above.
You tell WordPress that a page or post is private by adding a custom field to the page. A box to add custom fields is usually located under the main body of the page text in the WordPress editor (Fig 3: 1).
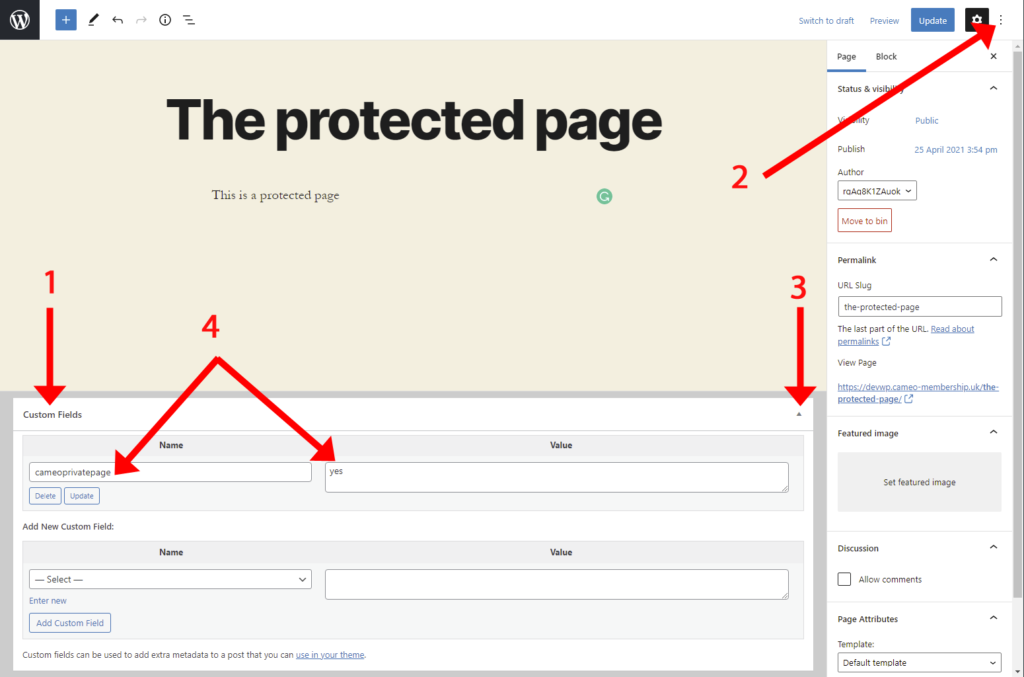
If you don’t see this, you need to ask WordPress to show the custom fields box (also see Fig 3: 2). You only need to do this once.
Enter the name of the custom field, which is cameoprivatepage (all one word, lower case) in the name box and any non-empty value (for example, “yes”; Fig 3:4). Then click Add custom field.
Once you have added the custom field for one page, other pages will offer the name of the field on a menu so you don’t have to type it each time.