
For the recipient to see an image in an email sent from Cameo, it must be on a public web site. For WordPress and Craft CMS sites, that means putting the images in the media library (which you can do in your site or from Cameo). When including an image in an email in Cameo, ideally you should be able to select the one you want from a set of thumbnail previews. This means Cameo has to be able to talk to your public website to find out what images are on offer. This article shows how to set that up.
Contents
Selecting an image
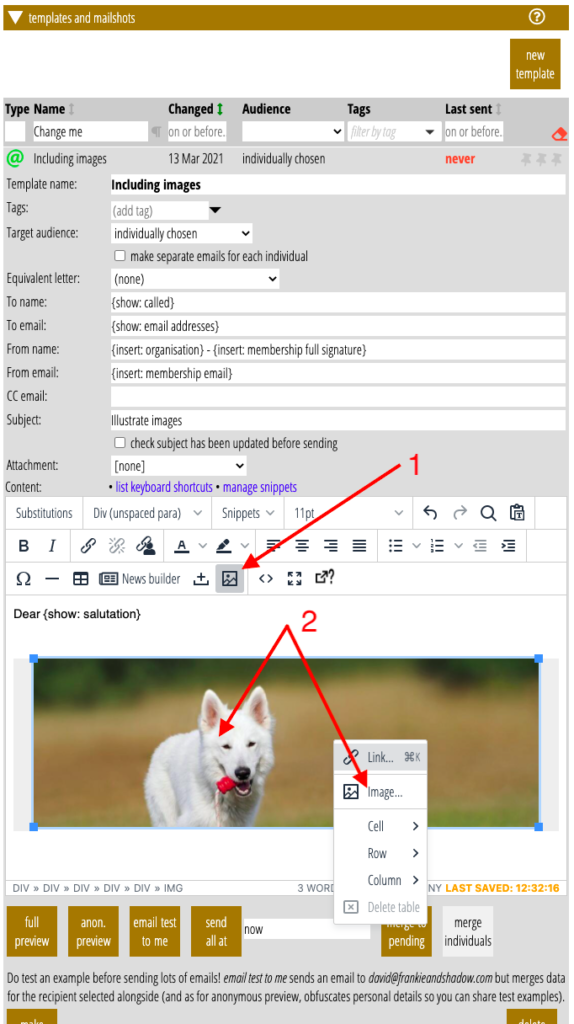
When everything is working properly, you select an image in the template editor by:
- clicking the image button (Fig 1: 1)
- in the box that pops up, you can manually enter the URL of an image (Fig 2: 1). However, there should be an image selector button alongside the box for the URL (Fig 2: 2): click that
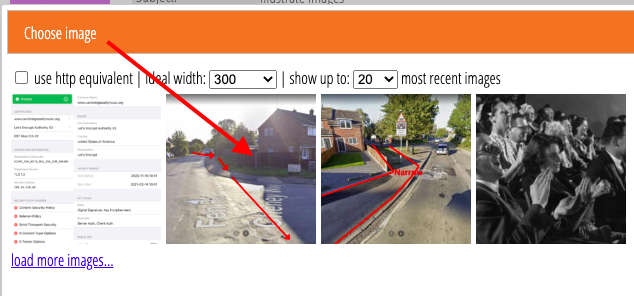
- a further box pops up which loads the images from your public site. Click one to insert its URL for you (Fig 3), and then click the Save button.
- replace an existing image by selecting it (click on it in the template content) and then use the image button; alternatively right click over an image and click the image button on the context menu that pops up (Fig 1: 2).
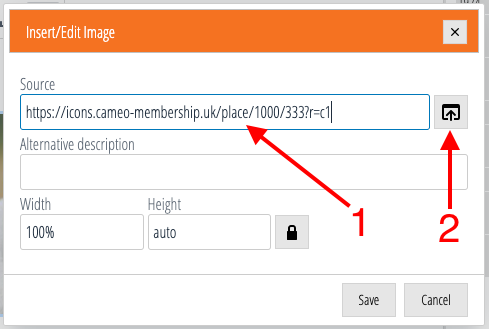
If the connection between Cameo and your site’s media library is not set up, the image selector button (Fig 2: 2) does not appear. If it is set up incorrectly an error message is displayed in the image selection box.
Image providers
Cameo provides a range of options for obtaining available images from your website:
- WordPress media library for independently-hosted WordPress sites, including file uploads
- WordPress media library for sites at wordpress.com (whose authentication arrangements are different), including file uploads
- Craft CMS, including file uploads
- Drupal site (Drupal is a fairly common content management system)
- Image gallery with download links (in particular, Apache web server’s index pages)
- JSON REST API
- Custom plugin for Cameo (a hand-crafted bit of code where no other alternative is available; this would be provided for you and is not discussed further here)
In Cameo:
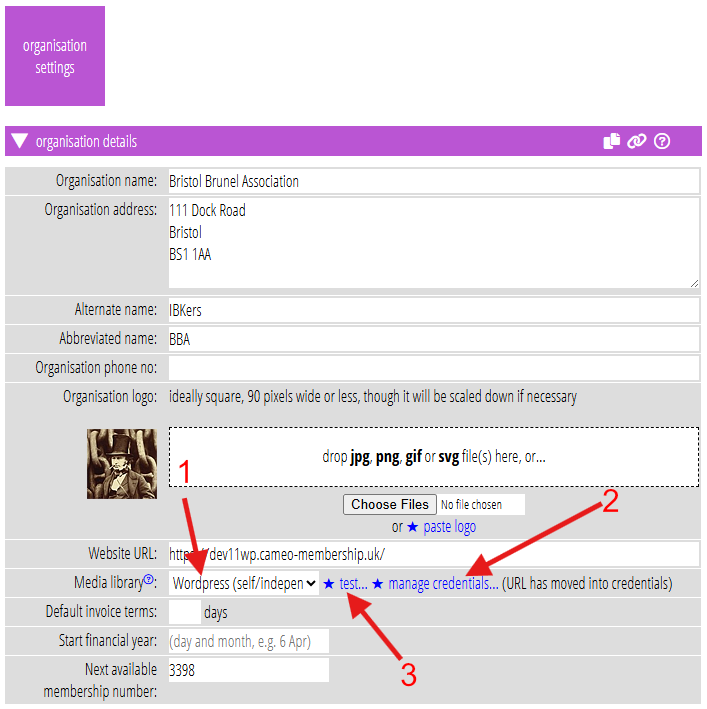
- Choose which of these is appropriate for your public site from the menu in Organisation Settings → Organisation Details (Fig 4: 1).
- Provide credentials allowing Cameo to talk to your media library. Usually, this will be at your organisation’s website, but if not you can also specify where to look along with the method-specific credentials (Fig 4: 2).
- Test it works (Fig 4: 3)
Craft CMS
Craft CMS (Cameo 11 only) takes a little more setting up at their end. Because of that, we have a separate article about using Craft CMS as media library, explaining what to do.
Gallery page
It is common to have a page on a website that links to each of the images, possibly also with thumbnails. Cameo can recognise a wide variety of such pages by looking for links to the images in the page’s HTML (using screen scraping).
Cameo looks for links on the page whose text matches:
- the word ‘download’ (case insensitive), possibly among other text
- an actual image (an HTML
<img>element; it will often be a thumbnail), possibly also preceded or followed by other text, but no other HTML elements - the name of the image file (e.g. “picture.jpg”) which is the same as the last portion of the URL which the link refers to – in HTML, something like:
<a href="https://example.com/image1.jpg">image1.jpg</a>
or just<a href="image1.jpg">image1.jpg</a>
The last of these is typical of an Apache directory listing. The Options +Indexes directive allows Apache to generate an index page. So if your images are all in one directory, this is a very easy way to make them available to Cameo.
JSON API
If you do not know what a JSON API is, this section is not for you.
If you have a custom written site, it is relatively easy to add code to deliver a JSON structure describing the images. The JSON Cameo expects looks like this:
[
  { "thumbnail": "https://example.com/tn1.jpg",
    "title": "Image 1",
    "urls": [
      { "url": "https://example.com/im1_small.jpg", "width": 300 },
      { "url": "https://example.com/im1_large.jpg", "width": 600 }
    ]
  },
  { "thumbnail": "https://example.com/tn2.jpg",
    "title": "Image 2",
    "urls": [
      { "url": "https://example.com/im2_small.jpg", "width": 300 },
      { "url": "https://example.com/im2_large.jpg", "width": 600 }
    ]
  }
]
The expected object returned by the API is an array of images. Each image is an object comprising:
thumbnail, a URL identifying a thumbnail representation of the image (which can be the original if a true thumbnail is not available),title, the title of the image, andurls, an array of further objects, each identifying the same image at one or more different sizes, comprising:url, the URL of an imagewidth: the width in pixels of the image- (optionally)
height: the height in pixels of the image
Authentication credentials
There is no particular need for the image list page to be confidential. The images need to be publicly accessibly anyway. However, sometimes access is restricted by the provider. For example, the popular WordFence and iThemes Security plugins for WordPress disable access to its API except with a password. If you’re using an Apache index page, you might choose to protect it, as it is rather ugly.
You may also find it convenient to be able to upload images or documents from Cameo to your WordPress media library. That avoids the need to go back and forth between WordPress and Cameo, but requires credentials. This capability was added in April 2024: see these articles:
- Add images to WordPress media library inside Cameo
- Paste images to WordPress media library inside Cameo
- Upload and link to file in WordPress media library, in Additional editor controls
- News builder block for file “attachments”
In these cases you’ll need to provide Cameo with some credentials it can use to access your site to obtain the list of images. Cameo currently only supports Basic Auth credentials. WordPress offers this when the API is not publicly available, and this is also the natural mechanism for securing an Apache index page.
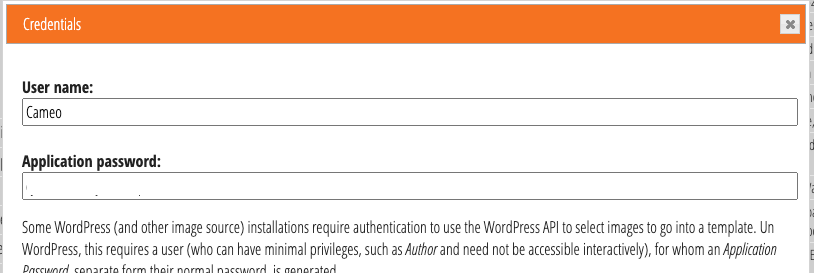
Provide a user name and password in the box provided when you click set/show credentials alongside the method selector (Fig 4: 2). This is only accessible to Cameo users with administrative privileges. The box explains how to obtain these for WordPress (Fig 5; more detail below).
WordPress
If the WordPress API is secured, you must provide an application password for a particular WordPress user. This is different from their usual interactive login password. Obtain this at the bottom of the user’s profile page.
However, some plugins may also suppress this by default, so you would need to turn it on. WordFence does this. To re-enable application passwords:
- go to WordFence on the main WordPress menu
- select All Options
- in the Additional options section, find Disable WordPress application passwords and un-tick (unb-check) the box.
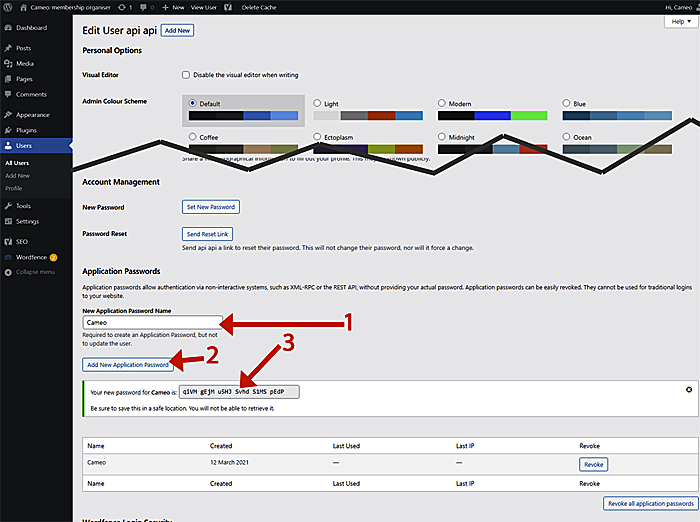
I recommend adding a new user to WordPress solely for this purpose (suggest calling it Cameo). That user can have limited privileges (e.g. Author) and an inaccessible email address. Once you have added the user:
- go to their profile page (Users > All Users, then click Edit under their user name),
- scroll to the bottom, to the Application Passwords section (Fig 6).
- for New Application Password name just provide a descriptive name of what this password is for(Fig 6:1). This is just for reference. I suggest Cameo!
- Click the Add New Application Password button (Fig 6: 2)
- Copy the password provided (Fig 6: 3) and paste it into Cameo’s password box (Fig 5). The password comprises six groups of four alphanumeric characters. You can leave the spaces between them in, or not, as you prefer.
- Cameo’s user name box refers to the name of the WordPress user, not the name you put in the New Application Password name box at Fig 6: 1.
Gallery and JSON
If gallery pages or JSON API is protected with Apache’s Basic Auth, whoever set that up will need to provide the user name and password, to go in the credentials box in Cameo.
If you do not know what Basic Auth is, the rest of this section is not for you!
To set up Basic Auth you will need to protect the index page (or API endpoint), but not the images themselves (especially if these are located in a subordinate URL – for example if the index page is at https://example.com/myimages and the images are, for example, https://example.com/myimages/animage.jpg).
First, use the htpasswd utility to make a password file. For example: htpasswd -c /etc/apache2/cameo.htpasswd cameo
Then use the following directives for your directory path (this assumes Apache 2.4):
<Directory /path-to/myimages>
    AuthType basic
    AuthName "private area"
    AuthUserFile /etc/apache2/cameo.htpasswd
    Require valid user
</Directory>
If your images are in that directory, you will also want:
    <FilesMatch ^*\.(jpg|png|svg|gif)>
        Require All Granted
    </FilesMatch>