
Note: much of this article has been superseded by the visual form editor and simplified form hosting in Cameo Version 9.
Cameo manages your membership data for you, but until now you had to write code on your main website to provide self-service joining, updates and other management. This is still possible, of course, using Cameo’s programmer API. But Cameo’s forms now provide a non-programmer way to put these on your website.
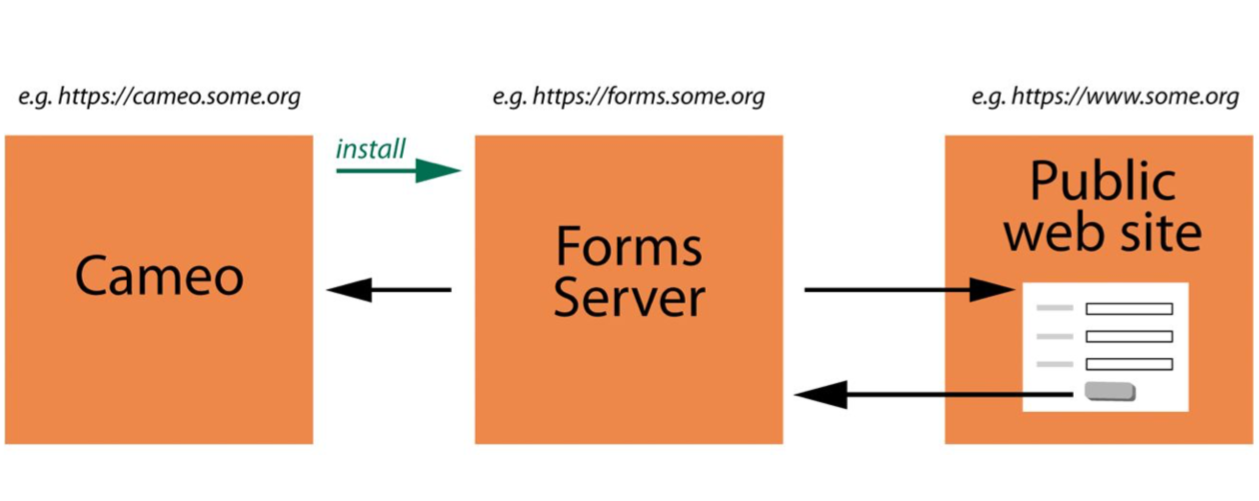
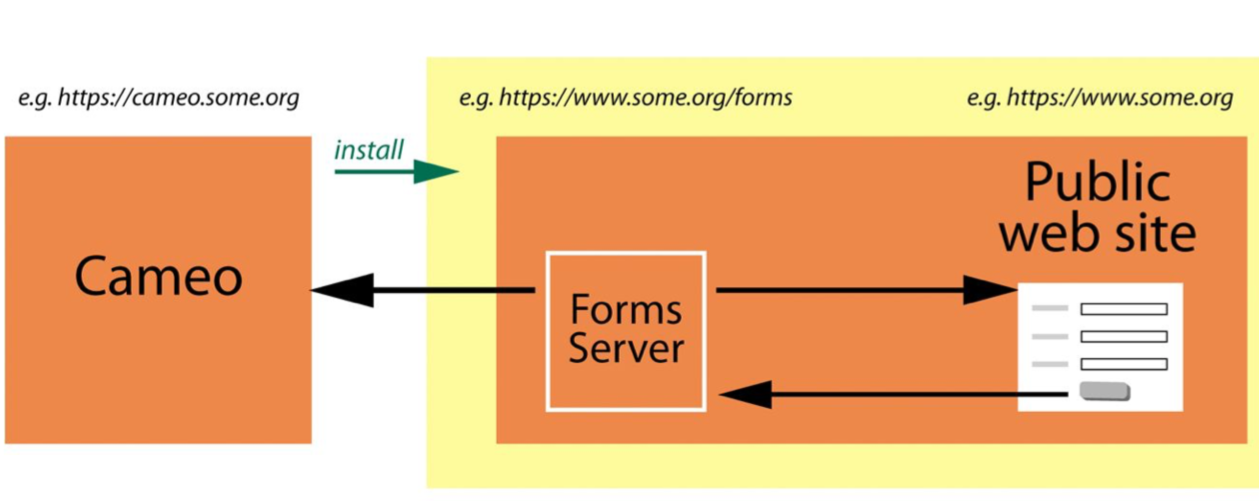
To illustrate here, we’ll use https://www.some.org as the main, public website, https://cameo.some.org as the corresponding Cameo installation, and, as we’ll see in a moment, a third URL https://forms.some.org as a forms server which acts as an intermediary between the two.
Cameo forms won’t deal with every desired presentation style and field, but they reduce the barrier to providing the basics, in a way that is:
- customizable,
- suited to any website, including taking advantage of WordPress if that’s your site’s technology,
- adopts your website’s basic appearance, such as font and form inputs
- and further styling if needed with custom CSS (the web’s styling language).
- supports various payment processors: PayPal, Stripe (card payments), GoCardless (Direct Debits), Charities Aid Foundation, prepaid vouchers (like phone top-up cards which you sell in advance), and manual (cash, cheques, bank transfers, standing orders),
Contents
The basics
Here’s what happens:
- Forms are created in Cameo in the pink Forms section. This requires your administrator to provide access
- Form types are provided for various common operations – signing up contacts, for example – so you choose the one you want, give it a name, give your preferences for which fields you want, in what order, and how to describe them. While you can interleave longer text between fields, you won’t usually need lots of text because the form will be embedded in one of your web pages where it can be surrounded by other content (which you provide in whatever way you usually would for your website).
- When you’re ready you then install your forms onto a separate forms server, which is a separate website which doesn’t provide web pages, but instead acts as an intermediary between Cameo and your website. Once set up, this is just a simple button press, and you do the same to update forms (either for changes you make or those provided by Cameo).
- Then you embed the form in a page on your main website. In WordPress sites, you can use Cameo’s WordPress plugin to embed the form with a WordPress shortcode; otherwise it is a single line of HTML which Cameo provides for you.
- When someone fills in the form, it then communicates back to Cameo, via the forms server to provide or update existing information.
Why a separate forms server? Doing it this way means Cameo doesn’t need access to your website, which are many and varied, but can still display forms in a way that can adopt your website’s style. In principle, Cameo could serve the forms itself to your website, rather than using an intermediary; we don’t because:
- Cameo can often run on low-powered servers, and adding publicly accessible pages might overwhelm it
- Some operations, such as new contacts and members, don’t necessarily need direct access to Cameo (which then fetches the information as required). This means it could be run behind a firewall with no public access (the range of forms you could use is quite limited in this case though).
However,
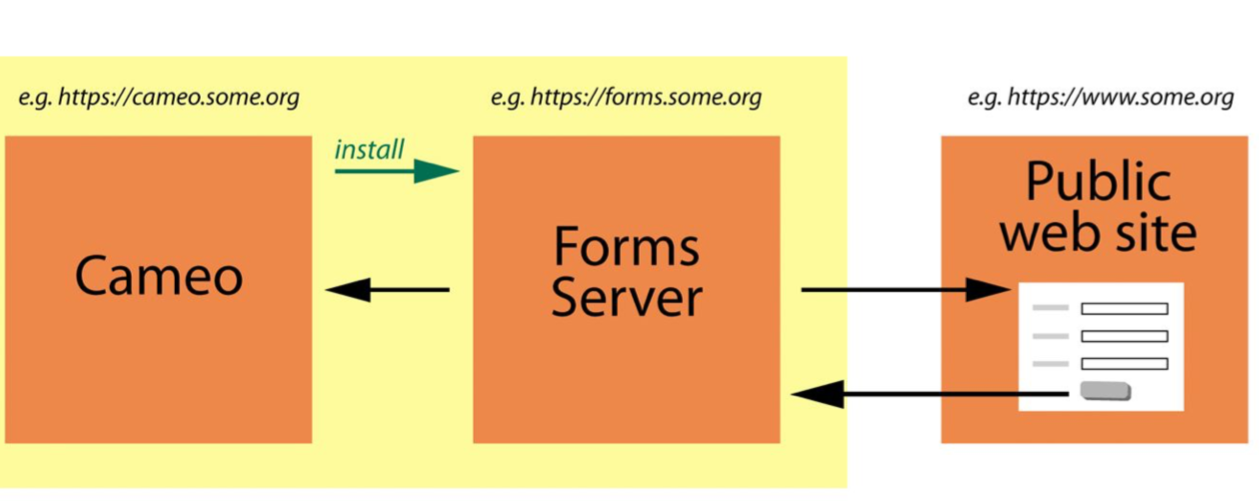
- it will be very common for the forms server to be hosted on the same physical server as your public web site, or indeed the same server as Cameo if it can support it (though this is a slightly less reliable a solution)
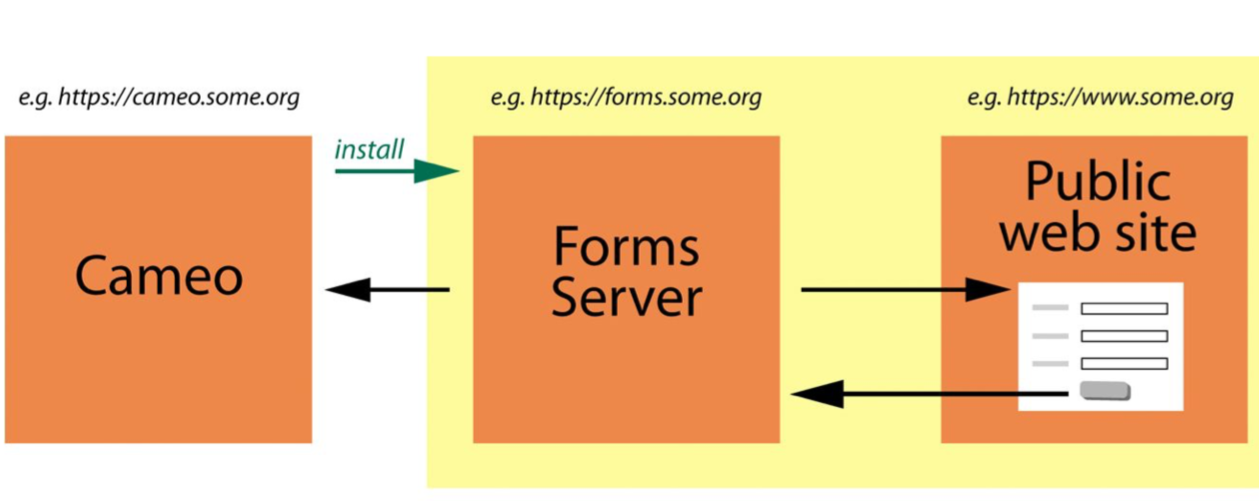
- it is also possible to set up the forms server to actually be a subsidiary part of your main website. For example, if you are https://www.some.org your forms server would be best as e.g. https://forms.some.org but could actually be https://www.some.org/forms.
Requirements
The forms server needs to run on a machine with the following installed:
- Linux
- Apache web server preferred
- PHP 5.6 or later (PHP 7 recommended)
- other software: openssl, zip/unzip, curl
Setting up
There are a few one-off steps needed to let Cameo and the forms server communicate with each other.
- Firstly, your domains need to operate over TLS (aka SSL or HTTPS), which uses certificates to encrypt communication between the visitor and your web site, and also now the forms server site. Your provider will be able to advise about this. However, it should not be necessary to pay for certificates: they are available free from LetsEncrypt.org. You are collecting personal information: the law requires that these be kept secure. This is one aspect of that.
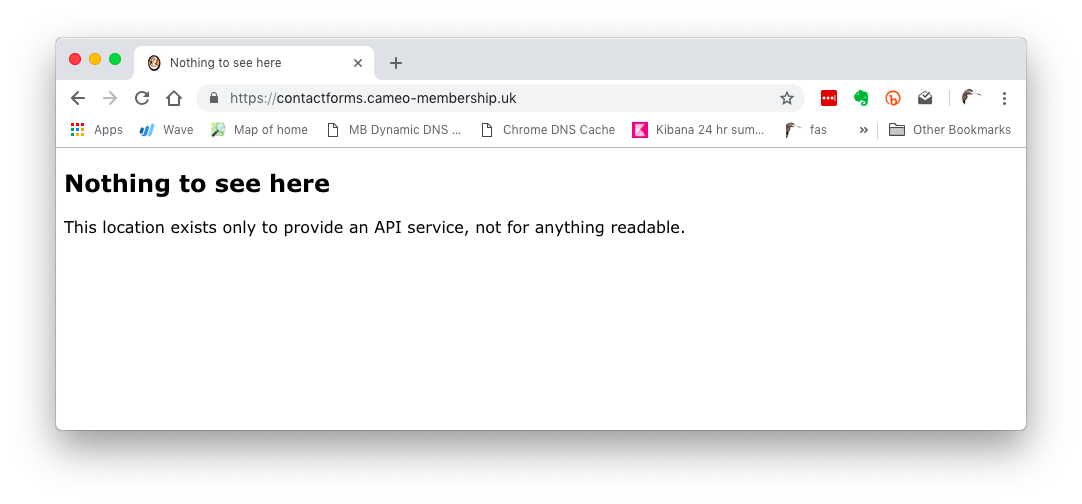
- Setting up your (empty) forms server depends on your provider. Often the domain name (e.g. forms.some.org) and corresponding directory (folder) on its server would be created for you by your provider if you’re on host shared with other websites – you’d just need to ask them. Some providers give you a control panel where you can do this yourself. cPanel is a common dashboard where you can manage your websites and files on the server. If this just isn’t possible, then you can use the tools you normally use to add it as a directory/folder to your public site. Check that you can see the site by entering its URL in the web browser. You should see the following:
- Create a separate directory/folder on your website to hold data. This shouldn’t normally be within the directory tree that holds the website’s files: usually you’d put it alongside, but it can be anywhere. For example if the path of the website files in your server is
/home/some/forms.some.org_htmlyou might create/home/some/forms.some.org_data. It must be possible for the web server serving the forms (often Apache) to write to this directory – consult your provider’s instructions for how to do this. It is common for your web server on a shared host to run under your account, in which case just creating the directory would typically be enough
In extremis, if there is no other choice (for example, you are using a specialist WordPress only provider, which doesn’t offer direct control, only through the WordPress dashboard, and you can’t host the forms server elsewhere), you can put the data directory as a sub-directory in the forms server or public site’s directory. Cameo protects this from public access when your web server is Apache. However if it is something else (the other common ones are Nginx and Microsoft IIS), then it is essential to take steps to protect the data directory from public access according to the method your web server provides, otherwise personal data would be available to anyone who can guess the URL.
- Tell Cameo about these two places, in the Forms Install section. In our example, this means
https://forms.some.orgin the first box (1) and/home/some/forms.some.org_datain the second (2).
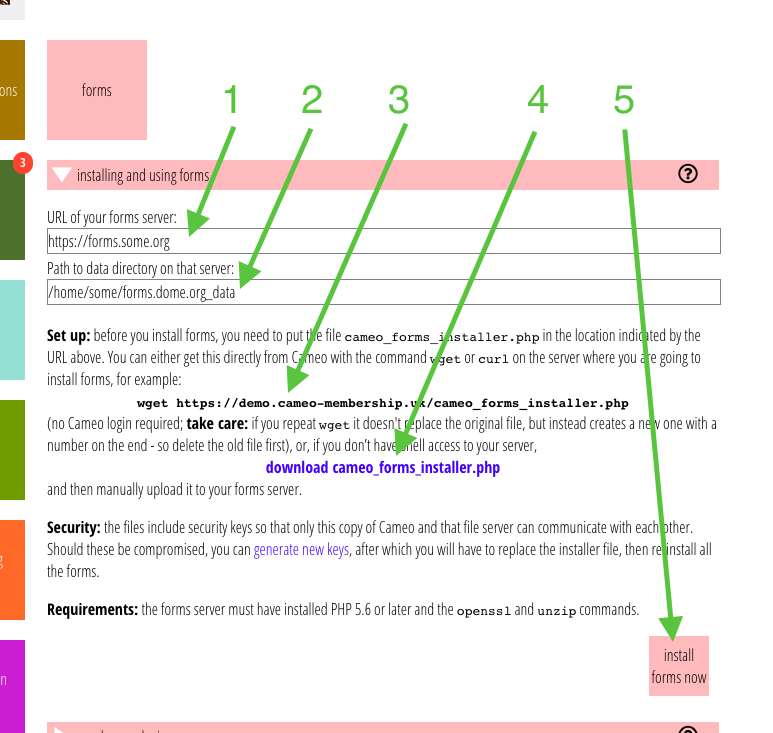
- Put the file provided in the Forms Install section onto your forms server (in
/home/some/forms.some.org_htmlin the example – not the data directory!). You can do this in two ways:
pull: if you have shell access (command line access) to your server, use thewgetcommand provided (3) to copy the file from Cameo into the server.
push: download the file with the link provided (4) and upload it to the server using your provider’s control panel or a program like FileZilla, Forklift, Cyberduck etc., or
This file is unique to the Cameo and forms server pair, and allows Cameo to securely place the necessary files on the forms server, but no one else.
- You can now either wait until you have created a form, or install the files shared by all forms onto the forms server by pressing the Install button in Cameo (5). The first time you do this will take longer as it has to install all the files that support third-party payment providers such as Stripe.
- If your public site (https://www.some.org) is WordPress, you should also install Cameo’s WordPress plugin. This allows easy embedding of a form in a page:
Download thecameoformsplugin from the WordPress section in Cameo’s Forms menu, and install and activate it in your public site from the WordPress dashboard. You’ll need to click the Upload button in Add New plugin and select the zip file you downloaded from Cameo (step by step instructions are in the help for this section).
Note that the WordPress plugin contains the location of the forms server, so it won’t work on a different site that uses a different install of Cameo and/or a different forms server. In particular, if you’re running a parallel test public site, forms server and Cameo, download separate copies of the plugin from the different Cameos.
Creating a form
Once the forms server is working you can then create a form.
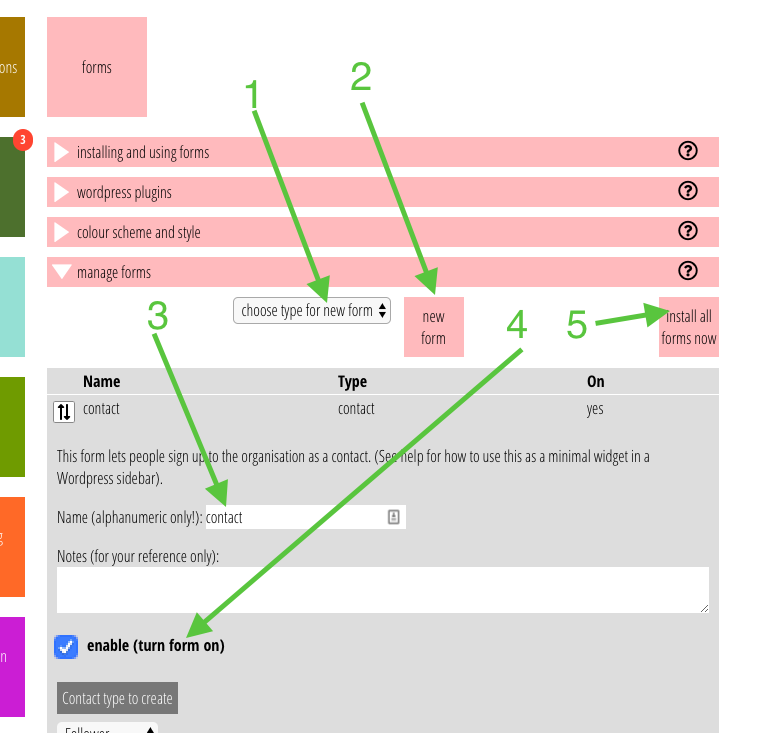
Go to forms → form editor, choose the type for form (1), and click the new form button (2). The new form definition appears below, with the details open ready to complete. When you have more forms they will also appear here in summary; click the summary to see the detail.
You can name the form if you want (3), though the name provided is usally just fine. Initially that’s the same name as the form type (e.g. contact, or contact2 etc if you have more than one form of the same type – you might do this to collect different information in different contexts, or just possibly on different public sites).
Then complete the main part of the form, changing which fields visitors will see, in what order, your preferred prompts and other text and so on. You may want to try the default settings first to see what they look like before customizing it. You might want to try this on a staging or test copy of your public site before exposing it to the world.
Finally enable the form (turn it on, 4) by ticking the box near the top and install all the forms onto the forms server, including your new one, by pressing the install all forms now button at the top of the section (5).
Displaying a form
The final link in the chain is to embed the form on your chosen page in your public site. The details are shown at the bottom of each form definition.
Non-WordPress sites
On non-WordPress sites, you need to arrange for a line of HTML to appear in the page at the desired position, for example like this:
<script src="https://forms.some.org/contact.js"></script>
You would use the domain name of your forms server in place of forms.some.org and the name of your form (not the type, though these are often the same) instead of contact.
WordPress sites
On WordPress sites you should have installed Cameo’s WordPress plugin to do this, as above.
To embed the form, type in a WordPress shortcode in the text of the page in the site’s page editor, at the point where you want it to appear. A shortcode is a widely-used way to include pre-defined page elements. For example like this:
[cameoform form="contact"]
Substitute the name of your form instead of contact. The Cameo plugin that handles this knows where the forms server is so it can substitute the script tag as above at the right point in the page. While you could open up the HTML editor and enter the script tag above manually, this isn’t recommended, as the WordPress editor has a habit of removing elements it doesn’t recognise, though the new WordPress Gutenberg editor seems to do a better job.
Test it
Either way, when you visit the public page, you should now see the form as any other visitor would see it. There may be a short pause after the page loads before the form appears, while it is fetched from the forms server.
Some forms talk directly to Cameo to complete their task. Others save the data in the data folder on the forms server, to be collected later by Cameo.
Some forms send email (if you request this when setting up the form). This is typically in two contexts:
- to send an email to an address Cameo has in a membership record, or has been supplied in the form, to validate the identity of the person who has filled in the form. This email will contain instructions to click the link provided (which will reference the page they are on, containing the form, with an authorisation code attached to it).
- to confirm the data has been received and acted on.
Rather than setting up a whole separate system to do this on the forms server, this is handled by Cameo’s templates in the usual way. The form definition explains exactly what is needed if you tick the box to request that email is sent.
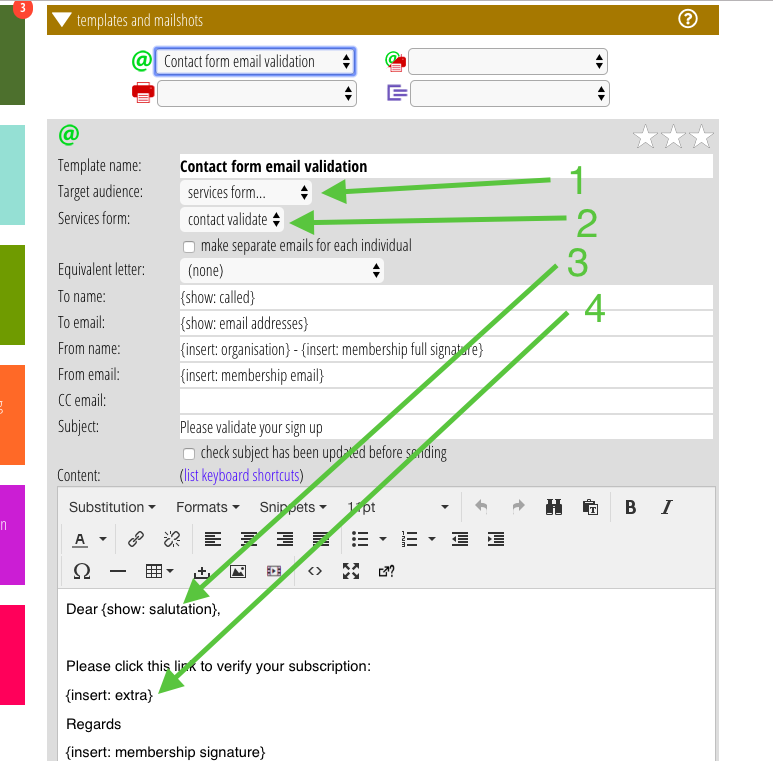
The template differs slightly from ordinary mail shots in three respects:
- the audience that should be selected for the template. You should choose services form for the template audience (1), and then select the specific form and operation that it responds to (2). Typically this will be the name of the form (not the form type, though these are often the same) followed by the context, for example
contact validate. - most forms require some detail provided by the form to be shown in the email. To do this use the
{insert: extra}substitution (4). For example, for a validation email, this inserts the link they must click to confirm they have received it. - not all the usual substitutions are available, depending on the context. This is particularly the case when creating a new membership or contact record, because the record has not yet arrived with Cameo. Instead a temporary “faked” record is created which can supply minimal details, particularly for
{show: salutation}to be able to address them (3), and others depending on the form: what you can use is listed in the form definition.