Cameo displays lots of things in a summary table with more detail and controls to make changes if you expand the summary. These share a common look and feel. Many have filters and/or sorting controls in the table header. This article explains how to use these tables and filters.
Contents
Basics
We’ll use the Events section as a typical example (Fig 1). When you enter the section by clicking on the section heading, it shows a list of events that have been added to Cameo.
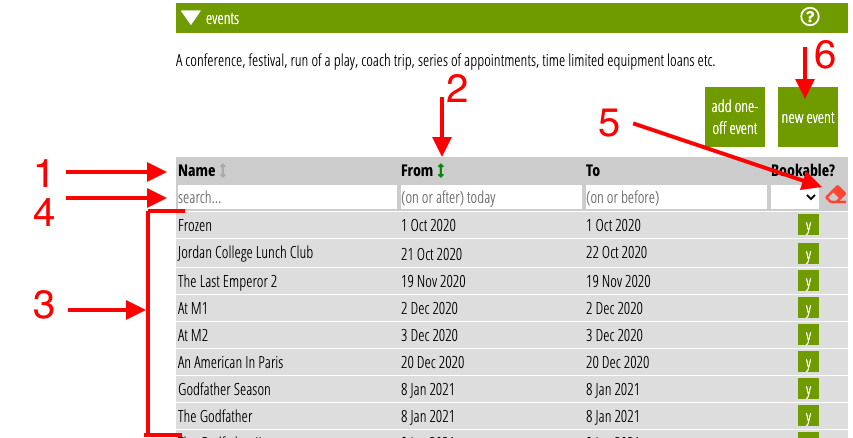
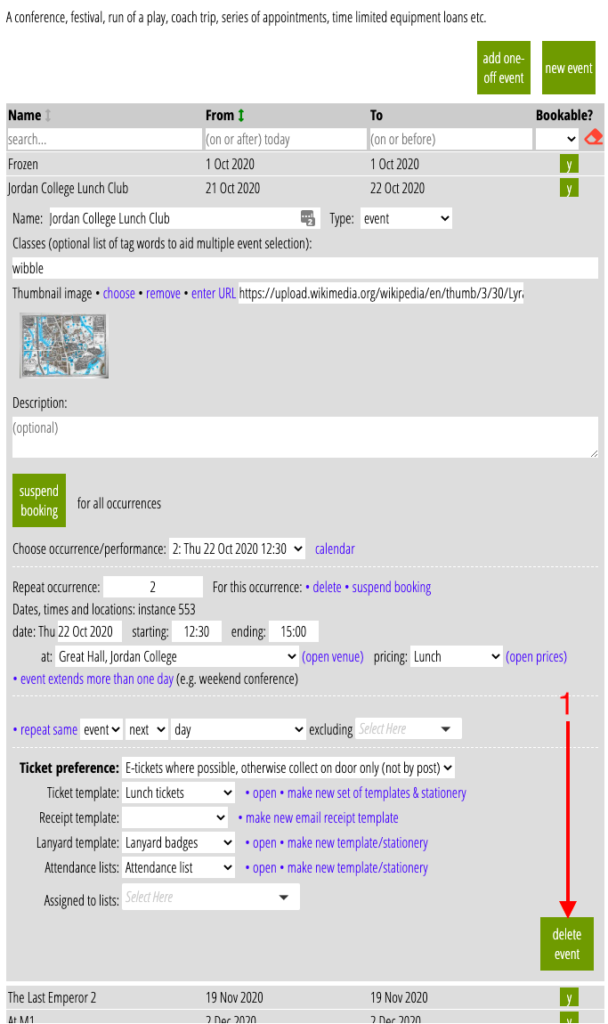
Each row shows a summary of an item (Fig 1: 3), in this case, an event. Clicking anywhere on that row will expand the summary to show the full detail for the item (Fig 2).
The columns are described briefly in the column headings (Fig 1: 1). If this is an abbreviation (to save space), you can hover over the heading to see a longer heading.
Where appropriate, column headings are followed by a small green or grey arrow (Fig 1: 2). Click on one to show the table sorted according to that column’s contents. The green arrow indicates which column the table is currently being sorted by. In some cases, particularly dates, you can click again to sort in reverse order.
Searching tables using filters
In longer tables, there is usually a second header row offering a series of boxes which are used to filter the table contents (Fig 1: 4): that is, to show only those rows matching the filters given by the boxes (all of them, when more than one is filled in). In short, to search a column according to the box in the column’s heading.
Text filters, like names and dates, respond as you type. Where a column shows a limited number of possibilities, the filter is a menu from which you can pick one (or often, more than one) to show rows matching the selected values.
For example, initially, the events list shows forthcoming events, those with any performance on or after today. If I want to show those with earlier dates, I can put, say, 1 Jan 2019 in the From date filter box and past events on or after that date will be shown. If I further type a few characters in the name box, I’ll see those earlier events, but only those whose name contains the characters typed.
For things like dates and membership numbers, if you type invalid content the filter is shown with a pink background and ignored. So when I start typing 1 Jan 2019, the filter will not take effect until I have typed at least 1 Jan, the first recognisable date.
Clear all the filters by clicking the eraser icon at the beginning or end of the filters (Fig 1: 5). You can also press ALT+= on the keyboard to clear filters (i.e. = while holding down ALT).
Details and changes
Click on any row to expand that row to show the full detail for the item (Fig 2). Any changes you make happen straight away (there is no Save button). Some tables don’t have any further detail.
To add a new item, click the New button on the right above the table headings (Fig 1: 6). This makes a minimal item placed as the first row of the table. Change and add to the minimal detail.
The button to Delete an item is at the bottom right of the detail for the item. For items that don’t have any expandable detail, any Delete button will be a × at the end of the row.
Depending on what kind of item it is, there may be other things you can do with the item as a whole (copy it, for example); buttons for these will mostly be at the bottom left opposite the Delete button.