You might want to sell event tickets in person, either in advance or at an event. You could do this instead of, or as well as, offering online bookings through the bookings form. This article shows you how you can use Cameo to operate box-office-style bookings.
Find Cameo’s box office in events & bookings → reservations, bookings and attendance. You’ll need to define stationery and a template that fits your printer, in communications → templates and mailshots.
Contents
Prerequisites

- You’ll need a computer, iPad or phone with a reliable internet connection at your ticket desk, so that you can use Cameo
- You’ll almost certainly need a ticket printer.
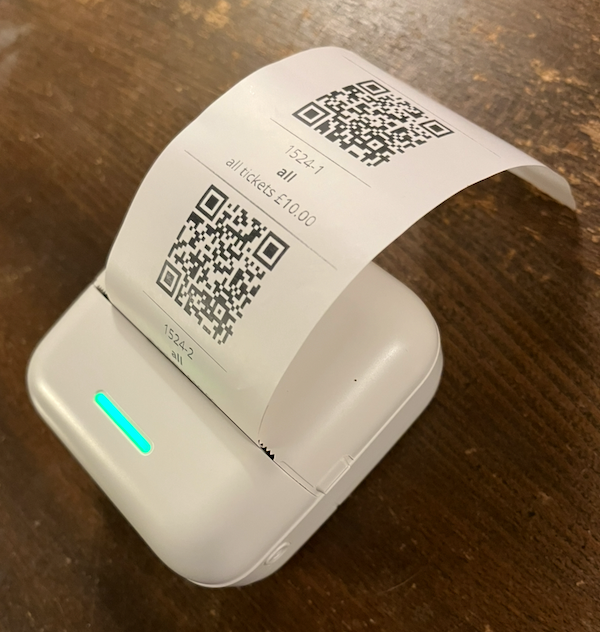
- You can buy dedicated ticket printers. You’ll have seen these (see right): they print on letterbox format light card that feeds from a perforated concertina pack. (Sometimes organisations use pre-printed branded ticket blanks). However, as somewhat specialised equipment, they are pretty expensive. They also need a power source.
- Alternatively, you could use an ordinary laser printer, printing on ordinary paper sheets, especially when printing a batch of tickets for collection before an event. Your stationery could print several bookings on the same sheet to make the best use of paper.
- However, for modest numbers of tickets, a neat solution for on-the-day bookings uses an almost-a-toy, cheap, Bluetooth, battery-powered, thermal roll printer. These don’t typically have printer drivers to make them available from any app. Instead, they work through a separate app. Combined with an iPad or phone, you can have a power- and wire-free ticket desk. We’ll use that here as an example. The main difference in Cameo is the stationery layout for your tickets.
- You’ll want a means for taking payment. For example, a Zettle card reader machine and account.
Bluetooth mini printer
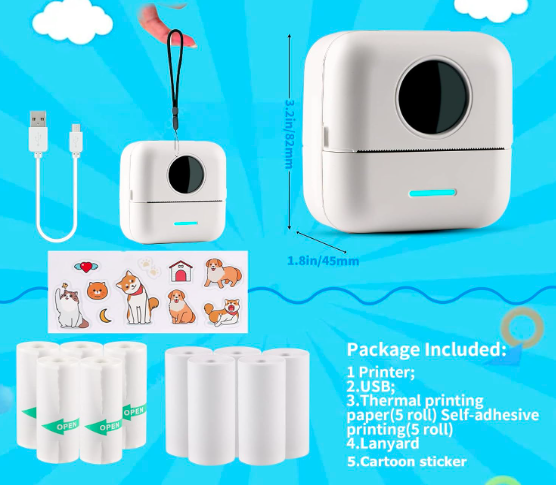
I found one of these HuiJuKeJi mini Bluetooth battery-powered printers on Amazon for under £25 (Fig 1, Fig 11).
Thermal paper rolls are 58mm across and widely available. (Some similar printers use 80mm rolls). They don’t print fast (1 – 2 cm/second), but barcodes are readable without problems. You can reduce printing time by using shorter tickets. I made them roughly square.
Most printers like this use more-or-less standard printing commands. So there are numerous apps which you can use to print to this and similar printers. I used Tiny Print from the Apple App Store on an iPad. Tiny Print is a phone app, but using it at double size on iPad is rather easier to use than on a small phone screen. The presentation is toy-like, but it works. The key is its ability to print web pages. So Cameo previews tickets in a web page and we print them in Tiny Print. It scales to fit, so we can get better quality by using twice the actual size for the tickets.
Ticket template and stationery
When you set up an event, Cameo creates a combination of an email ticket template, paper ticket templates and stationery if they don’t already exist. You need to reorganise the default letterbox format ticket layout to fit the thermal paper roll. (You can also define your own layout from scratch if you want, of course). A future version of Cameo will offer the thermal printer layout as an option.
The first “page” provides a receipt with event details, in two boxes. This is better in one box on the smaller thermal roll tickets. The remaining “pages” comprise:
- barcode in one stationery box, and
- ticket number and seat number (or perhaps all tickets for unreserved places) in a second box.
This can fit the more square format of the paper roll with only minor modifications.
First, define some new stationery to fit the thermal printer.
- In communications → templates and mailshots, find the template for paper tickets you created for the event.
- Click the manage stationery link (Fig 4: 2).
- Click the Add paper size button and provide the details for the thermal printer. Remember, we are using double size, so set say a 100 x 100 mm paper, and enter the description such as Thermal roll.
- Now add new stationery with the button provided, say called Thermal.
- Edit it, first selecting your Thermal roll paper size
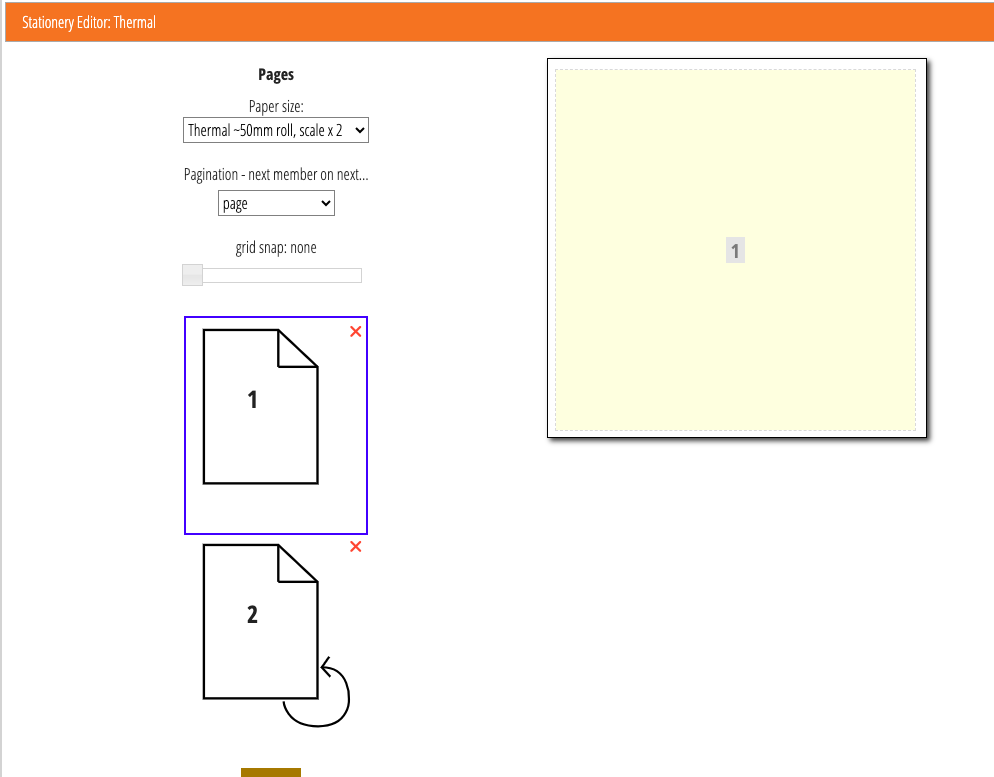
- Add a second page (which repeats for each separate ticket)
- On the first page (Fig 2), add a single box which almost fills the page. This accommodates your receipt details.
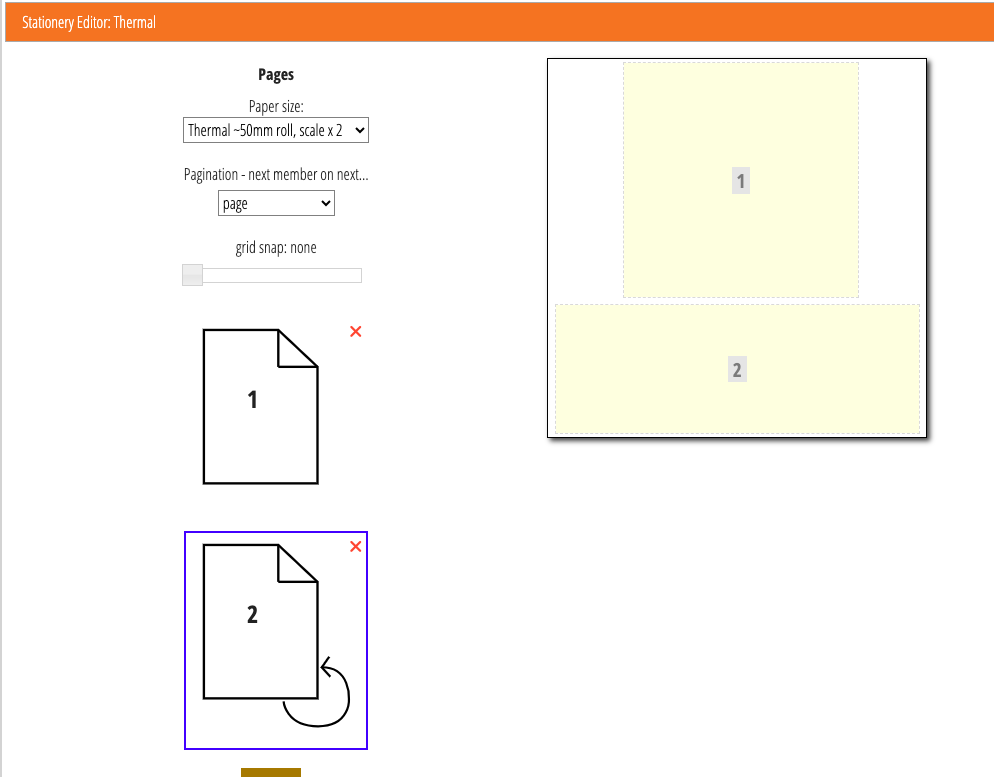
- On the second page (Fig 3) add a box for a QR Code, say 60mm square; and a second box underneath say 95 x 35 mm, allowing a small margin.
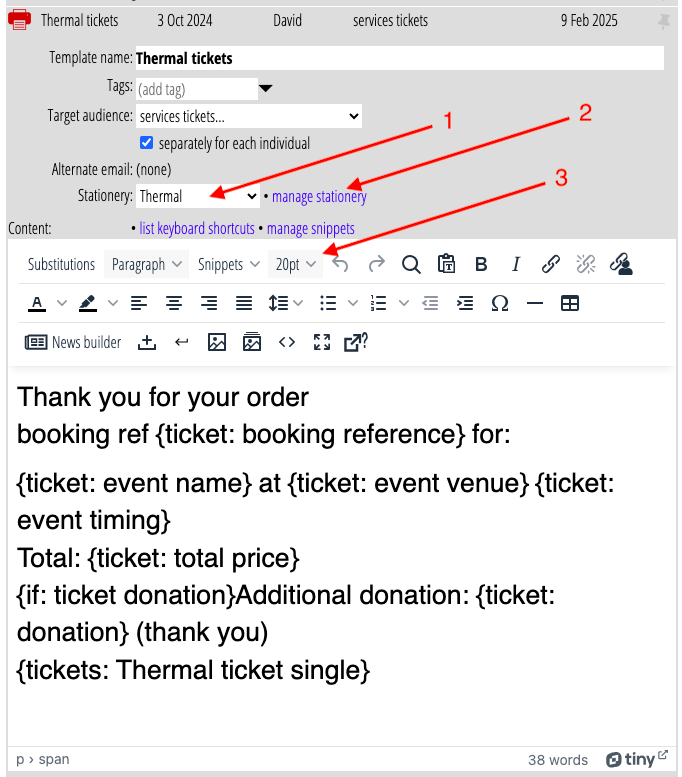
- Now returning to the template, select the new stationery for it (Fig 4: 1).
- Adjust the receipt details so they don’t have two next box elements. You’ll probably want to increase the font size (Fig 4: 3). The default would be too small in our scaled-up tickets. I used 20pt. You might need a little less if you have really long event names so they fit the page.
- A separate (subordinate) template produces the tickets themselves, repeated during merging by the
{tickets: ...}substitution at the end of the main template. Select that subordinate template, and adjust for the two boxes that we provided in the stationery. Select div (in next box) from the format menu to ensure content starts in the new box (rather than accidentally just squeezing in the QR Code box, for example)
Test tickets by locating or making a booking for an event which uses your template (see below for how to make a booking). You’ll need to choose the collect option – you don’t want to email tickets. Select tickets / receipts / lanyards for the booking and then one of the ticket test options. You’ll be able to see on screen whether everything fits before moving on to the printer (again, see below).
Box office bookings
To book and print tickets at the event, on a mini thermal printer using Tiny Print, first pair the printer (Fig 5: 1), then open Cameo in Tiny Print’s own browser (Fig 5: 2). If you plan to print tickets later, you can, of course, use an ordinary browser.
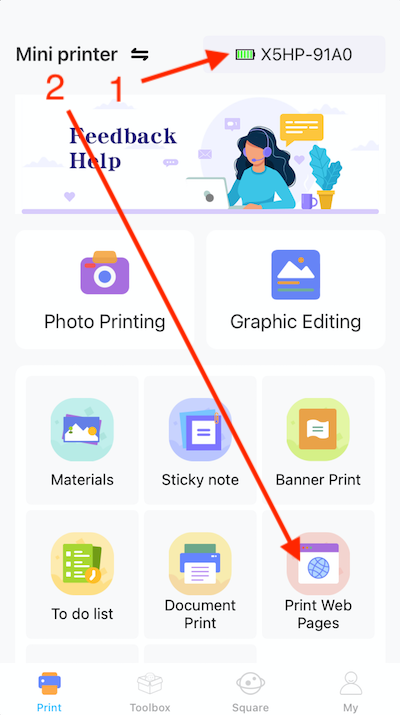
You’ll find it easier to copy and paste the URL from the ordinary browser than to type it. Log in. Then navigate to events & bookings → reservations, bookings and attendance. Because this is an iPhone app, it uses Cameo’s condensed interface for small screens. To open the main menu, tap the Cameo icon, then locate the section as usual.
Select the event you are booking for. Then under the Box office sub-section (Fig 6):
- Most likely, you’ll choose an anonymous booking (Fig 6: 1). Alternatively, you can create a new contact from the name you enter, or locate an existing membership from the main search box at the top. In the condensed interface, scroll to the very bottom of the page for located memberships.
- Then choose how many places (Fig 6: 2, Fig 7: 1) or, for a reserved seating event, the places you want from the seating plan).
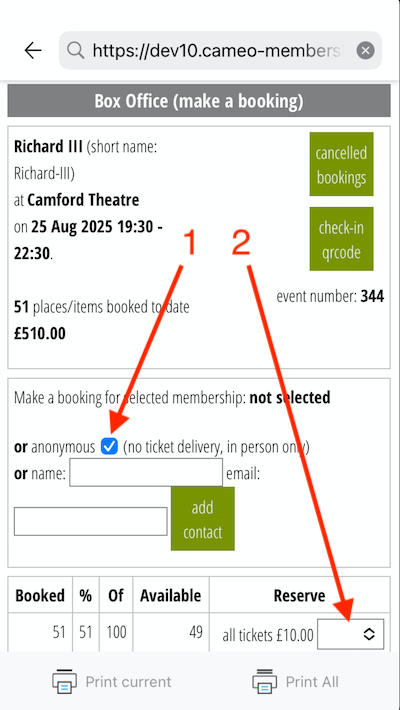
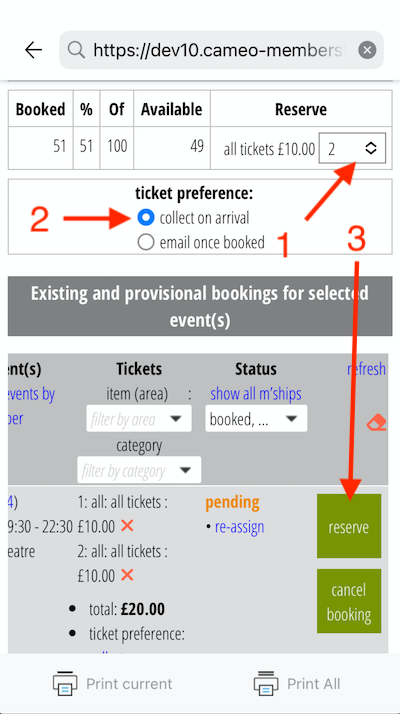
- Make sure to select collect for ticket preference (Fig 7: 2). As you proceed, you’ll see your pending booking at the top of the bookings list just below. (On the small screen you may have to scroll horizontally to see the rightmost part of the table).
- Click reserve (Fig 7: 3). As for the booking form, that secures the places for 20 minutes.
- Take payment.
- Once payment is complete, finalise the booking (Fig 8).
Printing the tickets
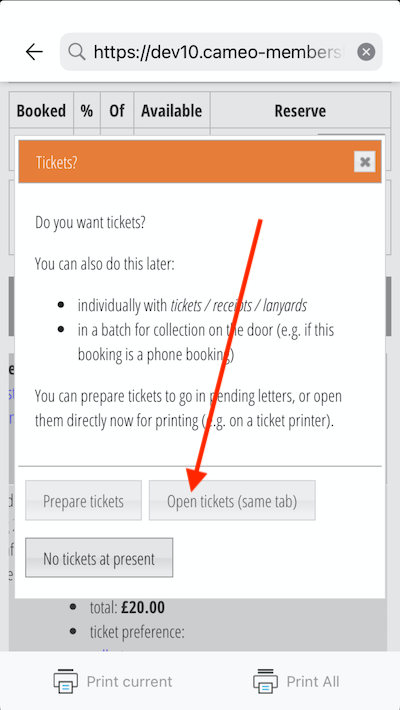
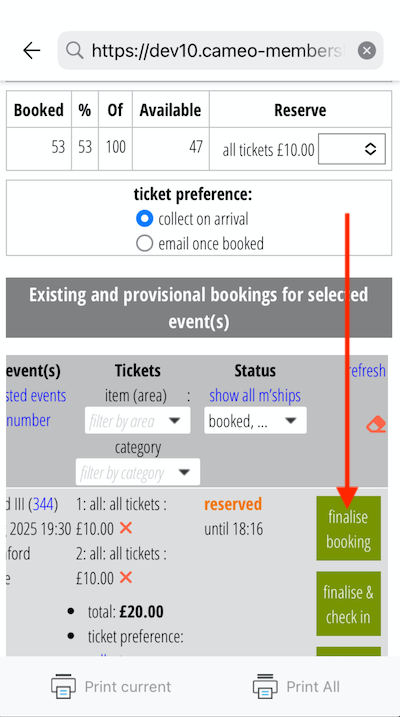
Finalising the reservation pops up a notice that you may want to print tickets (Fig 9). If this is an advance booking (even possibly over the phone), you may plan to print tickets for collection in a batch later, in which case dismiss this box. But for this example, we’ll proceed to print the tickets.
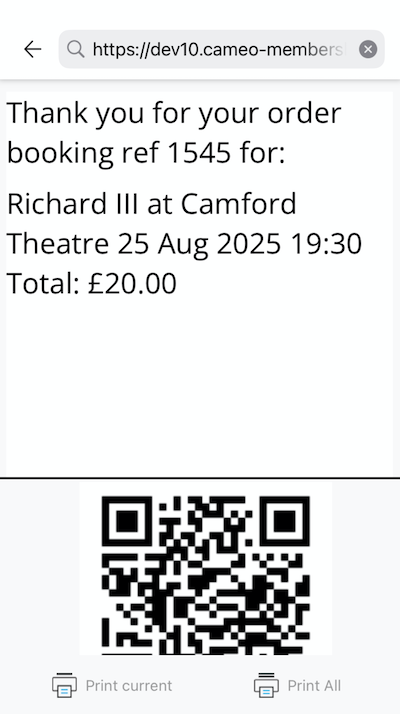
- Tiny Print’s browser cannot open multiple tabs, so we’ll open the tickets (Fig 9) in a new page in the same tab (Fig 10).
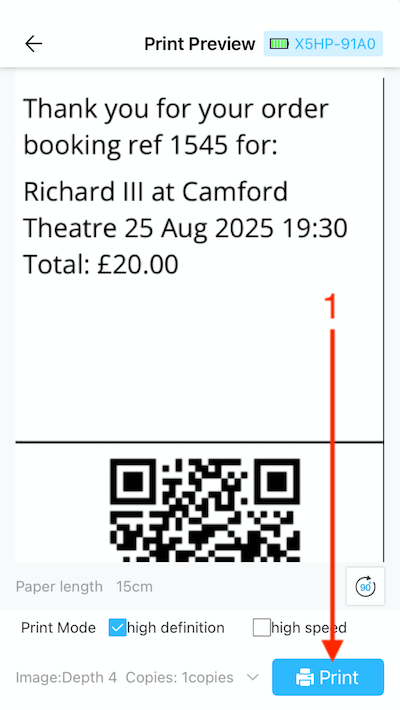
- Click Tiny Print’s Print All [pages] button at the bottom right (Fig 10). That shows a print preview window with a few printer controls, from where you can print the tickets (Fig 11: 1).
You’ll then need to press the browser’s back button (top left) twice to get back to the booking page, ready to make another booking for the same event.