
Providing for vouchers (for example, to pay for gift memberships) has proved popular. Cameo now provides significant additional automation to handle these more comprehensively:
- Voucher codes are generated automatically
- You can see the status and used value of each code
- Voucher codes integrate with shopping form order fulfilment
- Templates provide artwork for your voucher codes
- Voucher can provide a QR Code (printed) or link (in email) to a form where the recipient can redeem it, and fills in voucher number for them
- You can email codes (we still recommend printed codes for gifts)
- You can set voucher codes to expire
- You can cancel codes (for example if stolen)
Note: this concerns unique payment vouchers, not generic discount coupons (which are unchanged).
Contents
Background
Cameo has supported voucher codes as a payment method for some time.
Typically you would use these:
- To sell as gifts so one person can give another a membership as a present
- To sell memberships directly where it is inconvenient to fill in the entire join form
- As a means to pay for merchandise sales, usually as a gift voucher.
You can sell such codes using a shopping form. However, that is no different from selling a t-shirt, for example. Cameo did not provide any means to generate or manage codes. You simply told the payment method what voucher numbers it would accept and for what value. Much of the workflow was manual and outside Cameo. That meant arcane knowledge, which we try to avoid.
Now, Cameo manages voucher codes, integrated with the rest of the system. There’s quite a lot of “moving parts” to this, but they all dovetail together into a unified system.
Checklist
one-time set up
- choose voucher code style (admin → system preferences)
- decide preferred workflow (pre-issued/on-demand; print professionally/print in-house/email; different prefixes can use different workflows, and therefore templates).
- add voucher prefixes (trading → coupons and vouchers)
- set up template(s): later prefixes will usually default to the same as the first
- pre-print or pre-issue any stock of vouchers needed (repeat as more needed over time)
- set up payment method:
- with processor Voucher (organisation settings → payment methods)
- choose voucher prefixes for that method in (manage credentials)
- set up “bank” account for receiving voucher payments (organisation settings → bank accounts)
- add payment method to forms you want to accept those vouchers for
- add inventory items for different voucher prefixes (trading → inventory and stock)
- ensure you choose the voucher prefix that each represents
- make sure it is a live stock item (not draft)
- make a shopping form (forms → form editor) for purchasing vouchers
- include those inventory items as purchasable items
regular use
- fulfil online orders (trading → online sales)
- mark individual vouchers as sold if done manually (e.g. on a stall; trading → coupons and vouchers)
Setting up vouchers
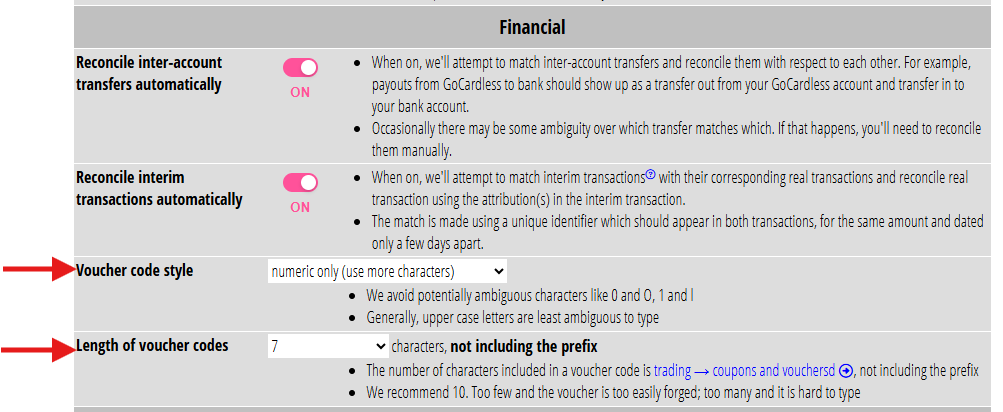
Cameo’s default for voucher numbers is to use a prefix followed by 10 random alpha-numeric characters. This is sufficiently long to not be guessable, but not too long to type. We exclude the potentially ambiguous 0 and O and similar.
However, if you want to change this pattern, you can do so (within reason) in admin → system preferences in the financial sub-section (Fig 1; incidentally, in this example, only 7 numeric digits is really not secure enough: as it says, use more characters!)
Managing vouchers
Manage vouchers in trading → coupons and vouchers (newly renamed; coupons are generic discount codes – they are not relevant to this article and have not changed).
Vouchers with a common prefix are grouped. Vouchers with the same prefix have the same value and other properties. For gift memberships different prefixes may well correspond to your membership tiers.
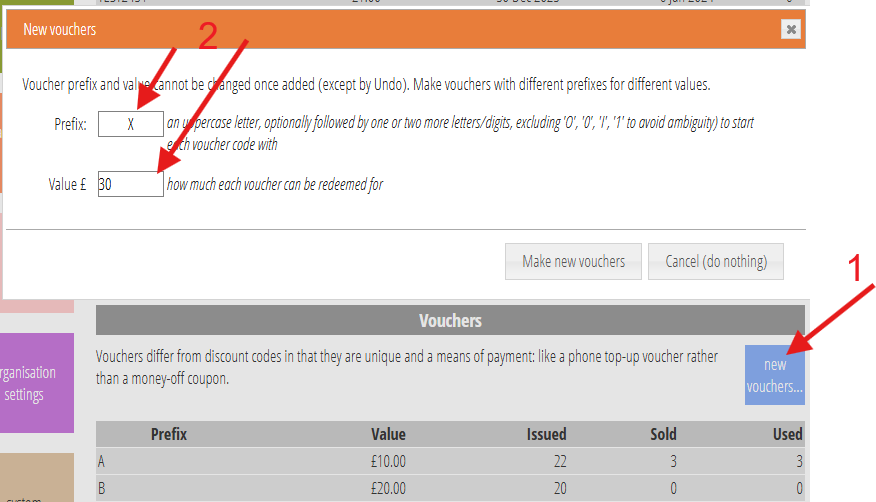
Use the new vouchers… button (Fig 2: 1) to add a new vouchers with a common prefix and value. The box that pops up asks for both of those (Fig 2: 2).
making a set of vouchers with a common prefix
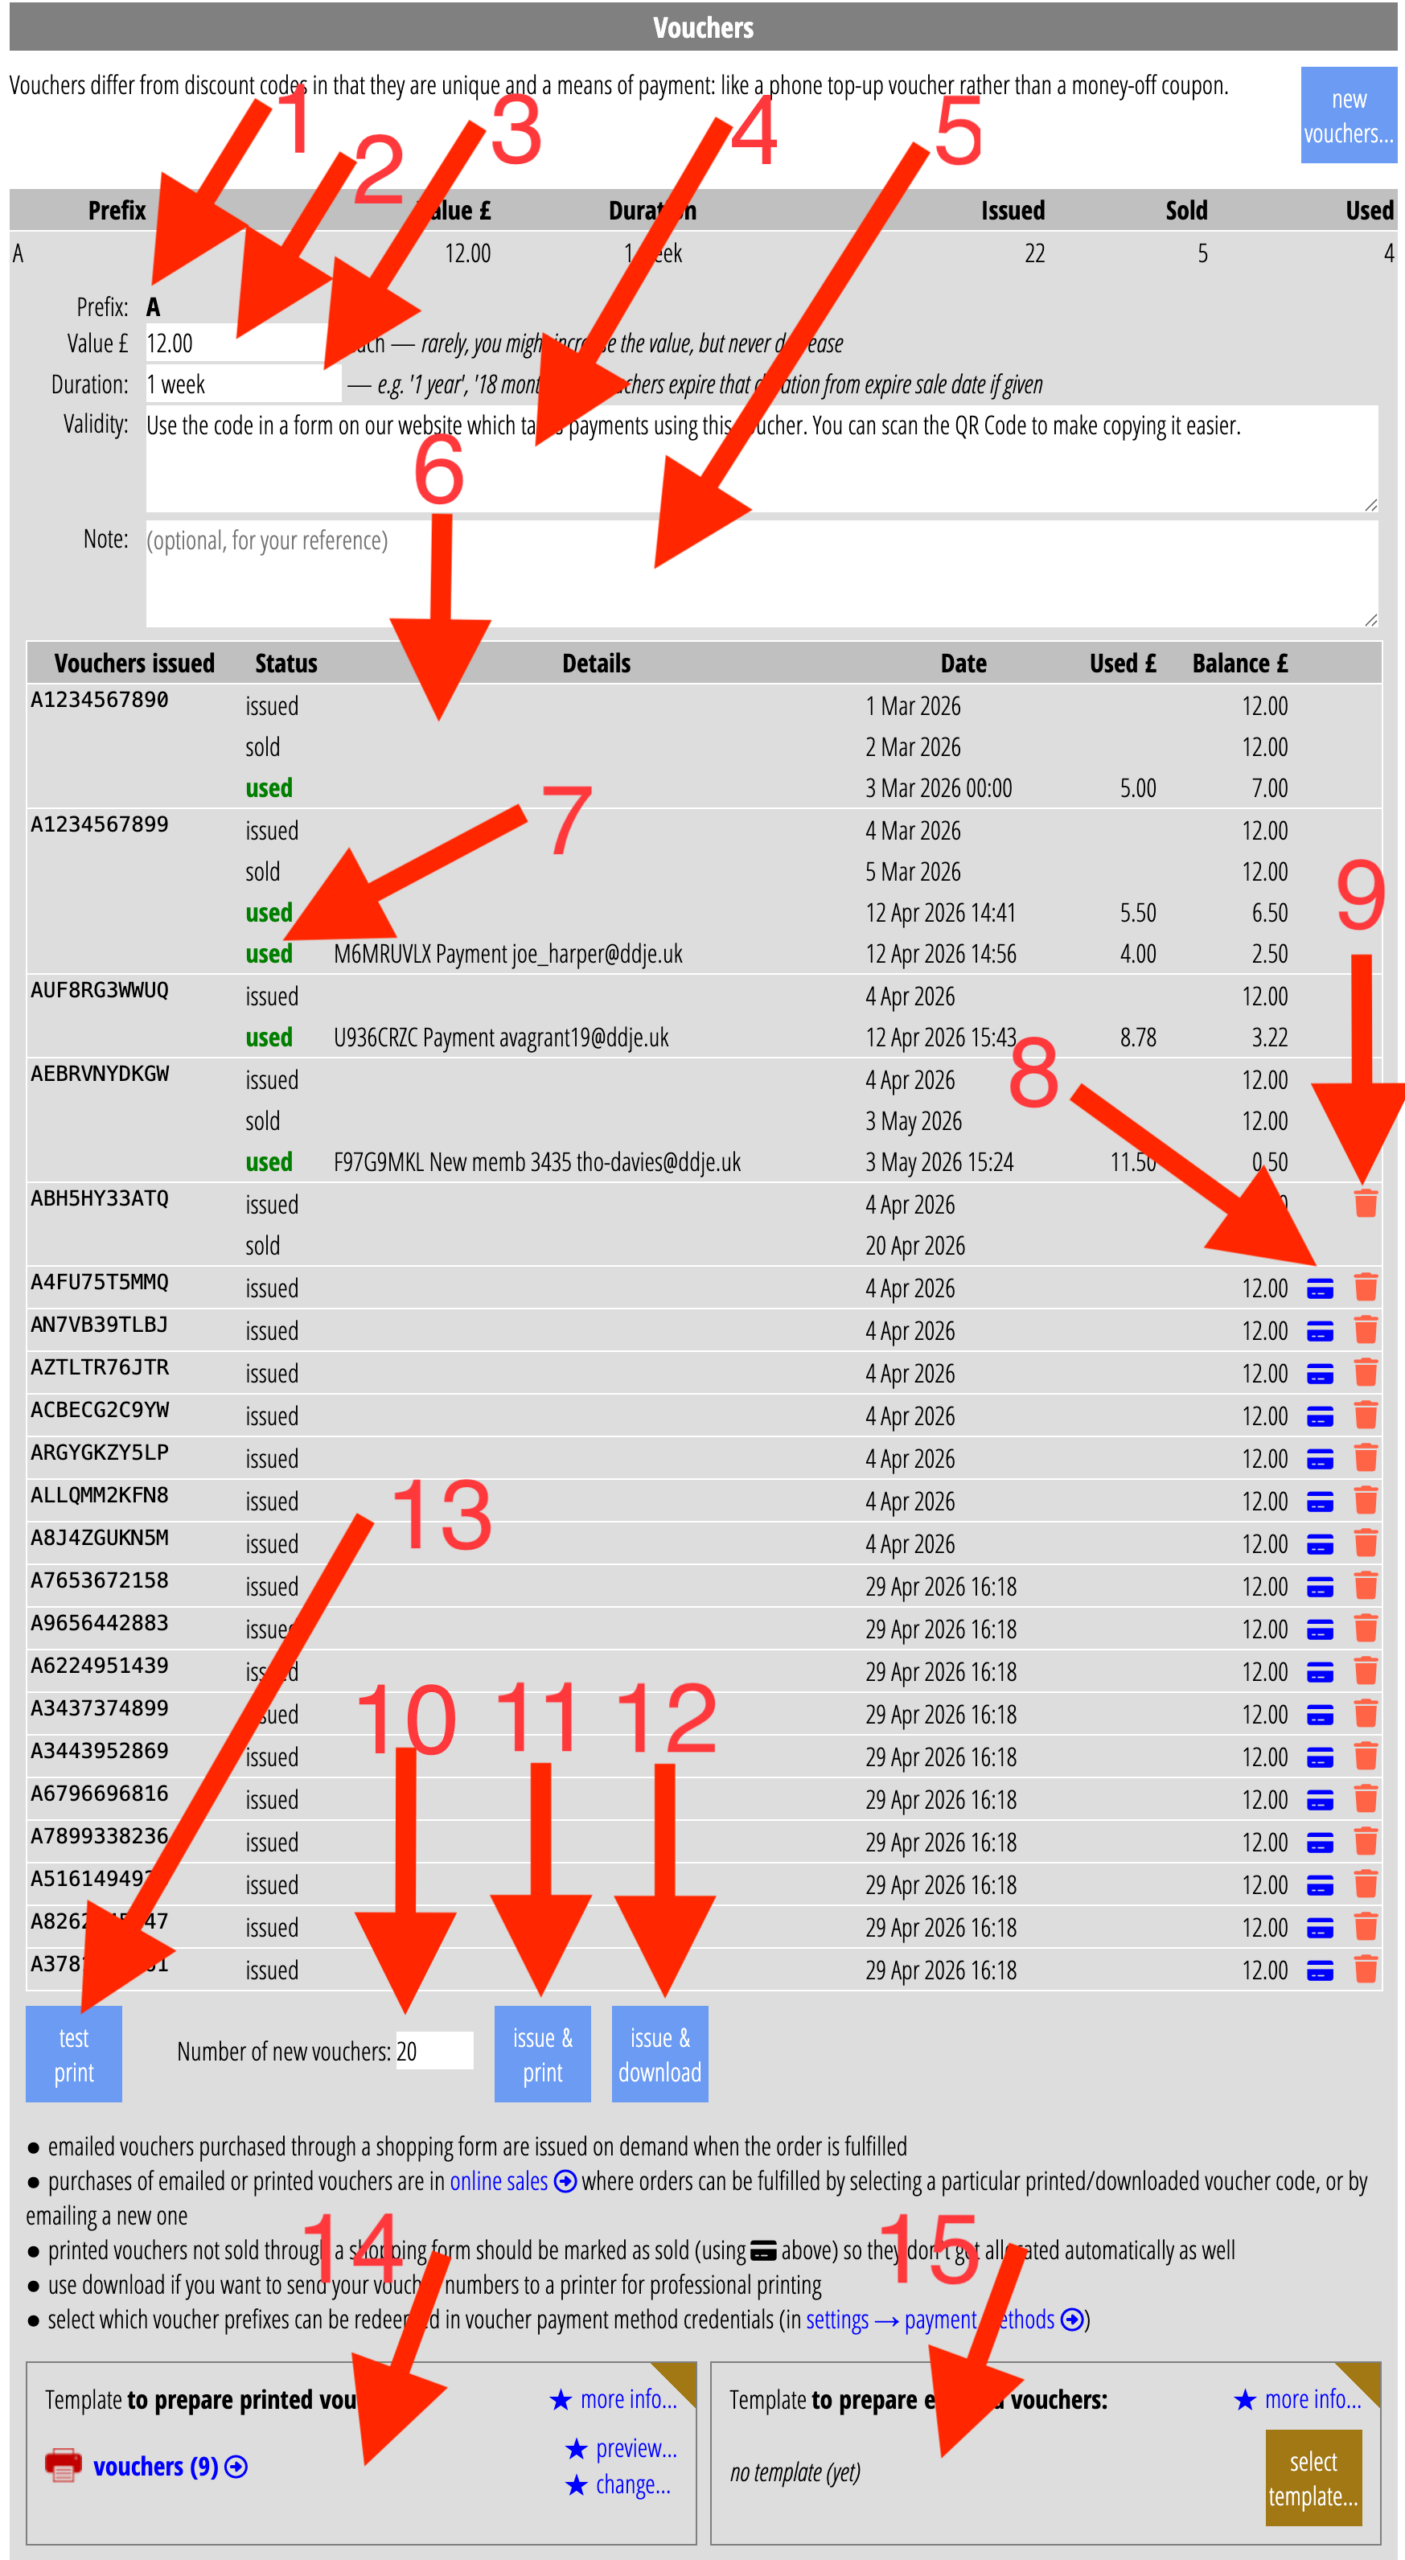
Open the new prefix in the usual way: click on the row for it in the table. You’ll then see
- the prefix (which you can’t change once set up; Fig 3: 1),
- the value (Fig 3: 2; you can only increase it once any are sold, not decrease)
- a field for duration (Fig 3: 3; how long after purchase a voucher is valid for; again you can only increase it once any are sold)
- a couple of text fields:
- Validity is available for substitution in your printed or emailed voucher (Fig 3: 4). It is intended to explain what the voucher is valid for and where you might use it; you might also want to include a description of the validity duration (e.g. only valid for two years after purchase)
- Note is just for anything you want to remember about that set of vouchers (Fig 3: 5); it has no other effect
- a table of any vouchers already issued with that voucher prefix (there won’t be any for a new prefix; Fig 3: 4),
- some buttons (Fig 3: 10 – 13), and
- two templates for printed vouchers (Fig 3: 14) and for emailed vouchers (Fig 3: 15) respectively.
workflow choices
You can then issue and sell voucher codes, in four different ways (in this order of preference, explained further below):
- In batches in advance, which you print yourself using a Cameo template (which you could insert in a off-the-shelf greetings card, for example),
- In batches, where you provide the voucher numbers to a professional printer to include in artwork,
- By email on demand (we generate the code(s) when you fulfil the sale using an email template),
- Printed on demand (ditto but using a letter template)
All but the second option requires a Cameo template.
We don’t recommend using email for gift sales (in particular): while it is convenient, it is rather impersonal. Instead, we recommend sending something they can pass on to their recipient – a gift card including the number for example. You can recoup the cost in the shopping form by selling the voucher for more than its face value. Alternatively, include a post and packing fee.
templates
Each voucher prefix offers a pair of templates, for printing and for email.
You don’t need any templates at all if you only ever download the codes. Otherwise, you would set the template for print or for email, depending on your chosen workflow.
You would rarely set both: if that does arise, we suggest using separate prefixes. Usually, though, once you’ve set the template for one prefix, any others will just need the same. That is then Cameo’s default the next time. Click change… in the template card to choose or make a different template if necessary.
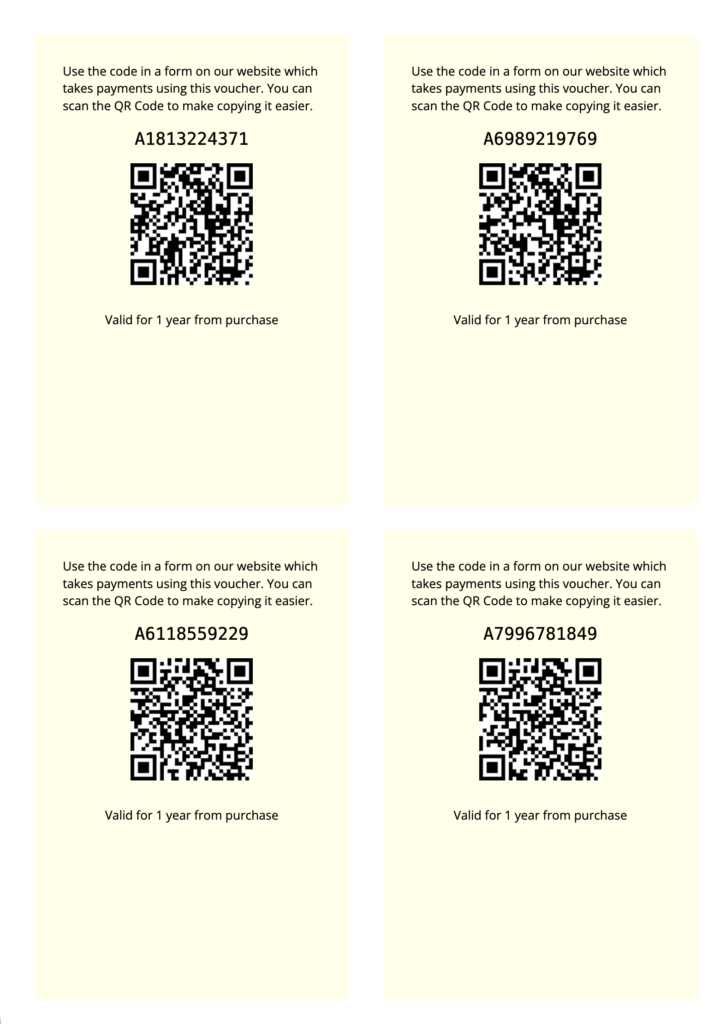
The default print template produces vouchers four-up on an A4 sheet (Fig 4). The intention is you can then insert them into a greetings card or similar. If you want more or fewer per page, adjust the stationery.
template substitutions
The proforma print template provided (Fig 4) includes:
- the validity text (Fig 3: 4), by means of the substitution
{voucher: validity} - the voucher number, from substitution
{voucher: number} - a QR Code for the voucher (which also directs them to a selected form that takes payment, such as the join form; see below), using substitution
{voucher: qrcode form-name} - the duration of the voucher, if set, using substitutions
{if: voucher duration}and{voucher: duration}. We use duration rather than expiry date so you can pre-print vouchers.
You can always remove the QR Code if you don’t want it, by customising the template, like any other detail. To be useful, you must give them the voucher number. (Even if you provide a QR Code, some people don’t know what to do with it). Also include instructions for how to redeem the voucher.
You can also include the face value of the barcode with substitution {voucher: value} – useful for merchandise. However, we recommend not including that for vouchers intended as gift memberships. You may increase rates. Not including the value allows you to:
- keep already printed stock;
- if you want, to permit redemption of purchased but unredeemed vouchers at the new rate (by amending the voucher’s value)
Like any other template stationery, you can also include high-resolution images, if the vouchers are to stand alone. You could also have a second page for each voucher, with artwork imaghery, if it is to be printed on both sides.
email template
Email templates are similar in principle. In place of the barcode, we include a link, with substitution {voucher: link to form-name}.
While the default does not do so, you can, if you wish, include the QR Code in the template, using {voucher: qrcode form-name}, exactly as in the print template. While this has no additional usefulness to the purchaser, if they want to print it to give as a gift, it will be useful to the final recipient.
An alternative might be to attach a PDF which is similar to the a print template. The easiest way to do that is:
- Create a print template for the voucher prefix
- Convert that template to a PDF using the button to do so underneath the template in communications → templates
- Select that template as an attachment to your voucher email template
- Turn off the print template (click change next to the template name at the bottom of the voucher prefix definition and select no template at all
As with the print template, you can add images to the PDF stationery. Bear in mind that:
- this can add considerably to the size of the PDF, and many email systems limit the size of emails they will receive. To be safe, keep your PDF under 2MB
- some recipients may not have a colour printer (or any printer at all, for that matter)
Workflow
Each prefix has its own workflow. Often they will all be the same. The option to differ allows flexibility when this is not the case.
● in batches, self-printed
At the bottom of the detail for each prefix, enter the number of vouchers you want (Fig 3: 10). Then click the issue & print button (Fig 3: 11). That adds:
- the vouchers laid out according to the template and its stationery in communications → pending letters
- the voucher codes with date of issue in the table of voucher codes (Fig 3: 6).
You can also do a test with the test print button (Fig 3: 13). That invents a single, temporary code in your usual style, but never actually issues a voucher. You can also test the template in communications → templates and mailshots.
If you are overprinting off-the-shelf greetings cards, you could also include your logo and contact details in the template. Adapt the print template (using {insert: ...} substitutions. If you printer can do it, use the manual feed and straight-through path when overprinting, to avoid bending the card.
Note that you can include high resolution images in Cameo stationery. So, in principle you can produce arbitrarily complex artwork merged directly in Cameo. If you have a suitable printer, you can produce your own artwork for a greetings card. (Use your favourite design software, such as Adobe Illustrator). Include an image exported from that in Cameo stationery, so it merges that with your codes.
If you do this, you’ll want to change the stationery so it only has one code per page (or every two pages if you print both sides). We suggest also uploading the artwork source file to file store for completeness.
● in batches, downloaded for professional printing
Again, enter the number of codes you want to issue (Fig 3: 10), but instead, click the issue & download button. That also shows you the issued voucher codes. However, instead of print-ready pages, it downloads a CSV file containing just one column for the voucher numbers. There’s several ways you might use this:
- Instant printers can print a PDF (say) produced by merging your artwork with the voucher numbers. Each page is different. Typically you would have two pages per code, each pair printed back to back, to make a greetings card or postcard, for example. You can use mail-merge software (e.g. Microsoft Word or Adobe InDesign) to combine the artwork with the rows in the CSV to produce such a PDF.
- Some printers can print your cards from your artwork and then apply the voucher numbers separately to the common prints
- You could also mail-merge with artwork yourselves, if you have a suitable printer, when the artwork is too complex to include directly in a print template. However, this introduces arcane processes outside Cameo, so including artwork in the stationery centralises everything.
● on demand, by email
We generate emails when you fulfil an order, in trading → online sales.
To allow this, add the email template (Fig 3: 15) rather than the print template, and customise as required.
Unlike batch printing, by the time you issue the voucher code and prepare the email you already have a customer’s membership record. Therefore, you can also use {show: ...} substitutions to include information from their record. (Indeed, you must do so, at least to provide the email address to send to).
If you have an email template, you cannot then sell printed vouchers with the same prefix through the shopping form – the email template takes priority. You can, however, do both if you use different prefixes. You can also sell pre-printed vouchers in person for a prefix which has both templates set (or use download): mark each voucher code as sold when you sell it.
If you have an email template, a test button is available to test it. The example in Fig 3 doesn’t have an email template so does not show the button.
● on demand, printed
If you only have a print template (Fig 3: 14) and no already-issued voucher codes, then fulfilling an order in trading → online sales issues and produces the page(s) ready for printing (in communications → pending letters), but only the number purchased rather than in larger batches.
Like email, this workflow has a customer to hand so you can also personalise. However, bear in mind that they may be giving it as a gift, so should not be personal to the purchaser. Fulfilling the order can also produce a dispatch note which includes an address label. While you could do that in the voucher template, it is more appropriate to use the dispatch note for this.
Redeeming voucher codes
When someone receives a voucher code (whether a gift or for personal use), they redeem it in the appropriate online forms. For example, a join form for gift memberships. It is not necessary to use the full value of the voucher: they retain any unused balance.
Create a payment method with processor Voucher in organisation settings → payment methods. You should also create a nominal bank account to receive voucher payments (if you have multiple uses for vouchers, you can usually direct them all to this account, depending on your accounting procedures).
In the credentials for that payment method (accessed through the manage credentials link), select the prefixes of the voucher codes you want that payment method to accept. (Previously, you would have entered all your manually-produced voucher codes and values in the payment method’s credentials at that point).
Then include the payment method among those accepted by the forms where you want to offer it. If you want different vouchers for merchandise and joining, for example, use different prefixes and different payment methods for each.
accounting
Typically, in your accounting, selling a voucher provides income but also creates a liability. If the voucher is never redeemed you might cancel it and turn the liability into a donation. That might happen after it expires if you set a duration, or say after two years if not. When someone redeems voucher, you would cancel the liability.
Voucher QR Codes
Transcribing URLs from paper into the browser address bar and a relatively long voucher codes into a form is error-prone. While forms do not accept incorrect codes, getting them wrong is frustrating.
QR Codes provide a ubiquitous way to deal with this kind of issue. (Phones also now recognise text in pictures and offer to copy it or visit a URL, which provides an even more modern solution).
You can offer a URL for the form of your choice (any form that takes payments; for example, the join form). The URL includes the voucher code. Present this either as a QR Code (on paper) or a link (in email).
Each barcode or link is different as it includes the voucher code. Scanning the QR Code takes them to the page embedding the form. When they reach the payment step, the form already knows the payment method is by voucher because the URL includes the code. So it does not offer other payment methods. Then, as long as the code is acceptable, the form skips the number acquisition step that usually follows, because it already knows the code. This simplifies the process considerably.
If they don’t follow the URL you provide, then everything behaves as before:
- they have the choice of voucher payment method among others, and
- we ask them to enter the voucher number.
- Existing vouchers still work.
qr codes in professionally printed materials
The template merge inserts barcodes and links for you, with {voucher: ...} substitutions (see templates above). However, if you are providing just a voucher codes spreadsheet to a printer (who can include a QR Code for you), you’ll need to know how to construct the URL. Use the URL of the page embedding the form along with a query parameter called vouchercode whose value is the voucher code. For example:
- your website is
https://www.example.com - the join form is in the page
/join/, and - your voucher code is
A123456, - then the URL looks like this:
https://www.example.com/join/?vouchercode=A123456
Selling vouchers
You might sell vouchers either or both:
- online, through your website, using a Cameo shopping form
- in person, for example on a stall at a fair
online sales (shopping form and inventory items)
To sell vouchers online, you can use a Cameo shopping form. You use options in the shopping form to indicate what that form can sell. Select these from among inventory stock items listed in trading → inventory and stock. These might be physical merchandise, such as mugs or t-shirts. In this context, however, they are voucher codes. Vouchers may be physical, pre-printed objects, in which case they behave much like t-shirts. Or they might be virtual objects when issued on-demand (discussed above).
Either way, you need to add inventory items for each prefix you wish to sell. You don’t have to sell the vouchers at face value. You can recoup the extra costs by:
- selling them for more to cover the cost of including a card, say; or
- adding a post and packing amount (bear in mind, if someone buys more than one voucher, we only apply only one post and packing charge);
- or both
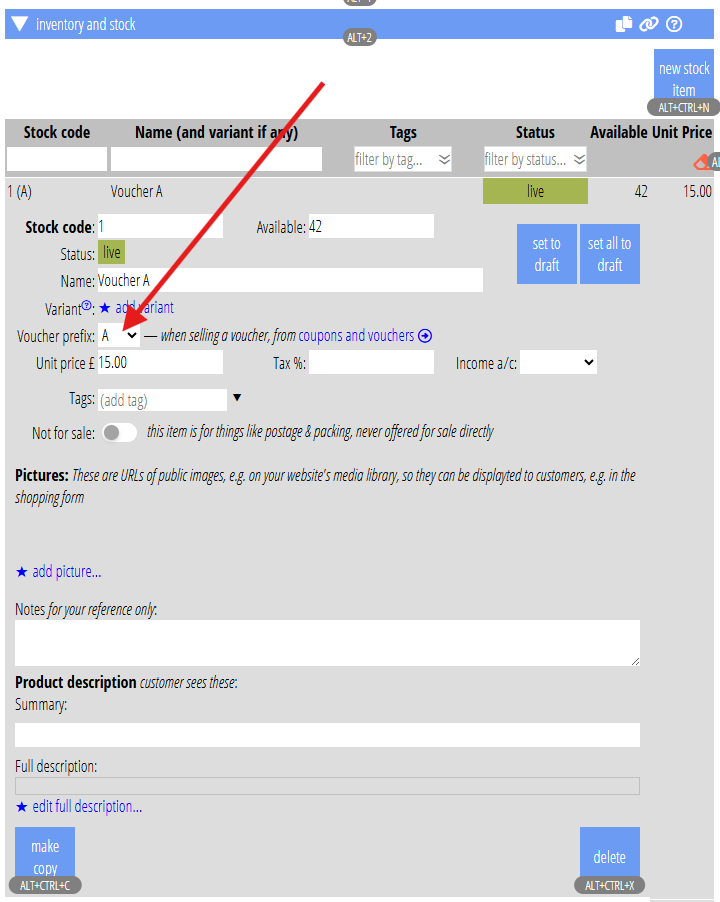
Vouchers now differ from other merchandise in one small, but essential, respect: select the voucher prefix it applies to when defining the inventory item (Fig 5). This allows sales to link directly to the relevant vouchers. If you omit this step, you would have to mark the voucher as sold manually, as for in-person sales (see below).
in-person sales
If you pre-print vouchers and sell them on a stall, for example to short-cut the joining process or as gifts, you need to tell Cameo you have made the sale. To do this, click the sold button (![]() ) next to the voucher number that you sold (Fig 3: 8). The same applies if you use a third-party online sales platform.
) next to the voucher number that you sold (Fig 3: 8). The same applies if you use a third-party online sales platform.
Doing this prevents online orders allocating the same voucher code. Note that not marking a voucher as sold does not prevent its use. (For example, someone redeems a voucher before you have packed up your stall for the day or done the admin).
Order fulfilment
When someone buys something from a shopping form, the order appears in trading → online sales. You mark each item as packed when done; and then you can produce a delivery note (including an address label).
Because you told Cameo the inventory item is a voucher, with a specific prefix (Fig 5), the order knows they bought a voucher. The line item changes the is now packed button to fulfil with voucher. When you click it, the behaviour depends on your selected workflow (see above):
- If you have an email template for that voucher prefix, it issues as many vouchers as they bought. It then prepares an email for each. (It’s technically hard to produce a single email if they buy more than one, but also if they are gifts, keeping them separate helps the recipient).
- If you have pre-printed vouchers for that prefix, we select the next number(s) in the list that are still available and tell you which to pack. If you keep the stock in the same order as they were issued, then they’ll be at the top of your pile. We also note the number in the order, in case you miss the pop-up box.
- If you are printing on demand (you have no issued vouchers), we’ll issue new number(s) and send it or them to pending letters using the prefix’s print template.
Cancelling or rescinding a voucher
Occasionally, you may want to cancel a voucher. Perhaps:
- its number leaked online
- someone stole your stock
- it has reached your nominal expiry date
To do this, click the bin icon (![]() ; Fig 3: 9) next to the voucher code you want to rescind. Forms will then no longer accept that voucher number as payment and are not available for sale.
; Fig 3: 9) next to the voucher code you want to rescind. Forms will then no longer accept that voucher number as payment and are not available for sale.