.
Craft CMS joins the list of systems which Cameo can use as a media library. As with WordPress you can list, select, search and upload images and other file types.
You need to do a significant amount of setting up at the Craft dashboard to let Cameo access its media library. The is instructions are too long for the media library credentials box, so we provide them here.
Contents
Background
When you include an image or a link to a file in a email (and elsewhere, such as event descriptions or inventory items), the media must be accessible to the recipient. Therefore it has to be on a public website, not inside Cameo. To do this, we make use of the media library in your existing content management system (usually the one that hosts your organisation’s web site). You can select images from it, and in most cases, upload new images to it, within Cameo.
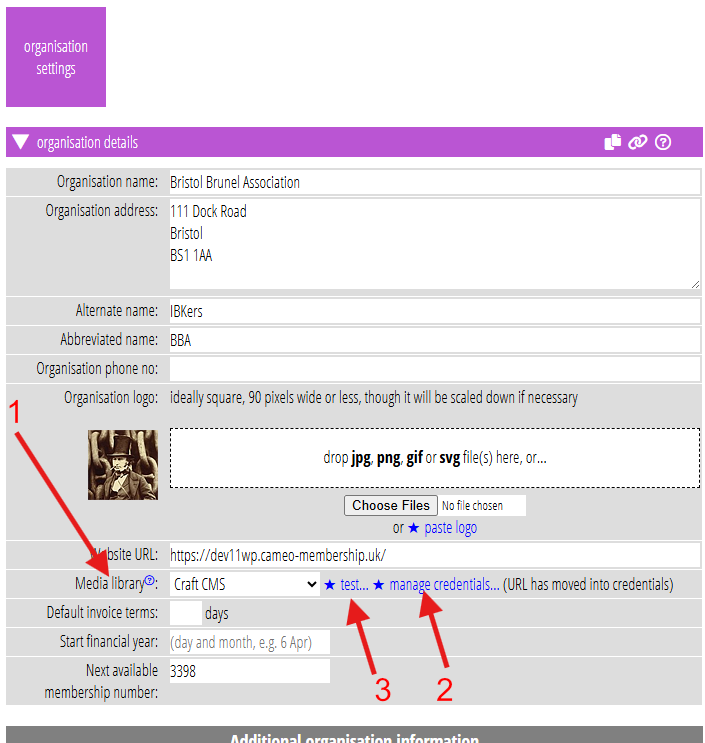
Choose which method Cameo should use, depending on your CMS, in organisation settings organisation details (Fig 1: 1). Then alongside, manage method-specific credentials to allow Cameo to access your site (Fig 1: 2). You must supply your Cameo password or 2FA code to get to credentials.
Craft CMS
To let Cameo manage files in Craft, you should provide the following components in Craft’s dashboard. These are in addition to whatever you require for your website. (You may choose to share some of these resources with your website, for example if you want to use the same images both in emails and in website articles).
- a file system, saying where Craft should physically store and access the uploaded files
- a volume, saying how Craft should present the files (which it calls assets); a volume references a file system and is the main component controlling assets.
- a custom field in your volume, used to store description (for searching) and turn on the alt field
- several image transforms which create copies of uploaded images at different sizes; in principle, you could store these copies elsewhere, but for Cameo’s purposes, they should sit alongside the originals
- a GraphQL schema, which controls what Cameo can see and do, on which volume; in principle it could identify multiple volumes, but stick to one for Cameo.
- A GraphQL token, which provides a unique password to authorise Cameo’s access and identifies the schema to use
Therefore, the token leads to the schema, the schema to the volume, the volume to the file system, custom fields and image transforms.
names and handles
Many components in Craft have a name and a handle, which both identify the component depending on the context. For example, see the file system in Fig 2. Craft uses the name for your reference on dashboard menus etc. It uses the handle in places where punctuation, spaces etc. may cause confusion. You should only use alphanumeric characters and underscores in handles. Craft usually works out a suitable handle for you when you provide a name.
When you tell Cameo about Craft components, provide the handle not the name. (In principle, Craft ought to be able to provide Cameo with these handle names automatically, but their API does not appear to support that, so you have to do it manually).
File system
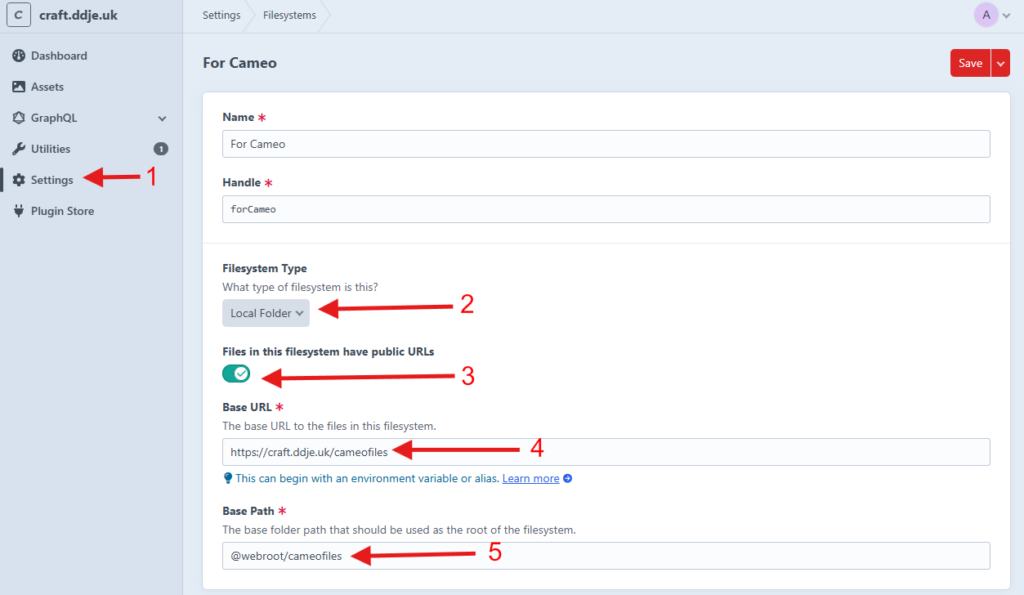
Add a file system in the Craft dashboard in settings → media → file systems (Fig 2: 1).
- Give it a name and a handle
- Usually the files will be on a local file system (Fig 2: 2)
- The files must be accessibly publicly, so turn on the switch for that (Fig 2: 3)
- Provide the location on disk where Craft stores the files (Fig 2: 5). In this example, we are making this relative to the directory which the web server accesses, the web root. Often this translates to an actual path such as
/var/www/html, but Craft provides a short-cut for that. - Provide the URL of the folder which refers to these files (Fig 2: 4). It may seem that these ought to be independent (so that
https://example.com/somewherecould refer to actual files in@webroot/elsewhere) but, in fact, Craft requires the path parts of both to be the same.
Don’t forget to Save.
Assets volume
Add a volume in the Craft dashboard in settings → media → assets → Volumes (Fig 3).
Give it a name and handle. You will need to provide the handle to Cameo later [item 3].
Identify the file system (Fig 3: 1). Leave everything else as is until you get to Field Layout (Fig 3: 2).
Here, you will already have Title. Use +Add to add some more.
- Add the Alternative Text field (handle alt), which you’ll find already listed. It is a built-in field which is not turned on by default.
- Add a new field for Description, with a suitable handle, e.g. description. Alternatively you could put a short description in the title field, and not add a separate field. Either way, you’ll need to provide Cameo with the handle of the field you choose [item 5].
Don’t forget to Save.
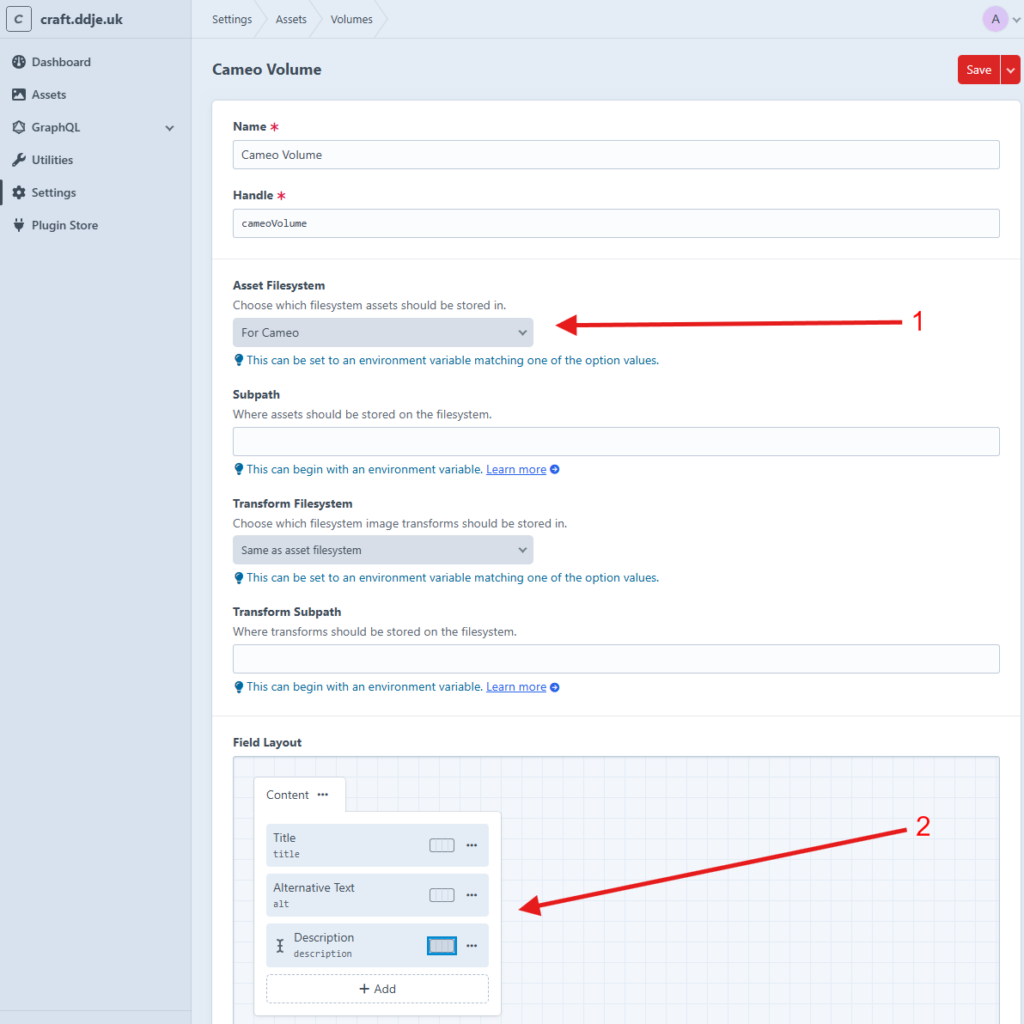
Image transforms
Add image transforms in the Craft dashboard in settings → media → assets → Image Transforms (Fig 4).
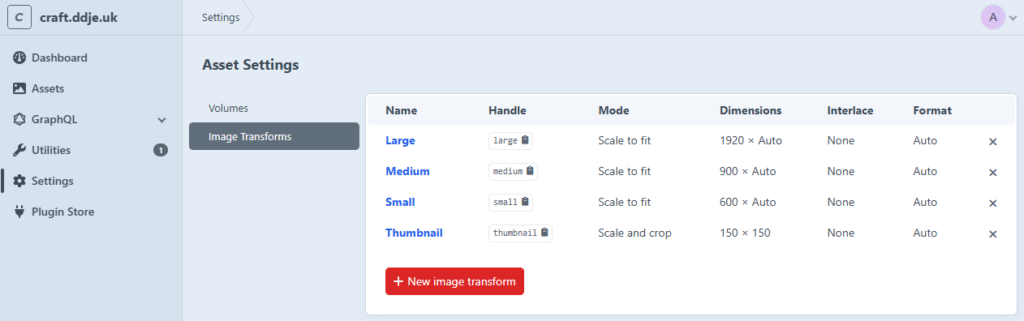
You should create at least two: one for a thumbnail say 150 x 150 pixels square, which Cameo can present in its image selector, and one to provide an image about 600 pixels across (much smaller than most originals, which typically measure several thousand pixels across, and much more suitable to include in emails).
However, we recommend using a couple more sizes as well. In this example, we’ve provided transforms called Thumbnail, Small, Medium and Large at 150, 600, 900 and 1920 pixels across (in addition to the original; each has a corresponding handle which you’ll need to tell Cameo about [item 4]).
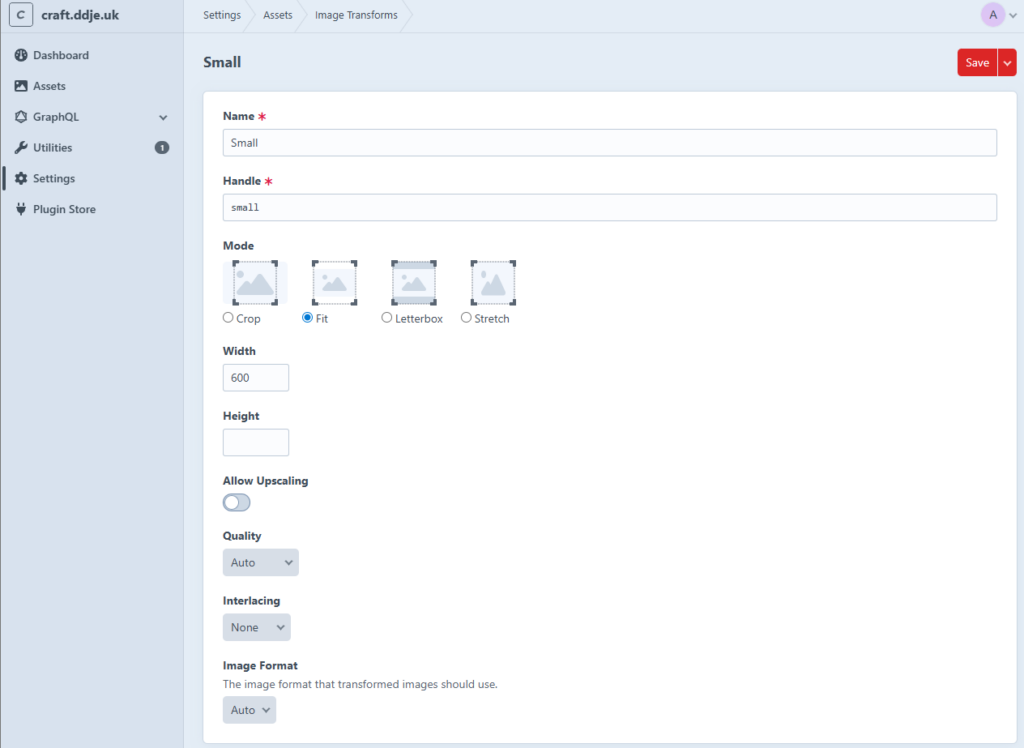
Here’s the details for Small for example (Fig 5):
- Provide Name and Handle
- You’ll want to keep the image aspect ratio so choose fit for Mode – preferably use crop for thumbnail (only) so it is square – it fits the image selector better and is what WordPress does.
- Enter the width to scale to (the number of pixels across)
- Omit the height so that Craft calculates it for you (if you provide a height, you will get space on two sides of the picture if it does not match the actual aspect ratio of the original)
- Don’t allow upscaling – if the image is smaller than your size, Craft won’t generate a new image. If it did, it would likely be fuzzy; it is better that Cameo uses the smaller original instead.
- Leave Quality, Interlacing and Image format as is.
GraphQL Schema
GraphQL is a way of making queries on systems in a supposedly standardised way, originally developed by Facebook. It’s not clear why this is called a schema, a word which would usually refer to the structure of data in a database; this one is more about access permission.
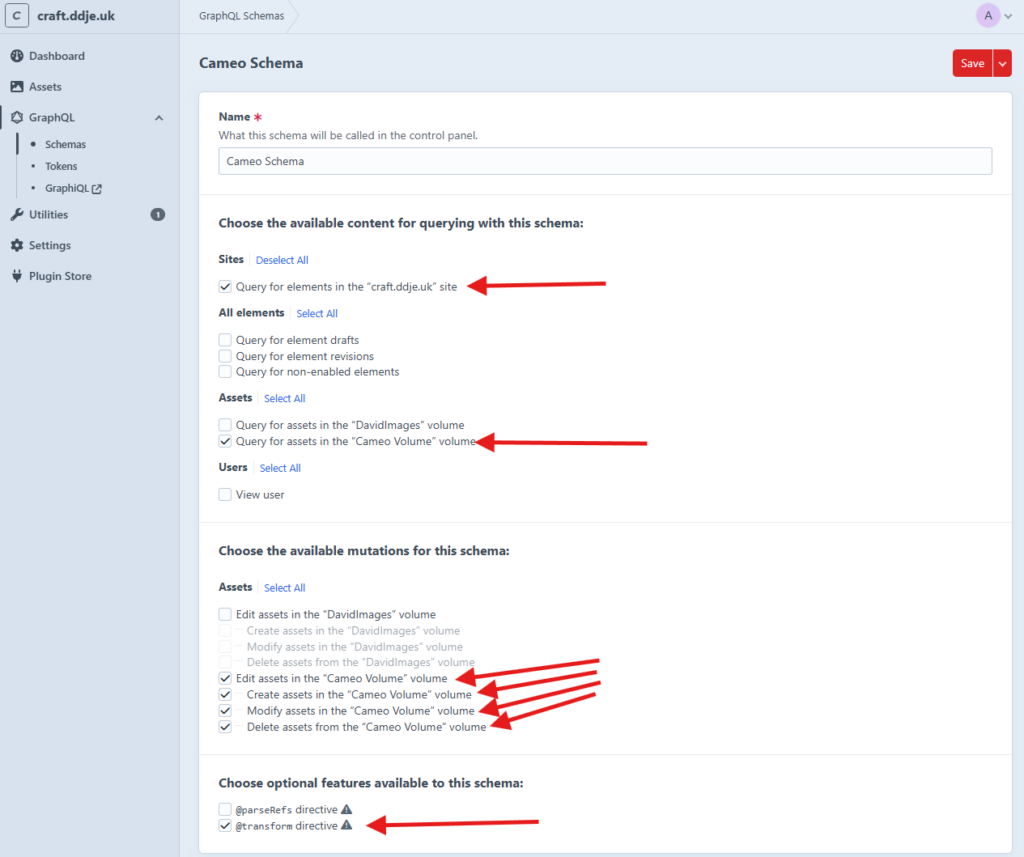
Create a GraphQL Schema in the Craft dashboard in settings → GraphQL → Schemas. A schema only has a name, no handle. You have to have this, but you don’t need to tell Cameo about it.
You will need to permit at least the following in your schema:
☑ Query for elements in the “your domain name” site
☑ Query for assets in the “name of your volume” volume
☑ Edit assets in the “name of your volume” volume
☑ Create assets in the “name of your volume” volume
☑ Modify assets in the “name of your volume” volume
☑ Delete assets in the “name of your volume” volume
☑ @transform directive
Don’t forget to save!
GraphQL token
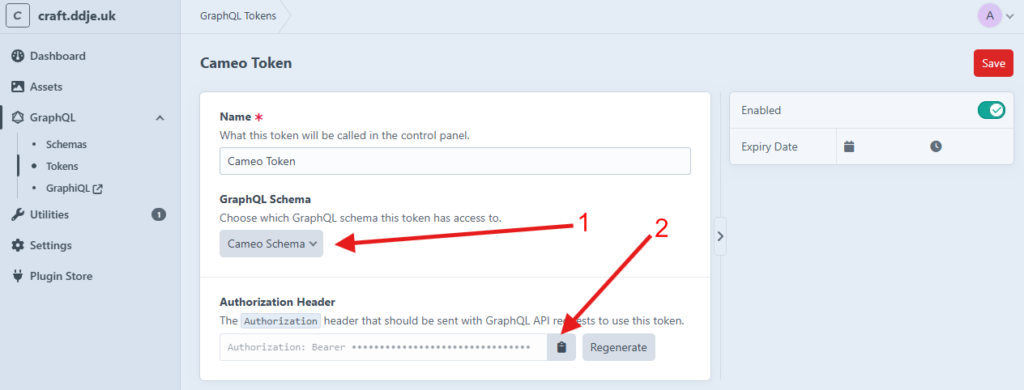
Create a token in the Craft dashboard in settings → GraphQL → Tokens. A token only has a name, no handle, but we want the Authorization Header for Cameo. It is like a password.
Choose a name and then select the schema from the previous step (you may well only have one; Fig 7: 1). Save it. Unlike many other systems, you can retrieve the token again after creating it (which is useful, though it is a security risk).
Click the copy button under Authorization Header (Fig 7: 3) to paste into Cameo’s credentials [item 1]. Cameo will accept the cryptic value with or without the preceding Authorization: Bearer bit.
That completes the Craft set up! Now we need to transfer some of the information to Cameo so it can make use of it.
Cameo credentials for Craft
When you have selected Craft CMS as the media library provider in organisation settings → organisation details (Fig 1:1), select manage credentials (Fig 1:2). For security, enter your password or 2FA number to get to the credentials (it doesn’t ask again for half an hour without activity).
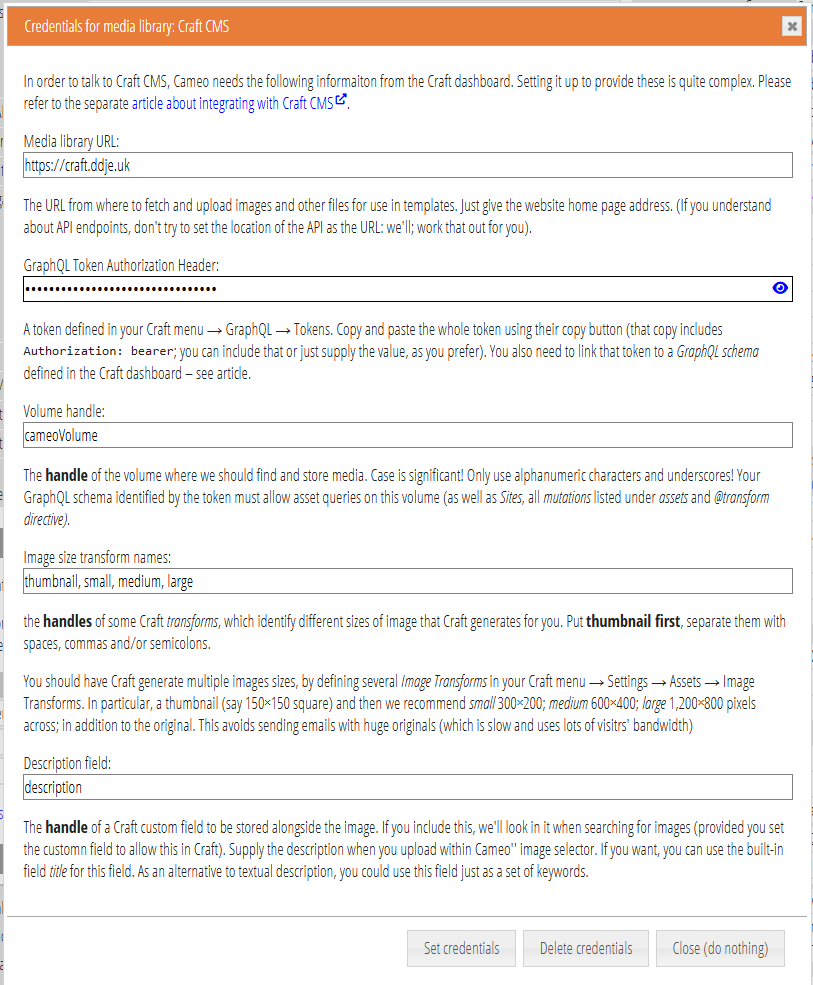
In the credentials box (Fig 8), provide the following (numbered as itemised in the previous sections):
- The URL of the media library web site (only if it is different from your main website; otherwise leave blank)
- The GraphQL Authorization Header, as copied from the GraphQL token in Craft: mandatory
- The handle of the Craft Volume you are using: mandatory
- The handles of the image transforms (separate them with commas, spaces and/or semicolons): at least one for a thumbnail, which should be first.
- The handle for the field to use for description (Cameo gets the text for this from a box alongside the file selector on upload; it searches within it when searching in Cameo’s image selector). If you omit this, we won’t store any description: it is optional but we strongly recommend supplying it.
Save credentials, then use the test button to check it works (Fig 1: 3). You can try all of selection, search and upload here. You’ll see the image selected in a follow-up box along with its alt-text. You can also see (and change) assets you have uploaded, along with their metadata in Craft’s dashboard, in Assets → your-volume-name.