.
Sometimes you need to combine two membership records into one. Cameo offers a tool to do that, improved significantly in version 11.
Contents
Background
Multiple membership records which represent the same person or household may arise in a number of ways. For example:
- The same person has two different roles with different contact details and genuinely should appear twice. For example, they are both a member and a councillor. In this case you can link them using the AKA field (there is a button to do this in new members → manage duplicates).
- They signed up as a contact at some point and later joined as a member. In this case, before enrolling them, you’ll want to combine the records. Providing contact details are sufficiently similar, enrolment should detect this and offer to merge.
- They did not follow a renewal link but instead manually found the join form on your web site and filled that in even though they are already a member. The join form may contain more up-to-date details. Again you will want to merge, this time with a current or old member.
- They completed a questionnaire with a different email address from the main membership record. While we can’t be sure this is the same person in any automated way, we have information to that effect. For example, they used jane.doe@gmail.com for their membership and jane.doe+questions@gmail.com for the contact: this pattern indicates the same person. We want to combine the extraneous contact record with their membership so everything is in one place.
- A couple have told you they are moving in together. They each have individual memberships. They have asked if you can combine them into one household.
- Someone makes a booking with a different email address, thereby creating a new contact record, and later tells you the email for their membership has changed to that address, revealing that they are the same person.
We could handle some of these previously, but with no control over how Cameo did the merge. In general it preferred newer information. Now, though, you have control over how to do the merge.
Merging happens in three places:
- During enrolment in new members → enrol new members when Cameo detects similarity between the new member and an existing member or contact. It offers to merge for you.
- Explicitly, in new members → manage duplicates. This looks for potential duplicates and offers to merge them in pairs. Alternatively you can specifically select two memberships that we did not detect automatically. This covers the last example (combining two households).
- (New) when re-assigning a booking, you have the option to merge instead.
Previously, merge was limited. For example, we could not merge records with different numbers of individuals (or when a single individual in each are two different people). We could not combine attachments linked to membership records and certain other linked records. We have removed all of these restrictions.
Merging records
When you press the button to merge a pair of records, a large box pops up showing the contents of fields (and related records) from both, side by side. A link at the top reminds you how to use the controls and what the colours mean. We also say why we think the duplicate might have arisen.
With a few exceptions, the default is to prefer newer information by default. Very often the proposed merge will be what you want, so you can just proceed to merge.
1: no ambiguity, we’ll keep these
2: prefer the later information
3: prefer the earlier information (unusual, so highlighted)
4: you can’t change this choice
5: drag-and-drop to re-order individuals
6: remove this individual
7: separate the two individuals (they are not the same person as we thought)
8: drag-and-drop to indicate individuals are actually the same person
9: link all related records into the result, unless you click to say otherwise.
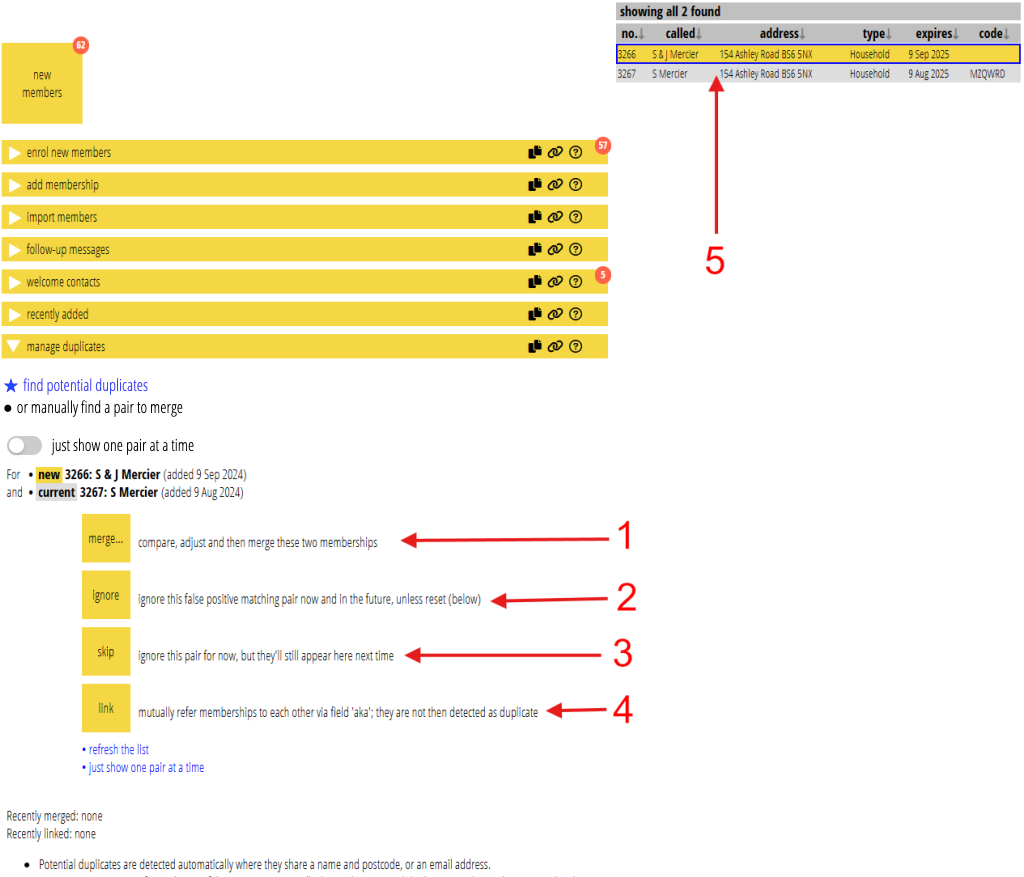
Where the fields match, or only appear in one of them, merge shows them on grey. We’ll include that value in the result (Fig 1: 1). Where they differ, by default we’ll keep the one shown in green, with a tick (Fig 1: 2). If that is not the newer data, we also show the one we’ll discard in red with a cross to make it clear this is an anomaly (Fig 1: 3). For a few fields, you can’t change this: merge shows these lighter (Fig 1: 4).
Where you have a choice (one of them is green), click on either of the values to reverse the preference: the colours swap over. Click on a grey value to to exclude the field altogether (both are red). Click again to put back as they were.
You can’t exclude a field altogether when the possible values are different: if you really need to do this, just remove the value from the record after you have done the merge. Similarly, if a common value is wrong in both, you can just leave it and edit it later. Merge does not replace ordinary editing of records.
related records
Related records (such as attachments and event bookings), shown by type at the end of the list, are all combined into the result by default, shown in green (Fig 1: 9). For example, merge includes all attachments linked to either record in the result. If you only want one of the originals to contribute related records, click the other; it changes to red. To not transfer any related records of that type, click both. Click again to revert.
individuals
Where name or email address matches, merge shows individuals from each record adjacent to indicate we think they are the same person. You can prefer the fields for these from either side, or exclude altogether, as for any other field.
Where different, merge shows the individuals separately on each side, in the same way as fields present only on one record or the other.
So, by default, merge includes all apparently different individuals, but merges similar individuals. However, you can also change this:
- Shuffle the order of individuals in the result by drag-and-drop using the person icon handle on the left side (Fig 1: 5).
- Omit an individual altogether using the red X (Fig 1: 6). Merge shows all their fields in red. Click the X again to reinstate.
- Separate individuals which merge incorrectly treats as the same using the not-equal icon (Fig 1: 7).
- Join individuals which merge incorrectly treats as different by dragging the equal icon of one onto the target indicated next to the other individual who you think is actually the same person (Fig 1: 8; and then choose which individual’s fields to prefer)
Where you merge a contact into a member, you cannot transfer individual’s contact fields (like job title) into the member record. Member records do not have such fields.
example
In Fig 1, a couple who were already members filled in the join form for a second time, with slightly different information. The enrolment process picked up the fact they were similar and offered to merge.
Much of the information is the same or correct as highlighted. However, we did not match individual John automatically because of both different name and email. So we’d want to drag the second John to match with the first (Fig 1: 8). Presumably the later email is the correct one (but if we know that is not the case, we can click to choose the other).
In this case, as we are taking all the information from the first John, you could also just delete the second instead, with its red X.
Notice the original source field has a bit more information in it, which may be useful to retain. So let’s also click that to choose it instead.
With those changes, we can click the proceed to merge button. You won’t need to enrol, as they were already members: we are left with a current membership after the merge.
However, if this was a mistaken renewal, you should then add a renewal record for them manually (in renewals → add manual renewal) and then process it in the usual way in renewals → incoming renewals. If it was not a renewal, you may need to adjust dates or other data manually to reflect what they actually intended.
Manage duplicates
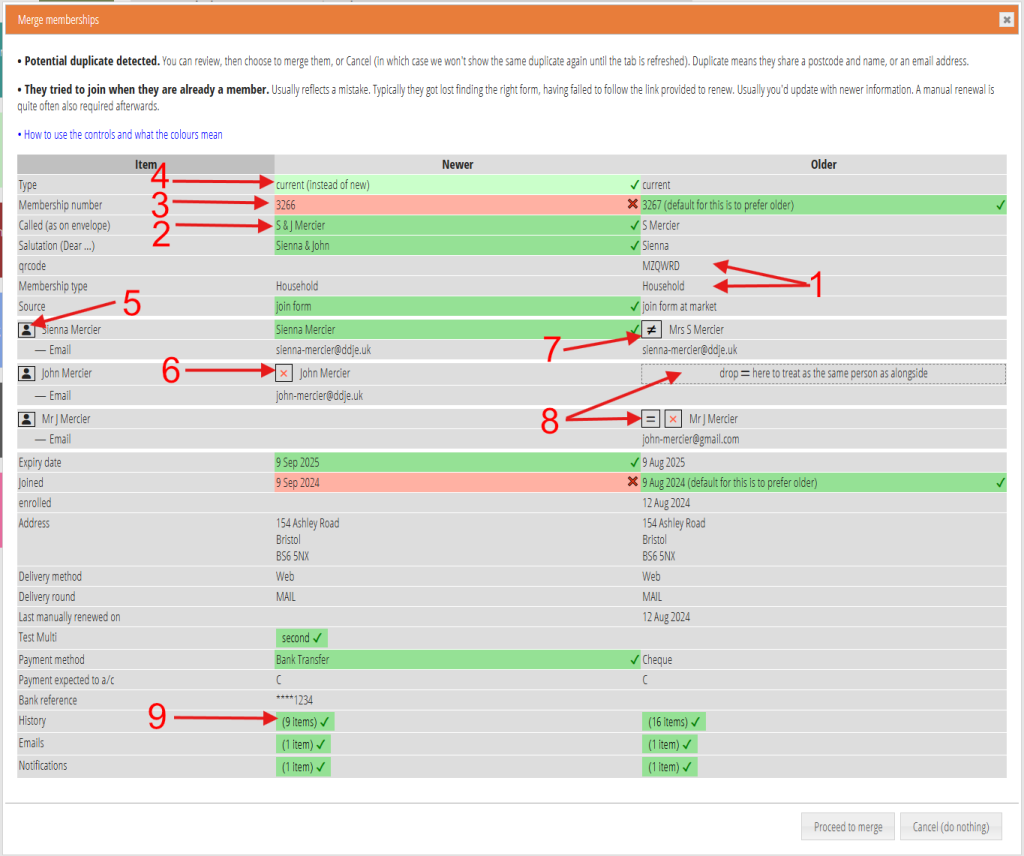
new members → manage duplicates lets you manually deal with duplicates. You can ask Cameo to locate potential duplicates or search for them yourself. You then process them in pairs. There are now only four buttons for each pair (and it no longer matters which comes first in each pair).
- merge (Fig 2: 1): merges according to the box described above
- ignore (Fig 2: 2): record a false positive: the pair differ and we should not consider them as duplicates in the future
- skip (Fig 2: 3): ignore the pair just this time
- link (Fig 2: 4): set the AKA fields in each record to refer to the other: they are the same person but present in the database for different reasons. If you set AKA, we do not consider them as duplicates here again.
If you want to merge a pair that we did not detect automatically (such as the “moving in together” example above), just look the two memberships up manually (Fig 2: 5). For example, enter the two membership numbers or email addresses in the main search box. If you need to use other search tools to find them, you can save them using the filter icon in the main search box, and restore them after manage duplicates has done its automatic search.