
.
Some tasks in Cameo need to send email, or occasionally produce a letter or report. A template services the task. You now see and control templates that service tasks in a uniform way everywhere they appear, using a template card.
Contents
Background
A template combines with member information to produce personalised email (or a letter, labels, PDF, spreadsheet etc.). Used with lists, they provide direct communication with members. In many cases, though, the email is a side effect of some task. For example, confirming enrolment or sending tickets for an event booking. We call this servicing the task, its purpose. We service four kinds of task:
- A simple task, where part of the task produces an email or letter (e.g. enrolment)
- Servicing an event booking, where the information about the booking and the event booked combines with the template and the member details. Substitutions for booking details typically start
{ticket:…}or{tickets:…} - Servicing a form, where information from the form combines with the template. Substitutions here typically start
{form:…}. The substitutions vary, depending on the form type and context. - Servicing trading, where information from a trading document (invoice, quotation or purchase order) combines with the template along with the membership data. (The membership record typically represents the customer). Substitution of details from the invoice details typically start
{invoice:…}
Previously, identifying the templates for a task was both subtle and different in different places. Template cards unify this. Wherever you need a template, a template card supplies it. Template cards follow a similar pattern to attachments, easily recognisable with common controls.
Template card
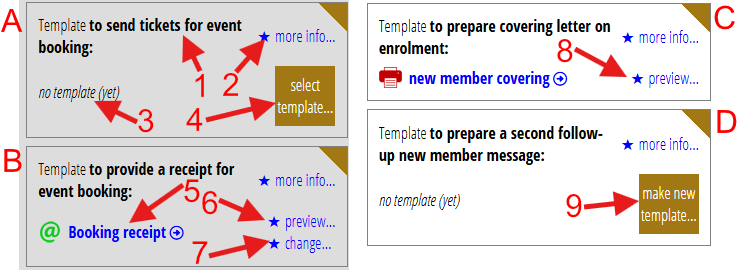
Here are some template cards (Fig 1). A and B come from an event definition in events & bookings → venues and resources; they service bookings. C and D come from new member enrolment in new members → enrol new members; they service simple tasks. The same principle applies everywhere, though. A and D don’t have template associated with them. B and C identify templates called Booking receipt and new member covering respectively.
what the template services
The top left of the box (Fig 1: 1) briefly describes the task the template services. You can see more about what the template is for (and where to make it) by clicking more info (Fig 1: 2). You can get the same information in the complete template definition in communications → templates and mailshots.
The bottom left of the box (Fig 1: 5) shows the name of the template which responds to this task. In common with many Cameo links, ![]() indicates that clicking it takes you to that item. In this case, the template definition in communications → templates and mailshots. However, you don’t need to go there to see the content of the template. You can use the preview button alongside (Fig 1: 6).
indicates that clicking it takes you to that item. In this case, the template definition in communications → templates and mailshots. However, you don’t need to go there to see the content of the template. You can use the preview button alongside (Fig 1: 6).
new templates
Where you do not have a template yet (Fig 1: A and D), the button alongside lets you make a new one (Fig 1: 4, 9). Also, in some cases, you can select an existing one (see next section).
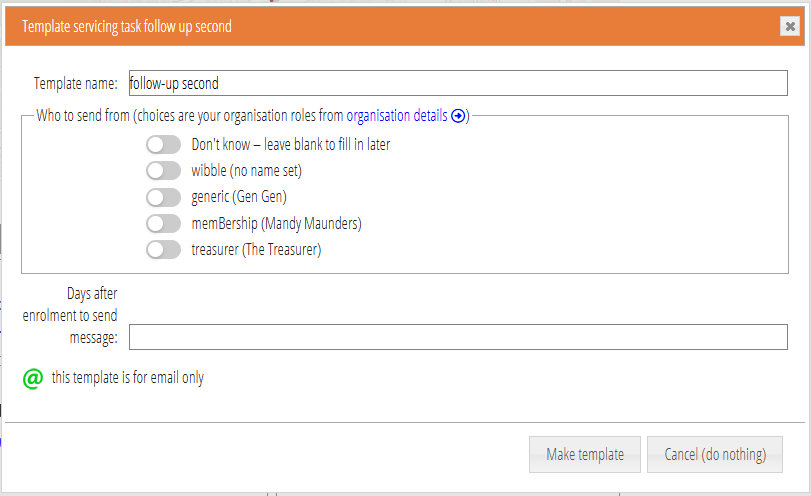
Simple tasks, like the various enrolment templates, only ever have one template for each task. So, when you don’t already have a template, the only choice is to make new template (Fig 1: 9). When you press that button, you get a box similar to new template. That provides basic details about the new template (Fig 2). You can then customise the wording etc. in the template editor in communications → templates and mailshots.
select template, and change
Other tasks (for bookings, forms and trading) apply to multiple items (such as events). When you make a new item (such as an event), you get the default template for each task, if there is one. Very often you’ll use the same templates for tickets from event to event, for example.
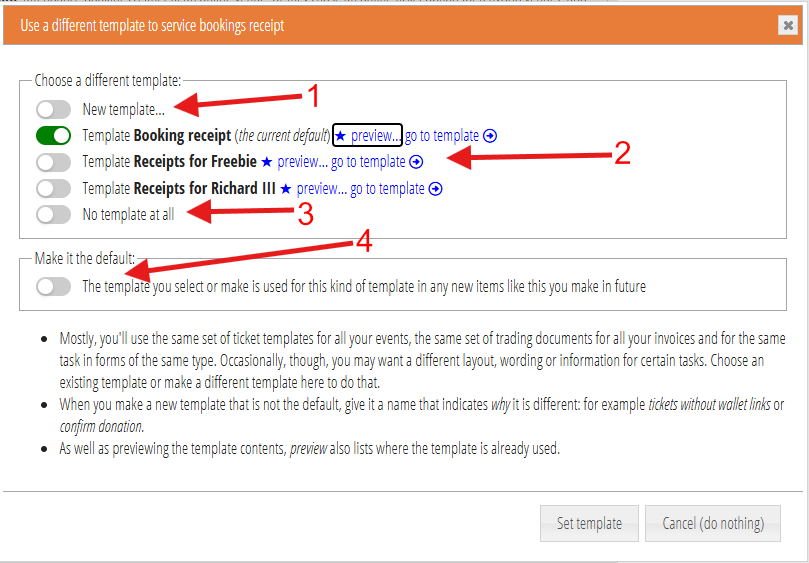
However, if you do need a different template for a particular event, form or invoice, you can get one using the change button (Fig 1: 7). This leads to a box to select the template you want (Fig 3).
You can:
- choose to make a new template (Fig 3: 1). Continuing takes you to the same new template box you saw above (Fig 2).
- choose an existing template (Fig 3: 2). You can also preview the template to check it is the right one, or indeed open it in the template editor.
- choose not to have a template at all (Fig 3: 3). For example, you already have a template but want to stop using it.
At the same time, you can choose to make your selection the default. In this example, if you turn this on and choose New template then your new template would become the default for future event receipts when you make a new event. Similarly for new forms and new trading documents.
If you don’t already have a template, use the select template button (Fig 1: 4). That button also takes you to the template selection box. To begin with, you may not have any existing templates. Then, the only choices would be new template or no template at all.
For simple templates, if you want to change or cancel the use of the template, either adapt or delete it in the template editor. For example, the covering letter, for example, in Fig 1: C. If deleted, you can then return to enrol (in this example). There you can make a new one from the proforma provided, if you want.